Ir para o conteúdo principal

Shark Rocket Professional HEPA Filter Replacement

  1. Shark Rocket Professional HEPA Filter Replacement, HEPA Filter: passo 1, imagem 1 %32 Shark Rocket Professional HEPA Filter Replacement, HEPA Filter: passo 1, imagem 2 %32
    • Look towards the side of the vacuum for the orange "Floor Nozzle" button.

    • Press the "Floor Nozzle" button and pull out the body of the vacuum up and away from the floor motor.

  2. Shark Rocket Professional HEPA Filter Replacement: passo 2, imagem 1 %32 Shark Rocket Professional HEPA Filter Replacement: passo 2, imagem 2 %32 Shark Rocket Professional HEPA Filter Replacement: passo 2, imagem 3 %32
    • Locate an orange dial at the bottom of the now-separate body of the vacuum.

    • Turn the dial so that it is pointed towards the open-lock icon.

  3. Shark Rocket Professional HEPA Filter Replacement: passo 3, imagem 1 %32 Shark Rocket Professional HEPA Filter Replacement: passo 3, imagem 2 %32 Shark Rocket Professional HEPA Filter Replacement: passo 3, imagem 3 %32
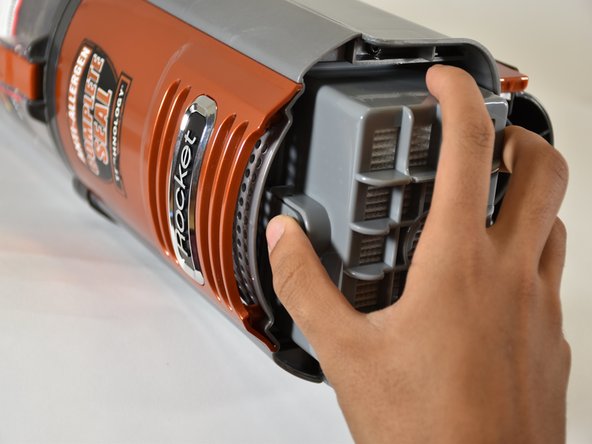
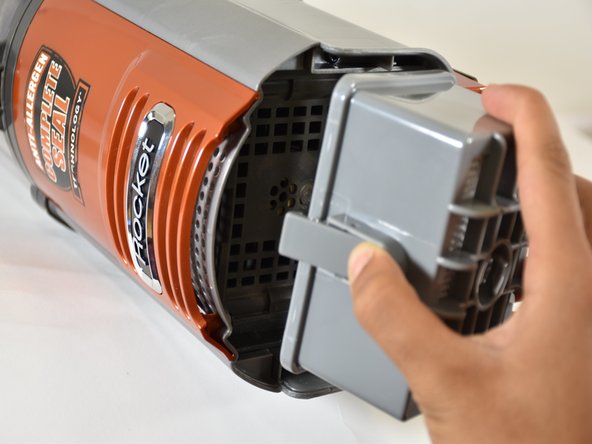
    • Open the cap to reveal the HEPA filter. The HEPA filter is a large grey rectangle with a tab on the side.

    • Press the tab, and pull out the filter.

Conclusão

To reassemble your device, follow these instructions in reverse order.

Uma outra pessoa concluiu este guia.

David Chau

Membro desde: 01/24/18

130 Reputação

Autoria de 1 guia

Equipe

Cal Poly, Team S18-G6, Livingston Winter 2018 Membro de Cal Poly, Team S18-G6, Livingston Winter 2018

CPSU-LIVINGSTON-W18S18G6

Membros da 4

Autoria de 10 guias

0 comentários

Adicione um comentário

Exibir estatísticas:

Últimas 24 horas: 2

Últimos 7 dias: 8

Últimos 30 dias: 22

Duração total: 2,658