Ir para o conteúdo principal

Sanyo VPC-T850 Lens Replacement

Guia arquivado
Este guia é mantido exclusivamente para fins históricos. Use a versão atualizada do guia para executar o reparo.

O que você precisa

  1. Sanyo VPC-T850 Lens Replacement, Disassembling Sanyo VPC-T850 Outer Casing: passo 1, imagem 1 %32
    • Turn the camera off by pressing the small, square button embedded in the top rim of the camera.

    • Locate the battery hatch on the bottom-right side of the camera and slide it outwards to open.

    • In the compartment, move the small notch and push down on the battery to remove it.

    • During reassembly, there is an arrow on the battery hatch indicating which way it goes in.

  2. Sanyo VPC-T850 Lens Replacement, Remove Screws: passo 2, imagem 1 %32 Sanyo VPC-T850 Lens Replacement, Remove Screws: passo 2, imagem 2 %32 Sanyo VPC-T850 Lens Replacement, Remove Screws: passo 2, imagem 3 %32
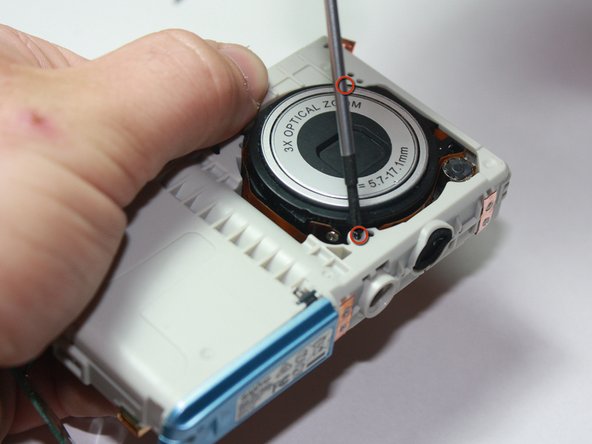
    • Remove the eight screws around the sides and bottom of the camera using a Phillips #00 screwdriver.

  3. Sanyo VPC-T850 Lens Replacement, Remove Rear Panel: passo 3, imagem 1 %32 Sanyo VPC-T850 Lens Replacement, Remove Rear Panel: passo 3, imagem 2 %32 Sanyo VPC-T850 Lens Replacement, Remove Rear Panel: passo 3, imagem 3 %32
    • Using the spudger, gently pry the rear panel away from the left side.

    • Be careful not to damage the three green cables as you remove the rear panel of the camera.

  4. Sanyo VPC-T850 Lens Replacement: passo 4, imagem 1 %32
    • Using the Phillips #00 screwdriver, remove the eight black screws connecting the green keypad chip to the rear panel.

    • Do not put any excessive force on the green wires.

  5. Sanyo VPC-T850 Lens Replacement: passo 5, imagem 1 %32
    • Separate the rear panel from the rest of the camera.

  6. Sanyo VPC-T850 Lens Replacement: passo 6, imagem 1 %32 Sanyo VPC-T850 Lens Replacement: passo 6, imagem 2 %32
    • Using the Phillips #00 screwdriver, remove the 3 screws located across the top of the camera.

    • Separate the black plastic panel from the camera. The camera button will be attached, so be gentle.

  7. Sanyo VPC-T850 Lens Replacement: passo 7, imagem 1 %32 Sanyo VPC-T850 Lens Replacement: passo 7, imagem 2 %32
    • Carefully pull off the side covers wrapped around the camera.

  8. Sanyo VPC-T850 Lens Replacement, Remove Front Cover: passo 8, imagem 1 %32 Sanyo VPC-T850 Lens Replacement, Remove Front Cover: passo 8, imagem 2 %32 Sanyo VPC-T850 Lens Replacement, Remove Front Cover: passo 8, imagem 3 %32
    • Using the spudger, gently lift off the front cover of the camera.

    • The front cover is fragile, so be gentle when removing it. It can easily break if not removed carefully.

  9. Sanyo VPC-T850 Lens Replacement, Disconnect the Ribbon: passo 9, imagem 1 %32 Sanyo VPC-T850 Lens Replacement, Disconnect the Ribbon: passo 9, imagem 2 %32
    • Use caution not to damage ribbon when disconnecting.

    • The yellow ribbon is attached to the right side of the screen and goes to a black connector piece.

    • Gently flip the black connector away from the LCD screen to unlock the yellow ribbon.

    • Carefully pull the yellow ribbon towards the LCD screen to disconnect it.

  10. Sanyo VPC-T850 Lens Replacement, Remove LCD Screen: passo 10, imagem 1 %32
    • The LCD screen should now be disconnected from the rest of the camera and a pry tool can be used to lift it out of its casing.

  11. Sanyo VPC-T850 Lens Replacement, Lens: passo 11, imagem 1 %32
    • Flip the camera over with the lens facing up.

  12. Sanyo VPC-T850 Lens Replacement: passo 12, imagem 1 %32
    • Using the Phillips #00 Screwdriver, remove the two screws holding the lens in place.

    • Use your other hand to hold the lens in place so the lens does not fall out while removing the screws.

  13. Sanyo VPC-T850 Lens Replacement: passo 13, imagem 1 %32 Sanyo VPC-T850 Lens Replacement: passo 13, imagem 2 %32
    • While keeping hold of the lens, flip the entire assembly around.

    • Using your fingers, gently push the lens out from its position in the casing.

    • There is still a flat, golden wire connecting the lens to the motherboard.

  14. Sanyo VPC-T850 Lens Replacement: passo 14, imagem 1 %32 Sanyo VPC-T850 Lens Replacement: passo 14, imagem 2 %32
    • Carefully unplug the golden wire from the motherboard to remove the lens from the assembly.

Linha de Chegada

Uma outra pessoa concluiu este guia.

Jonathan Yau

Membro desde: 04/11/10

26 Reputação

Autoria de 4 guias

Equipe

Cal Poly, Team 27-95, Amido Spring 2010 Membro de Cal Poly, Team 27-95, Amido Spring 2010

CPSU-AMIDO-S10S27G95

Membros da 4

Autoria de 4 guias

0 comentários

Adicione um comentário

Exibir estatísticas:

Últimas 24 horas: 0

Últimos 7 dias: 0

Últimos 30 dias: 0

Duração total: 2,887