Ir para o conteúdo principal

Samsung Series 9 NP900X3C-A02US Touch Pad Replacement

O que você precisa

  1. Samsung Series 9 NP900X3C-A02US Touch Pad Replacement, Touch Pad: passo 1, imagem 1 %32
    • Shut down the laptop.

    • Power off the laptop by navigating the window icon on the bottom left and clicking on the power followed by shutdown.

  2. Samsung Series 9 NP900X3C-A02US Touch Pad Replacement: passo 2, imagem 1 %32 Samsung Series 9 NP900X3C-A02US Touch Pad Replacement: passo 2, imagem 2 %32
    • Remove the back cover of the laptop by using a Phillips #00 screwdriver to remove ten 2 mm screws.

    • Pry out the bottom panel on all sides using a prying tool.

  3. Samsung Series 9 NP900X3C-A02US Touch Pad Replacement: passo 3, imagem 1 %32 Samsung Series 9 NP900X3C-A02US Touch Pad Replacement: passo 3, imagem 2 %32 Samsung Series 9 NP900X3C-A02US Touch Pad Replacement: passo 3, imagem 3 %32
    • Unscrew the internal battery and disconnect it from the motherboard.

    • Remove all the cables, tapes by using the tools such as plastic spudgers.

    • Look for the ribbon cable connection and by using the spudger to pull up the clip and unlock the ribbon cable.

  4. Samsung Series 9 NP900X3C-A02US Touch Pad Replacement: passo 4, imagem 1 %32 Samsung Series 9 NP900X3C-A02US Touch Pad Replacement: passo 4, imagem 2 %32
    • Peel out any tapes holding the touchpad carefully.

  5. Samsung Series 9 NP900X3C-A02US Touch Pad Replacement: passo 5, imagem 1 %32 Samsung Series 9 NP900X3C-A02US Touch Pad Replacement: passo 5, imagem 2 %32
    • By using the prying tool unstick and detach the module.

  6. Samsung Series 9 NP900X3C-A02US Touch Pad Replacement: passo 6, imagem 1 %32 Samsung Series 9 NP900X3C-A02US Touch Pad Replacement: passo 6, imagem 2 %32
    • Remove four 0.1mm screws using a Phillips #00 Screwdriver from the laptop.

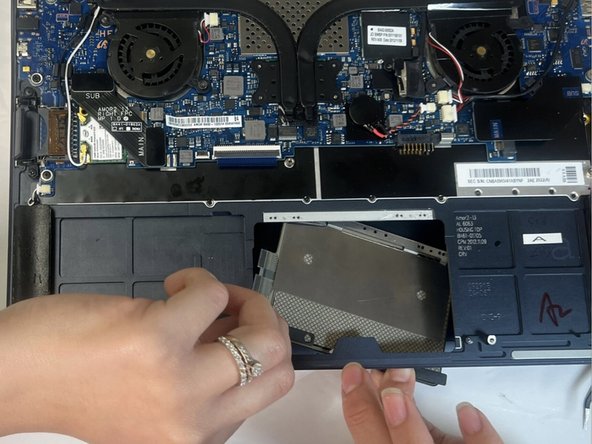
    • Open the laptop a little bit to create space to drop the touchpad module by pushing it gently downwards.

    • After taking out the touchpad clean it especially at the edges and the corners by using rubbing alcohol and microfiber cloth.

Conclusão

To reassemble your device, follow these instructions in reverse order.

Ghaniyah Gul

Membro desde: 02/07/23

391 Reputação

Autoria de 2 guias

Equipe

Gateway, Team A-2, Gonzalez Spring 2023 Membro de Gateway, Team A-2, Gonzalez Spring 2023

GCC-GONZALEZ-S23SAG2

Membros da 5

Autoria de 2 guias

0 comentários

Adicione um comentário

Exibir estatísticas:

Últimas 24 horas: 0

Últimos 7 dias: 1

Últimos 30 dias: 8

Duração total: 153