Ir para o conteúdo principal

Samsung Series 9 NP900X3A Memory Card Replacement

O que você precisa

  1. Samsung Series 9 NP900X3A Memory Card Replacement, Back Panel: passo 1, imagem 1 %32
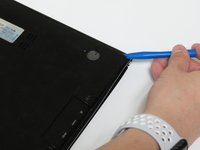
    • Locate the rubber feet at every corner of the laptop back panel. Use the ifixit prying tool, and break the adhesive between the rubber feet, and the case.

    • Screws securing the back panel underneath the adhesive will be exposed.

    • Removing the rubber feet will weaken the adhesive making reassembly difficult. Apply new adhesive if you choose to place the rubber feet back on to the device.

  2. Samsung Series 9 NP900X3A Memory Card Replacement: passo 2, imagem 1 %32
    • Use a Phillips #0 screwdriver to remove the ten 0.2mm screws from the bottom cover.

    • Keep track of the screws and their placement on the laptop. This will help make reassembly easier and more organized.

  3. Samsung Series 9 NP900X3A Memory Card Replacement: passo 3, imagem 1 %32 Samsung Series 9 NP900X3A Memory Card Replacement: passo 3, imagem 2 %32 Samsung Series 9 NP900X3A Memory Card Replacement: passo 3, imagem 3 %32
    • Find an opening on the back of the laptop. Use the plastic prying tool to help pry open the back panel of the laptop.

    • Use both hands when removing the back case cover. Too much force will bend the cover making it difficult to reassemble.

  4. Samsung Series 9 NP900X3A Memory Card Replacement, USB & Headphone I/O Board: passo 4, imagem 1 %32
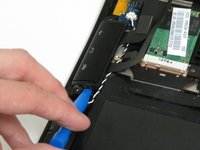
    • Locate the AUX and USB port on the left side of the laptop.

  5. Samsung Series 9 NP900X3A Memory Card Replacement: passo 5, imagem 1 %32
    • Remove the one 0.1mm screw using a Phillips #0 Screwdriver from the laptop.

    • Keep track of the 0.1mm screws for reassembly later.

  6. Samsung Series 9 NP900X3A Memory Card Replacement: passo 6, imagem 1 %32
    • Use a plastic prying tool to remove the top connector of the port from the motherboard.

    • This should come out very easily and allow access to the Memory card.

  7. Samsung Series 9 NP900X3A Memory Card Replacement: passo 7, imagem 1 %32
    • Remove the second connector from the motherboard using the prying tool.

    • This should come out very easily, and allow access to the Memory card.

  8. Samsung Series 9 NP900X3A Memory Card Replacement: passo 8, imagem 1 %32 Samsung Series 9 NP900X3A Memory Card Replacement: passo 8, imagem 2 %32
    • Find an opening on the side of the port and pry the USB and AUX port out of the laptop with the prying tool.

  9. Samsung Series 9 NP900X3A Memory Card Replacement: passo 9, imagem 1 %32
    • Remove and place the port outside of the laptop. You are free to install your new USB and HDMI ports.

  10. Samsung Series 9 NP900X3A Memory Card Replacement, Memory Card: passo 10, imagem 1 %32
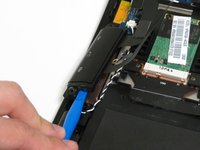
    • Using your Phillips #0 Screwdriver, unscrew the 0.1mm screws securing the memory card in place at the top.

    • Remember to keep track of the screws for reassembly.

  11. Samsung Series 9 NP900X3A Memory Card Replacement: passo 11, imagem 1 %32 Samsung Series 9 NP900X3A Memory Card Replacement: passo 11, imagem 2 %32 Samsung Series 9 NP900X3A Memory Card Replacement: passo 11, imagem 3 %32
    • After removing the screws, your card should angle upward making for an easier removal.

    • Using both hands, gently lift the card out of its socket in the direction away from yourself.

    • Use caution when removing the card, bending the pins will damage the socket and your ability to reuse the memory card if you plan to.

  12. Samsung Series 9 NP900X3A Memory Card Replacement: passo 12, imagem 1 %32
    • Replace the the card with a new compatible memory card.

    • To install your new memory card, follow these steps in reverse order.

Conclusão

To reassemble your device, follow these instructions in reverse order.

2 outras pessoas executaram este guia.

0 comentários

Adicione um comentário

Exibir estatísticas:

Últimas 24 horas: 0

Últimos 7 dias: 0

Últimos 30 dias: 7

Duração total: 1,121