Ir para o conteúdo principal

Samsung NX300 Jog and Mode Dial Replacement

O que você precisa

  1. Samsung NX300 Jog and Mode Dial Replacement, Unscrew the Back Panel: passo 1, imagem 1 %32 Samsung NX300 Jog and Mode Dial Replacement, Unscrew the Back Panel: passo 1, imagem 2 %32
    • Using a Phillips #00 precision screwdriver, remove the seven 4mm screws (5 on the bottom of the device and 1 on each of the two sides) holding the back panel to the camera.

    • On the NX300M model, there is an additional screw under the text AMOLED behind display which should be removed before detaching the back panel of the camera.

  2. Samsung NX300 Jog and Mode Dial Replacement, Remove the Input Port Screw: passo 2, imagem 1 %32
    • Using a Phillips #00 precision screwdriver, remove the last 4 mm screw located inside the input ports' compartment.

  3. Samsung NX300 Jog and Mode Dial Replacement, Open the Camera Casing: passo 3, imagem 1 %32 Samsung NX300 Jog and Mode Dial Replacement, Open the Camera Casing: passo 3, imagem 2 %32 Samsung NX300 Jog and Mode Dial Replacement, Open the Camera Casing: passo 3, imagem 3 %32
    • Place a plastic opening tool into the gap between the back panel and camera body, from both the top and the bottom of camera. Carefully pry open the camera and separate the back panel.

  4. Samsung NX300 Jog and Mode Dial Replacement, Remove the Back Panel: passo 4, imagem 1 %32 Samsung NX300 Jog and Mode Dial Replacement, Remove the Back Panel: passo 4, imagem 2 %32 Samsung NX300 Jog and Mode Dial Replacement, Remove the Back Panel: passo 4, imagem 3 %32
    • Using tweezers or your fingers, pull the display's black ribbon from the motherboard. This frees the back panel altogether.

    • To safely remove ribbons, you would need to first unlock the holding mechanism by lifting up the black strip atop the ribbon adapter.

  5. Samsung NX300 Jog and Mode Dial Replacement, Remove Mounting Screw: passo 5, imagem 1 %32 Samsung NX300 Jog and Mode Dial Replacement, Remove Mounting Screw: passo 5, imagem 2 %32 Samsung NX300 Jog and Mode Dial Replacement, Remove Mounting Screw: passo 5, imagem 3 %32
    • Using a Phillips #00 precision screwdriver, remove the 3mm screw holding the top panel of the camera in place. Also, remove the screws under hot shoe metal clip, otherwise you can break a piece of sensor frame leading to costly repair.

  6. Samsung NX300 Jog and Mode Dial Replacement, Remove the Top Panel of the Camera: passo 6, imagem 1 %32 Samsung NX300 Jog and Mode Dial Replacement, Remove the Top Panel of the Camera: passo 6, imagem 2 %32 Samsung NX300 Jog and Mode Dial Replacement, Remove the Top Panel of the Camera: passo 6, imagem 3 %32
    • Using a plastic opening tool, carefully remove the top panel of the camera.

    • The top panel is held in by plastic clips. Be careful not to break these clips in removal.

  7. Samsung NX300 Jog and Mode Dial Replacement, Remove the Power Switch Board: passo 7, imagem 1 %32 Samsung NX300 Jog and Mode Dial Replacement, Remove the Power Switch Board: passo 7, imagem 2 %32 Samsung NX300 Jog and Mode Dial Replacement, Remove the Power Switch Board: passo 7, imagem 3 %32
    • Using a Phillips #00 precision screwdriver, remove the three 4mm screws holding the power switch board in place.

    • Using tweezers, gently pull the ribbon cable out of the power switch board.

  8. Samsung NX300 Jog and Mode Dial Replacement, Remove the Jog Dial: passo 8, imagem 1 %32 Samsung NX300 Jog and Mode Dial Replacement, Remove the Jog Dial: passo 8, imagem 2 %32 Samsung NX300 Jog and Mode Dial Replacement, Remove the Jog Dial: passo 8, imagem 3 %32
    • Using a Phillips #00 precision screwdriver, remove the 4mm screw holding the jog dial in place.

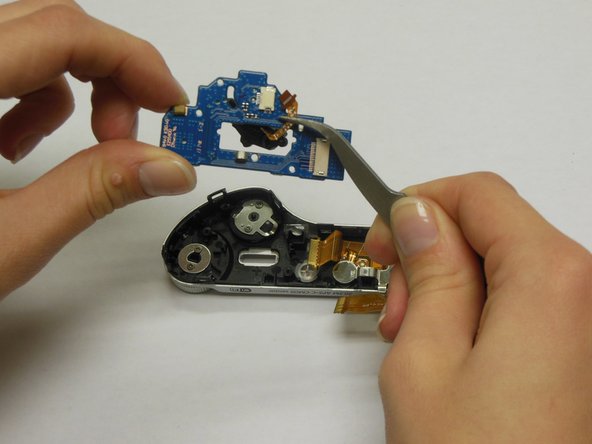
    • Using tweezers, gently remove the ribbon cable attached to the jog dial.

  9. Samsung NX300 Jog and Mode Dial Replacement, Remove the Connecting Ribon: passo 9, imagem 1 %32 Samsung NX300 Jog and Mode Dial Replacement, Remove the Connecting Ribon: passo 9, imagem 2 %32 Samsung NX300 Jog and Mode Dial Replacement, Remove the Connecting Ribon: passo 9, imagem 3 %32
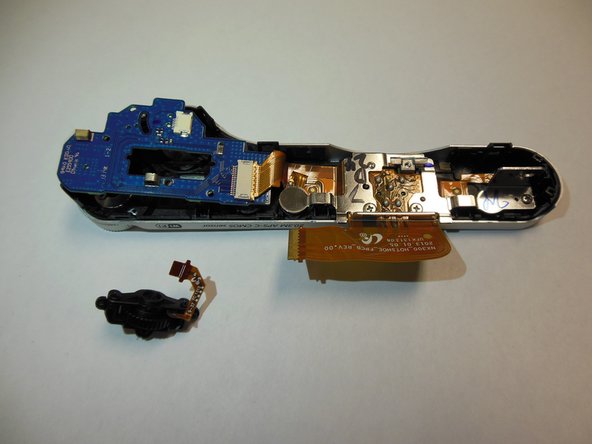
    • The jog dial should fall out easily. If not, use a pair of tweezers to gently poke it though the power board.

  10. Samsung NX300 Jog and Mode Dial Replacement, Remove the Buttons: passo 10, imagem 1 %32 Samsung NX300 Jog and Mode Dial Replacement, Remove the Buttons: passo 10, imagem 2 %32
    • Using a Phillips #00 precision screwdriver, remove the four 3mm screws holding the mode dial and power switch/shutter button in place.

    • Remove the metal mounts from the underside of the dials. The dials are now free from the camera.

  11. Samsung NX300 Jog and Mode Dial Replacement, Check the Dial Alignment: passo 11, imagem 1 %32 Samsung NX300 Jog and Mode Dial Replacement, Check the Dial Alignment: passo 11, imagem 2 %32 Samsung NX300 Jog and Mode Dial Replacement, Check the Dial Alignment: passo 11, imagem 3 %32
    • Make sure the dial slot aligns with the power switch board prior to reassembly.

Conclusão

To reassemble your device, follow these instructions in reverse order.

11 outras pessoas executaram este guia.

Andres Perez

Membro desde: 01/21/15

951 Reputação

Autoria de 5 guias

Equipe

USF Tampa, Team 9-6, Blackwell Winter 2015 Membro de USF Tampa, Team 9-6, Blackwell Winter 2015

USFT-BLACKWELL-W15S9G6

Membros da 4

Autoria de 10 guias

3 comentários

Thanks, this was useful. Camera was switching modes randomly. I didn't replace the PCB however, just opened and sprayed a lot of silicon oil into the dial.

Marian Juranyi - Responder

Thanks! I fixed my camera. But i think step 10 not necessary.

odiss2000 - Responder

Perfect ! My Camera was switching modes randomly too. I changed the board from step 9 with a new part found on Ebay. Thank you :-)

sgexfabry - Responder

Adicione um comentário

Exibir estatísticas:

Últimas 24 horas: 0

Últimos 7 dias: 9

Últimos 30 dias: 61

Duração total: 9,430