Ir para o conteúdo principal

Samsung Gear S Home Button Assembly Replacement

O que você precisa

  1. Samsung Gear S Home Button Assembly Replacement, Display Assembly: passo 1, imagem 1 %32 Samsung Gear S Home Button Assembly Replacement, Display Assembly: passo 1, imagem 2 %32 Samsung Gear S Home Button Assembly Replacement, Display Assembly: passo 1, imagem 3 %32
    • Remove the wrist strap by peeling back the rubber starting from one corner of the watch face. Continue peeling the rubber away from the watch face until the strap is completely off.

  2. Samsung Gear S Home Button Assembly Replacement: passo 2, imagem 1 %32 Samsung Gear S Home Button Assembly Replacement: passo 2, imagem 2 %32
    • Starting from an edge, wedge a metal spudger in between the screen and the chrome trim ring and pry, lifting the screen outwards.

    • Some force is needed due to adhesive seal.

  3. Samsung Gear S Home Button Assembly Replacement: passo 3, imagem 1 %32
    • Use a plastic opening tool to gently pry upwards on the plastic motherboard assembly.

  4. Samsung Gear S Home Button Assembly Replacement: passo 4, imagem 1 %32
    • Locate the ribbon assembly attaching the display to the motherboard.

  5. Samsung Gear S Home Button Assembly Replacement: passo 5, imagem 1 %32
    • Use a plastic opening tool to detach the glass screen/ LED Display ribbon connector from the motherboard.

  6. Samsung Gear S Home Button Assembly Replacement: passo 6, imagem 1 %32
    • Now the watch should be in three separate pieces.

  7. Samsung Gear S Home Button Assembly Replacement, Home Button Assembly: passo 7, imagem 1 %32 Samsung Gear S Home Button Assembly Replacement, Home Button Assembly: passo 7, imagem 2 %32
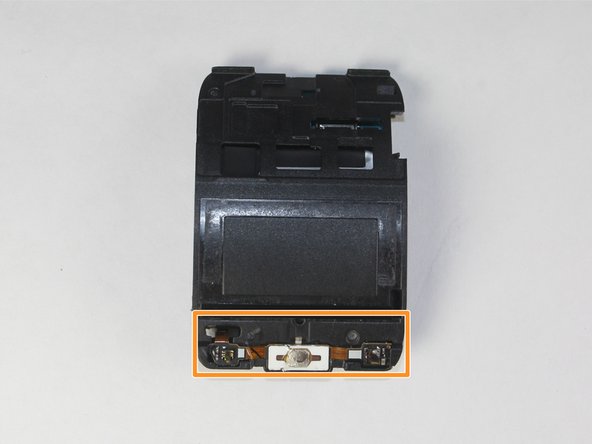
    • Locate the home ribbon connector attached to the wrist side (side that faces the user when wearing it) of the motherboard assembly.

    • Locate the home ribbon assembly attached to the screen side of the motherboard assembly.

  8. Samsung Gear S Home Button Assembly Replacement: passo 8, imagem 1 %32
    • Use a plastic opening tool to gently pry up on the home ribbon connector.

  9. Samsung Gear S Home Button Assembly Replacement: passo 9, imagem 1 %32
    • Use the spudger to pry up the home ribbon assembly.

Conclusão

To reassemble your device, follow these instructions in reverse order.

2 outras pessoas executaram este guia.

Luis Franco

Membro desde: 09/03/15

1.076 Reputação

Autoria de 4 guias

Equipe

USF Tampa, Team 12-1, Blackwell Fall 2015 Membro de USF Tampa, Team 12-1, Blackwell Fall 2015

USFT-BLACKWELL-F15S12G1

Membros da 4

Autoria de 5 guias

2 comentários

where can i buy the home buton?

Hanna Iskandar - Responder

I am in search of the SM-R750v Housing Back Cover, any suggestions

Rita Arnold - Responder

Adicione um comentário

Exibir estatísticas:

Últimas 24 horas: 0

Últimos 7 dias: 5

Últimos 30 dias: 10

Duração total: 5,134