Ir para o conteúdo principal

Samsung Galaxy Tab S2 SIM/SD Card Reader Replacement

O que você precisa

  1. Samsung Galaxy Tab S2 SIM/SD Card Reader Replacement, Screen: passo 1, imagem 1 %32
    • Working on your device while it is turned on may result in an electric shock. Be sure to shut down and unplug your device before you begin.

    • Removing the screen may be difficult due to strong adhesives.

    • Apply heat to all the seams of the device using an iFixit iOpener or heat gun in order to loosen the adhesive around the edges of the screen.

  2. Samsung Galaxy Tab S2 SIM/SD Card Reader Replacement: passo 2, imagem 1 %32 Samsung Galaxy Tab S2 SIM/SD Card Reader Replacement: passo 2, imagem 2 %32
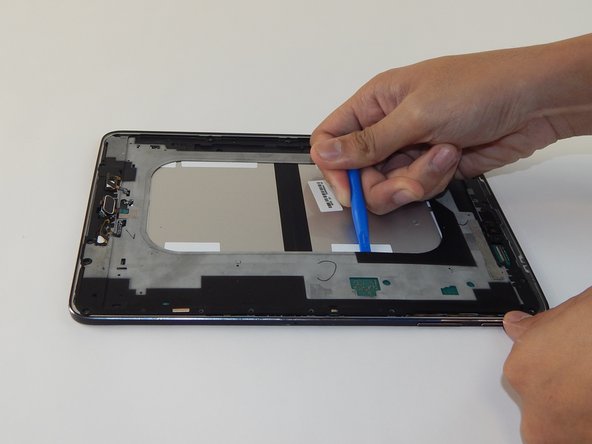
    • Insert the plastic opening tool into the gap on the side of the tablet, near a corner where you want to start removing the screen.

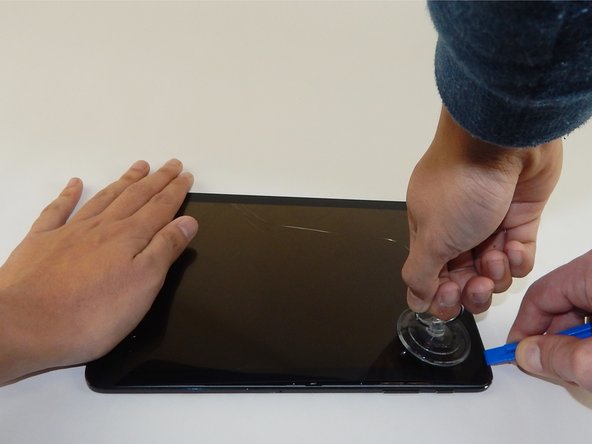
    • Place the small suction cup on the screen near the corner that the plastic opening tool is placed.

    • Lift the small suction cup up while pushing down with the plastic opening tool to remove screen (you may need to have someone else hold the device down for proper leverage).

    • A ribbon cable is attached to the back of the screen. Avoid lifting or moving the screen more than 3-4 inches before disconnecting the ribbon cable or you could damage the device.

  3. Samsung Galaxy Tab S2 SIM/SD Card Reader Replacement: passo 3, imagem 1 %32
    • A piece of silver tape is placed over the gold ribbon cable connecting the screen to the tablet.

    • Use the tweezers to carefully remove the silver tape.

  4. Samsung Galaxy Tab S2 SIM/SD Card Reader Replacement: passo 4, imagem 1 %32 Samsung Galaxy Tab S2 SIM/SD Card Reader Replacement: passo 4, imagem 2 %32
    • With the plastic opening tool gently lift to disconnect the gold ribbon cable that attaches the screen to the base tablet.

  5. Samsung Galaxy Tab S2 SIM/SD Card Reader Replacement, Panel Replacement: passo 5, imagem 1 %32 Samsung Galaxy Tab S2 SIM/SD Card Reader Replacement, Panel Replacement: passo 5, imagem 2 %32
    • Remove the nineteen 3mm Phillips #1 screws.

  6. Samsung Galaxy Tab S2 SIM/SD Card Reader Replacement: passo 6, imagem 1 %32 Samsung Galaxy Tab S2 SIM/SD Card Reader Replacement: passo 6, imagem 2 %32
    • Pry open the next layer of the device using the plastic opening tool.

    • Even though the device separates along the outside edge, using the inside edge (as pictured) may help with leverage.

  7. Samsung Galaxy Tab S2 SIM/SD Card Reader Replacement, SIM Card Reader: passo 7, imagem 1 %32
    • As you can see here, the SIM card is stuck.

  8. Samsung Galaxy Tab S2 SIM/SD Card Reader Replacement: passo 8, imagem 1 %32 Samsung Galaxy Tab S2 SIM/SD Card Reader Replacement: passo 8, imagem 2 %32
    • Before doing anything to this device, you must first disconnect the battery and the SIM card reader off the main board.

    • Using a plastic opening tool, pry up and disconnect the cable that connects the battery to the device.

  9. Samsung Galaxy Tab S2 SIM/SD Card Reader Replacement: passo 9, imagem 1 %32
    • Disconnect the SIM card reader flex cable as well, and then carefully pry the SIM card/microSD card reader out.

Conclusão

To reassemble your Tab S2, follow these instructions in reverse order.

ekim1389

Membro desde: 07/16/16

121 Reputação

Autoria de 1 guia

0 comentários

Adicione um comentário

Exibir estatísticas:

Últimas 24 horas: 0

Últimos 7 dias: 1

Últimos 30 dias: 7

Duração total: 2,728