Introdução
Often times a battery can lose its ability to hold its charge. If your battery will not charge, or if your battery only holds its charge for a few hours before dying, the battery may need to be replaced. This guide will show you how to replace the battery in your device.
O que você precisa
-
-
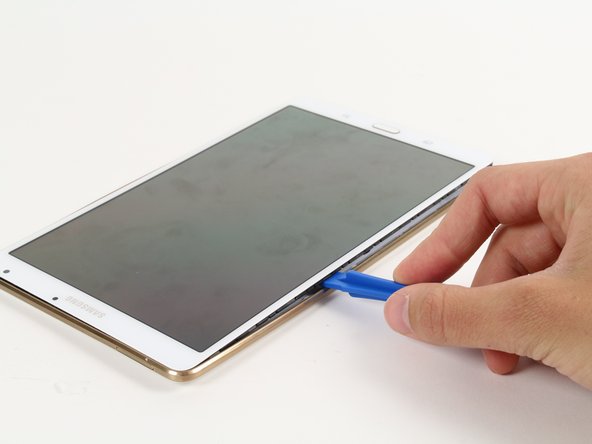
Place the plastic opening tool between the face of the display and rim of the back cover of the device.
-
Move the plastic opening tool in a downward motion until you see separation between the tablet and back cover.
-
-
-
-
The battery is glued down, usually with double-sided tape along the sides. The goal is to lift the battery out by pulling on the folded white tab in the top right corner. It may be necessary to first loosen the adhesive by running a flat, thin plastic tool under the edges of the battery.
-


To reassemble your device, follow these instructions in reverse order.
To reassemble your device, follow these instructions in reverse order.
Cancelar: não concluí este guia.
65 outras pessoas executaram este guia.
Equipe

Cal Poly, Team 12-15, Maness Fall 2015 Membro de Cal Poly, Team 12-15, Maness Fall 2015
CPSU-MANESS-F15S12G15
Membros da 4
Autoria de 12 guias
11 comentários
Mine, the T320, the battery was held in place by 4 screws. Otherwise same steps.
The cover was tricky to get off, the plastic bends a bit but it took some careful force.
Thanks , Easy to understand and perform. I think the battery connector is loose from mother board. How do I fix that?
I'm sure it's a solder job to reattach the connector to the motherboard. From the picture above it looks like a PIH connector but it may be an SMT, hard to tell without physically seeing it close up. At any rate, being this is a newer device, the solder used is lead free (RoHS compliant, the motherboard should have the letters Pb inside a circle with a line through, screen printed on it) so unless you have some experience in soldering with lead free, you'll probably need to do some searching in your area for electronics repair shops (be sure to ask about their experience with lead free soldering). Lead free soldering requires more heat that can cause extensive damage to the substrate if not done properly.
-experience: 22 years electronics manufacturing and repair (3 leading global electronics manufacturers and the U.S. Navy)
Well written with precise instructions. The pictures included in these instruction for each stage of the process are clear and shoe exactly what needs to be done. What at first seems a bit of a daunting task to an amateur is a relatively easy tasks when equipped with these instructions. Thank you to the author.