Ir para o conteúdo principal

Samsung Galaxy Tab E 8.0 Motherboard Replacement

O que você precisa

  1. Samsung Galaxy Tab E 8.0 Motherboard Replacement, Back Panel: passo 1, imagem 1 %32 Samsung Galaxy Tab E 8.0 Motherboard Replacement, Back Panel: passo 1, imagem 2 %32
    • Use the iFixit Opening Tool to pry off the back case, moving the tool around the screen.

    • Make sure the device is off and the SD card is removed before taking off the back casing.

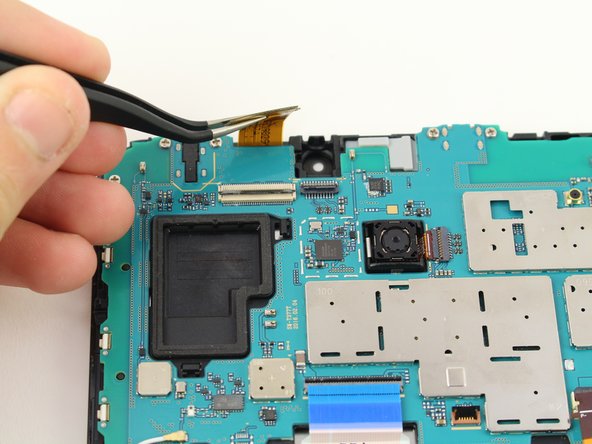
  2. Samsung Galaxy Tab E 8.0 Motherboard Replacement, Back Camera: passo 2, imagem 1 %32 Samsung Galaxy Tab E 8.0 Motherboard Replacement, Back Camera: passo 2, imagem 2 %32
    • Use the tweezers to lift the switch connecting the back camera to the motherboard.

    • Use your hand to remove the back camera from the motherboard.

  3. Samsung Galaxy Tab E 8.0 Motherboard Replacement, Front Camera: passo 3, imagem 1 %32 Samsung Galaxy Tab E 8.0 Motherboard Replacement, Front Camera: passo 3, imagem 2 %32 Samsung Galaxy Tab E 8.0 Motherboard Replacement, Front Camera: passo 3, imagem 3 %32
    • Use the tweezers to lift the switch connecting the front camera to the motherboard.

    • Remove the front camera from the motherboard by lifting with the tweezers.

  4. Samsung Galaxy Tab E 8.0 Motherboard Replacement, Motherboard: passo 4, imagem 1 %32 Samsung Galaxy Tab E 8.0 Motherboard Replacement, Motherboard: passo 4, imagem 2 %32
    • Use the tweezers to flip the switch on the bottom of the strap that goes over the battery.

    • Release the strap from the switch by lifting the strap with your hand.

  5. Samsung Galaxy Tab E 8.0 Motherboard Replacement: passo 5, imagem 1 %32 Samsung Galaxy Tab E 8.0 Motherboard Replacement: passo 5, imagem 2 %32
    • Use the tweezers to flip the switch that connects the top of the strap to the motherboard.

    • Lift the top end of the strap with your hand and remove the strap completely from the device.

  6. Samsung Galaxy Tab E 8.0 Motherboard Replacement: passo 6, imagem 1 %32 Samsung Galaxy Tab E 8.0 Motherboard Replacement: passo 6, imagem 2 %32
    • Use the tweezers to flip the switch of the connector.

    • Lift the connector from the motherboard.

    • This connector does not come completely off, but disconnects from the motherboard.

  7. Samsung Galaxy Tab E 8.0 Motherboard Replacement: passo 7, imagem 1 %32 Samsung Galaxy Tab E 8.0 Motherboard Replacement: passo 7, imagem 2 %32
    • Use the tweezers to flip the switch of the blue connector on the motherboard.

    • Lift the connector from the motherboard.

    • This switch can detach from the device, but just needs to disconnect from the motherboard.

    • Ensure the blue ribbon cable is not under the motherboard upon reassembly.

  8. Samsung Galaxy Tab E 8.0 Motherboard Replacement: passo 8, imagem 1 %32 Samsung Galaxy Tab E 8.0 Motherboard Replacement: passo 8, imagem 2 %32
    • Use the tweezers to flip the switch of the connector that runs from the battery to the motherboard.

    • Lift the connector from the motherboard.

    • This switch can detach from the device, but just needs to disconnect from the motherboard.

  9. Samsung Galaxy Tab E 8.0 Motherboard Replacement: passo 9, imagem 1 %32 Samsung Galaxy Tab E 8.0 Motherboard Replacement: passo 9, imagem 2 %32
    • Use a JIS #00 screwdriver to remove the six 4.5mm screws at the top of the motherboard.

    • Lift the motherboard with your hand to detach the motherboard from the device.

Conclusão

To reassemble your device, follow these instructions in reverse order.

Uma outra pessoa concluiu este guia.

Christian Bloemhof

Membro desde: 10/08/18

1.102 Reputação

Autoria de 7 guias

Equipe

Cal Poly, Team S13-G4, White Fall 2018 Membro de Cal Poly, Team S13-G4, White Fall 2018

CPSU-WHITE-F18S13G4

Membros da 4

Autoria de 8 guias

0 comentários

Adicione um comentário

Exibir estatísticas:

Últimas 24 horas: 0

Últimos 7 dias: 3

Últimos 30 dias: 13

Duração total: 2,145