Ir para o conteúdo principal

Samsung Galaxy Tab 10.1 Rear Facing Camera Replacement

O que você precisa

  1. Samsung Galaxy Tab 10.1 Rear Facing Camera Replacement, Rear Panel: passo 1, imagem 1 %32 Samsung Galaxy Tab 10.1 Rear Facing Camera Replacement, Rear Panel: passo 1, imagem 2 %32
    • Place the bottom of the tablet towards you.

    • Remove the 4.1mm screws near the charge port with a Tri-Wing screwdriver.

    • If there are plastic tabs covering these screws, use pointed tweezers to pry the tabs out.

    • On model GT-P7500, this step is omitted, as that model doesn't have these 2 screws.

  2. Samsung Galaxy Tab 10.1 Rear Facing Camera Replacement: passo 2, imagem 1 %32 Samsung Galaxy Tab 10.1 Rear Facing Camera Replacement: passo 2, imagem 2 %32 Samsung Galaxy Tab 10.1 Rear Facing Camera Replacement: passo 2, imagem 3 %32
    • Start in the middle of the left side and insert a plastic opening tool between the rear panel and the front panel assembly.

    • Carefully run the plastic opening tool along the left and top edge to pry the rear panel away from the rest of the device.

    • Place opening picks along the side you have already pried open to keep the back panel detached from the rest of the device.

    • Be sure to work carefully, as prying too firmly can crack the screen.

  3. Samsung Galaxy Tab 10.1 Rear Facing Camera Replacement: passo 3, imagem 1 %32 Samsung Galaxy Tab 10.1 Rear Facing Camera Replacement: passo 3, imagem 2 %32 Samsung Galaxy Tab 10.1 Rear Facing Camera Replacement: passo 3, imagem 3 %32
    • Using the plastic opening tools, continue to carefully run along the right and bottom edge, and then lift the screen from the back panel.

  4. Samsung Galaxy Tab 10.1 Rear Facing Camera Replacement, Battery: passo 4, imagem 1 %32 Samsung Galaxy Tab 10.1 Rear Facing Camera Replacement, Battery: passo 4, imagem 2 %32 Samsung Galaxy Tab 10.1 Rear Facing Camera Replacement, Battery: passo 4, imagem 3 %32
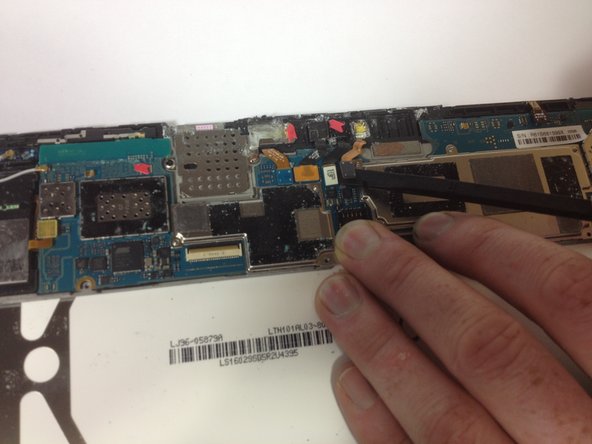
    • Flip up the retaining flaps on the ZIF connectors that secure the three large ribbon cables.

    • Carefully pull the three ribbon cables from their sockets on the motherboard.

  5. Samsung Galaxy Tab 10.1 Rear Facing Camera Replacement: passo 5, imagem 1 %32 Samsung Galaxy Tab 10.1 Rear Facing Camera Replacement: passo 5, imagem 2 %32
    • Remove the ten 3 mm Phillips #00 screws surrounding the battery.

  6. Samsung Galaxy Tab 10.1 Rear Facing Camera Replacement: passo 6, imagem 1 %32 Samsung Galaxy Tab 10.1 Rear Facing Camera Replacement: passo 6, imagem 2 %32 Samsung Galaxy Tab 10.1 Rear Facing Camera Replacement: passo 6, imagem 3 %32
    • Lift the edge of the battery up with your finger or a spudger.

    • Detach the battery by holding the motherboard down while gently lifting the battery up.

  7. Samsung Galaxy Tab 10.1 Rear Facing Camera Replacement, Rear Facing Camera: passo 7, imagem 1 %32 Samsung Galaxy Tab 10.1 Rear Facing Camera Replacement, Rear Facing Camera: passo 7, imagem 2 %32
    • Use the spudger to pry up on the white connection of the rear camera wire.

  8. Samsung Galaxy Tab 10.1 Rear Facing Camera Replacement: passo 8, imagem 1 %32
    • Grab the white connection with your fingers and lift it up from its slot.

    • We have removed the motherboard in these pictures to make it easier to see, but it is not necessary to complete this step.

Conclusão

To reassemble your device, follow these instructions in reverse order.

Uma outra pessoa concluiu este guia.

Jess McCafferty

Membro desde: 09/30/13

1.704 Reputação

Autoria de 2 guias

Equipe

Cal Poly, Team 13-5, Forte Fall 2013 Membro de Cal Poly, Team 13-5, Forte Fall 2013

CPSU-FORTE-F13S13G5

Membros da 5

Autoria de 17 guias

0 comentários

Adicione um comentário

Exibir estatísticas:

Últimas 24 horas: 0

Últimos 7 dias: 1

Últimos 30 dias: 3

Duração total: 2,464