Introdução
Breaking news! Updated S9 Teardown Below!
さあ、もっとスマートフォンの分解”アクション”をする時間です。今日、私たちは新製品のSamsung Galaxy S9を詳細に点検してみます。アップグレードされたカメラ、より早いプロセッサ、複数のステレオスピーカーが搭載されています。さて、内側はどう変わったのでしょうか?分解して見てみましょう!
若干大きいサイズのほうがご希望ですか?それならば、私たちが行ったS9+ の分解 をご覧ください。
分解ビデオを日本語字幕付きでご覧いただけます。画面右下の設定から字幕をクリックして、”日本語”を選択してください。
私たちの大切な修理人たちと繋がれる場所、Facebookや Twitter、Twitter日本語版、Instagramをフォローして一緒にオタクの道を歩みましょう。
O que você precisa
Vídeo de Apresentação
-
-
このスモールバージョンS9+も大幅なハードウェアのアップグレードがみられます。早速確認してみましょう。
-
ノッチレス5.8インチ AMOLED ディスプレイ、解像度2960 × 1440 (~570 ppi)
-
Qualcomm Snapdragon 845もしくは SamsungオリジナルExynos 9810(発売場所によって異なる)
-
12 MP 光学手ブレ補正 (OIS) 付きDual Aperture (可変絞りレンズ)—f/1.5と f/2.4モード—加えて 8 MPセルフィーカメラ
-
ヘッドフォンジャックとmicroSDスロット
-
IP68 防水/防塵規格
-
Android 8.0 Oreo
-
-
-
まず、この分解を共謀してくれたCreative Electronより届いたX線画像を見てみましょう。
-
もしS8がお気に入りの方は嬉しいニュースですーSamsungも同意するはずです。デザインはほとんど変化がありません。新しい(そしてより便利な)位置に付けられた指紋認証センサーがあります。
-
私たちのS9は左側に前モデルのS8(2017年の分解後、再組み立てしたものです)と兄貴分のS9+(先週行った分解の傷がまだ癒えていません)に囲まれて居心地が良さそうです。
-
IP68防水防塵機能を保持したまま、ヘッドフォンジャックと拡張ストーレッジを変わらず搭載してくれたSamsungに拍手です。
-
-
-
最近のGalaxyモデル内部に侵入するのは簡単な作業ではありませんが、やり方だけはもう分かっています。
-
手順1:温める。
-
手順2:さらに熱を当てる。
-
手順3:吸盤カップと接着剤をスライス、見えない指紋センサケーブルに当たらないように注意。
-
この手順3についての苦情についてはおそらく耳にしたことがあるでしょうが、これに付け加えます。そうなんです、この作業は大変でリスクがあります。もし背面ガラスにひび割れが入っている場合、少しでも安価に交換できるかどうか賭けに出てください。(私たちのお気に入りのAppleもまだこの問題に取り組んでいるところです。)
-
-
-
バッテリーが逃げ出すことを恐れたかのように、バッテリーの背面にはたっぷりと接着剤が留められています。
-
恐るに値しません!この光景は見たことがあります。そしてこのような粘着性のある問題を解決するために秘密のフォーミュラを開発しました。
-
以前、Samsungはツール無しで10秒で交換できるバッテリーを持つ防水付きスマートフォンを製造していたのです。
-
S9+よりは小さいものの、S9のバッテリーは3000 mAh、11.55 Wh。出力電力は3.85 Vです。
-
これはS8と全く同じです。そしてPixel 2 (10.39 Wh)やiPhone X(10.35 Wh)のような競争相手よりも若干、容量は大きいです。
-
-
-
-
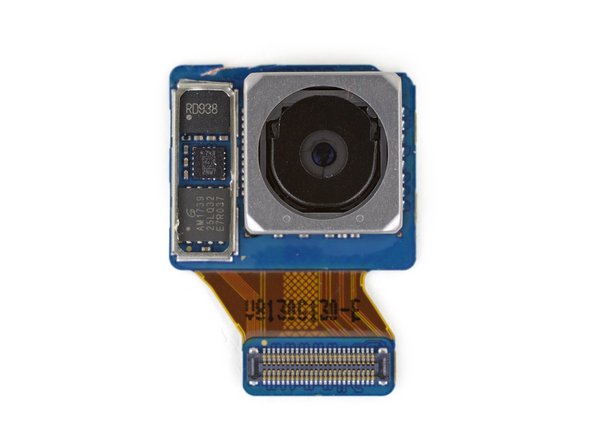
他の最新モデルと比べるとS9はFストップ(絞り値)が倍、センサは半分です。
-
画像に含まれていないもの:Samsungが売り出し中の2 Gbit LPDDR4 DRAM、画像センサの下に積層されています)
-
画像中:幾つかのミステリーなチップがあります。
-
RD938、おそらくOISドライバー
-
STMicroelectronics L2G2IS 2軸OISジャイロスコープ
-
GigaDevice GD25LQ32 32 Mbシリアルフラッシュ
-
-
-
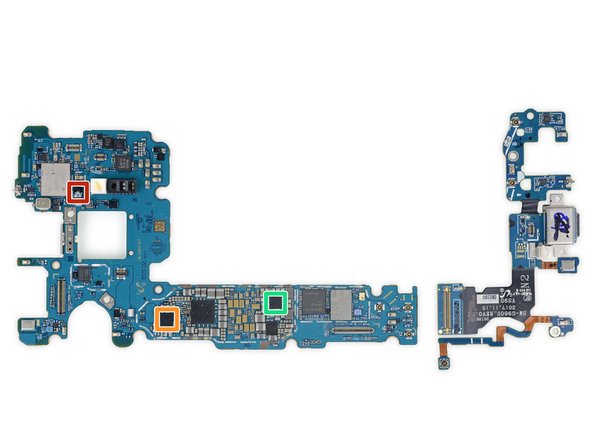
素晴らしいハードウェアを動かすチップを詳細に見てみます。
-
Samsung K3UH5H5OMM-AGCJ 32 Gb (4 GB) LPDDR4X DRAM、Qualcomm Snapdragon 845に積層
-
東芝 THGAF8G9T43BAIR 64 GB UFS (NANDフラッシュ + コントローラー)
-
Avago AFEM-9096 フロントエンドモジュール
-
Qualcomm Aqstic WCD9341オーディオコデック
-
Maxim MAX77705F PMIC
-
Skyworks SKY13716-1 ローバンドフロントエンドモジュール
-
P9320に類似したIDT P9320Sワイヤレスパワーレシーバー
-
-
-
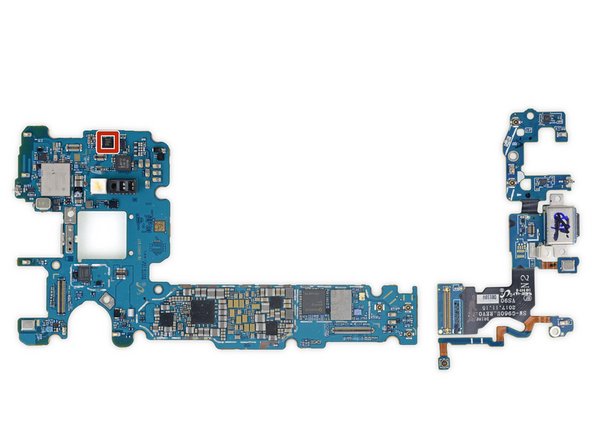
裏側にも別の統合回路があります。
-
Murata KM7N07016 Wi-Fi/Bluetoothモジュール
-
NXP PN80TNFCコントローラー
-
Qualcomm PM845 (PMICに類似)
-
Qualcomm SDR845 RFトランシーバー
-
判断しにくいのですが、これはS9+でも搭載されていたSkyworks SKY78160-11のフロントエンドモジュールと同じではないかと考えます。
-
Qualcomm PM8005 PMIC
-
クアルコムQDM3870ハイバンド・ダイバーシティ・フロントエンド・モジュール
Hard to make out but I think you’re right. We updated the text. Thanks for the tip!
-
-
-
IC識別、パート 3です:
-
NXP Semiconductor PCAL6524 24ビットI/Oエクスパンダー
-
ON Semiconductor FPF3688UCX ロードスイッチ
-
Vishay DG2730 2ポート, 480 Mbps USB 2.0 DPDTアナログスイッチ
-
ON Semiconductor FAN48618BUC53X 1 A ブーストレギュレータ
-
Richtek RT8010GQW 1 Aステップダウン DC-DCコンバーター
-
Texas Instrumentsブーストコンバーター (おそらく)
-
NXP Semiconductor NCX2200 コンパレータ
-
-
-
IC識別、パート4です (センサー):
-
STMicroelectronics LSM6DSL 3軸加速度センサー/ジャイロスコープ
-
AKM Semiconductor AK09916C 3軸加速度センサー/ジャイロスコープ
-
STMicroelectronics LPS22HB圧力センサー
-
心拍センサー
-
Ablic (旧Seiko Instruments) S-5712CCDL1-I4T1U ホールセンサー
-
- 多くのコンポーネントがモジュール式で個別に交換が可能です。
- バッテリーの交換は技術的には可能ですが、これにアクセスするには不必要なチャレンジが待っています。
- 両面ガラスが接着剤で固められているため、修理の際にはガラスを割ってしまう可能性があります。このため修理の第一段階が困難です。
- スクリーンの修理は多量に付けられた接着剤と格闘する一方で、沢山のパーツを解体しなければなりません。


Considerações finais
Índice de reparabilidade


(10 é o mais fácil de reparar)
Um agradecimento especial a esses tradutores:
100%

Estes tradutores estão nos ajudando a consertar o mundo! Quer contribuir?
Comece a traduzir ›
16 comentários
Hello:
So, no radio on this model either?
Thanx for another great video and teardown explanation : )
Is there any physical difference between the Qualcomm Single & Dual-SIM versions (ditto for the Exynos versions)?
Was just curious if the only difference is the software & possibly the SIM Tray,to where you could convert,say,a US Single SIM version to a Dual-SIM version found in the other markets.
Physically my s9 in okay. Except the back glass in broken most likely ran over by car. It boots up just barely. It was working fine until I tried “Okay Google.” As with most glitches I restarted the phone and that's when I realized something was wrong after I found it in the road at work. Popped off the Otter box. Saw the back glass all cracked up. Side to side it appears fine, not crushed. But obviously something from failing off the muffler of a Ford explorer and then sitting in the road internally something is damaged. It will charge, I can reach the Boot menu via the Power+volume down button. Any Ideas on where to go to get repaired? Or….Go to E bay and buy something else since Verizon did not here my request for coverage to be added to my phone on 3 separate occasions and there crappy Insurer denied my claim. Thank you greatly for any consideration to a reply. T. Mills treeoflife23@hotmail.com or westhitter@gmail.com
Anyone knows what is the temparature and humidity sensor in this model?
Do you guys know what the part in the Sim card slot is that ejects the Sim card?
After replacing my screen along with a complete teardown the person I'm talking to hears an echo. What did I do wrong and what part do I need to replace?
Hello i cant deal with its network huge network problem i have been faced since i had bought
Thoughts on repairability with a non working SD card slot? Card that works fine in other devices and used to work fine in this phone (for nearly two years) started randomly dismounting w/ corrupted filesystem when accidentally exposed to, uh, a significant quantity of water with card slot fully closed. I was hoping the card slot unit was on a separate board like the headphone socket but it looks like it's part of the motherboard from here and I'm not liking my chances of desoldering it without a hot air station. I'm guessing it's toast... especially as the screen is shattered too and I can get a whole replacement for ~95 on Amazon vs a new display+digitizer for ~120.