Esta versão pode conter edições incorretas. Mude para o último instantâneo verificado.
O que você precisa
-
Este passo não foi traduzido. Ajude a traduzi-lo
-
Insert a paper clip or SIM eject tool into the hole in the SIM card slot on the power button side of the phone.
-
Press to eject the SIM card tray.
-
-
-
-
Encha uma panela ou frigideira com água suficiente para submergir completamente um iOpener.
-
Aqueça a água até ferver. Desligue o fogo.
-
Coloque um iOpener na água quente por 2 a 3 minutos. Certifique-se de que o iOpener esteja totalmente submerso na água.
-
Use um pegador para retirar o iOpener aquecido da água quente.
-
Seque bem o iOpener com uma toalha.
-
Sua bolsa térmica iOpener está pronta para o uso! Se precisar reaquecer o iOpener, aqueça a água até ferver, desligue o fogo e coloque o iOpener na água por 2 a 3 minutos.
-
-
Este passo não foi traduzido. Ajude a traduzi-lo
-
Lay the heated iOpener over the rear panel for about two minutes to loosen the adhesive around the edge of the glass.
-
Shift the iOpener to heat the remaining section of the panel for another two minutes.
-
-
Este passo não foi traduzido. Ajude a traduzi-lo
-
Once the rear glass is hot to the touch, apply a suction cup near the bottom edge of the glass.
-
Lift on the suction cup to create a small gap underneath the rear glass, and insert an opening pick into the gap.
-
-
Este passo não foi traduzido. Ajude a traduzi-lo
-
Slide the pick along the bottom edge of the phone to slice through the adhesive securing the rear glass.
-
-
Este passo não foi traduzido. Ajude a traduzi-lo
-
Repeat the heating and cutting procedure for the remaining three sides of the phone.
-
Leave an opening pick under each edge to prevent the adhesive from resealing.
-
-
Este passo não foi traduzido. Ajude a traduzi-lo
-
Use an opening pick to slice through any remaining adhesive.
-
Remove the rear glass.
-
-
Este passo não foi traduzido. Ajude a traduzi-lo
-
Use tweezers to peel away any remaining adhesive from the phone's chassis.
-
Clean the adhesion areas with high concentration isopropyl alcohol (at least 90%) and a lint-free cloth. Swipe in one direction only, not back and forth. This will help prep the surface for the new adhesive.
-
Peel the adhesive backing off of the new rear glass, carefully line up one edge of the glass against the phone chassis, and firmly press the glass onto the phone.
-
-
Este passo não foi traduzido. Ajude a traduzi-lo
-
Remove the thirteen 3.5mm Phillips #00 screws securing the midframe to the phone.
-
-
Este passo não foi traduzido. Ajude a traduzi-lo
-
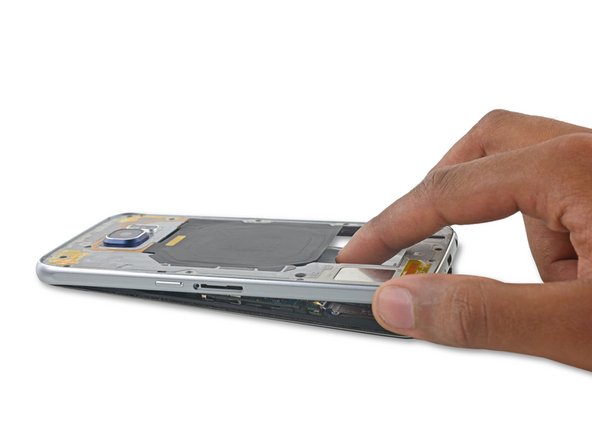
Firmly grasp the edge of the midframe assembly.
-
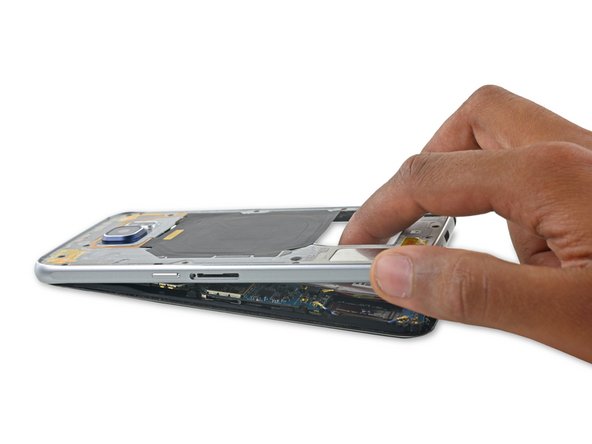
Lift up on the midframe assembly while pushing down on the battery to separate the midframe assembly from the rest of the phone.
-
While lifting the midframe, be careful to avoid snagging it on the audio jack or charging port.
-
Once the midframe is partially seperated, carefully run an opening pick around the edges of the rest of the phone to separate the top of the midframe.
-
To avoid damage to the headphone jack, remove the top of the midframe first, then push the midframe downwards to disengage it from the headphone jack.
-
You may need to heat and apply an iOpener to the edges of the display to soften the display adhesive if midframe separation is difficult.
-
-
Este passo não foi traduzido. Ajude a traduzi-lo
-
Lift the midframe assembly up to separate it from the rest of the phone.
-
Cancelar: não concluí este guia.
17 outras pessoas executaram este guia.
6 comentários
Step 18
Is it really that "simple" to separate the midframe from the front of the phone? In most videos (even the one on ifixit) a suction cup is used (after warming the front) with some prying tools.
So, does Step 18 really work?
It appears that the front is hold together by only 4 adhesives in the corners. Are this damaged during the front removal process? (is there a replacement kit?)
Just another question, I damaged the heart sensor plastic cover, is it possible to buy just that part or do I need to buy a complete midframe?
Can this step be exactly with a simple push as stated? Other sources required focusing heat on the 4 corners and run through with a pick....?
Secondly, how can one avoid damaging the lamination under the glass while removing it or trying to get the first foothold with the pick. Most guides I have seen appear to skip this step.
I have seen one phone parts site (EtradeSupply) list all different variants of the mid housing (G920F, G920V, G920R etc). But another site (WitRigs) has just one, as if they aren't specific.
Does anyone know? Because i'm in Australia and can't find G920i variant.
Also, has anyone simply swapped over the antennas, and crimped them onto the new housing?
Ok Guys I am definitely !#^&@@ off right now.... but to the point.
Please Edit to this guide --> @Step 18:
First of all: Heat the for corners with your iOpener to lose the adhesive which sits in the corners.
Be very very gentle when you push down on the battery and try to put a little pressure onto or maybe into the headphone jack when you first encounter that the display gets lose, because the headphone-jack fits very well in the frame and holds on a little corner.
Only go around the whole display with a spudger when the adhesive is really warm to lose it when it doesn't come out as easy as you thought. Because otherwise you may face that the display to display-glass laminate gets damaged. That just happened to me at the upper display side... so to get a perfect new looking phone I have to replace that as well....EXPENSIVE :(
Hope this may help you guys.
but ... nevertheless ... thank you guys from IFixit for your continous effort to help people repairing there stuff - heads up :-)
Hi Jakob, thanks for your input! When writing this guide we used a device that had been previously disassembled, so our experience may have been different from yours. Just to be clear: you have an issue with step 18 because the adhesive between the midframe and front assembly is very strong and simply pushing the battery is not adequate? Are there other steps that need to be adjusted?
And, as a general note, you can edit this guide yourself! When you hover your cursor over any particular step, an "Edit" button will appear. Alternatively, you can scroll to the top of the page and click the "Edit" tab up there.


