Ir para o conteúdo principal

Samsung Galaxy S6 Edge Rear Glass Replacement

O que você precisa

  1. Samsung Galaxy S6 Edge Rear Glass Replacement, iOpener Heating: passo 1, imagem 1 %32 Samsung Galaxy S6 Edge Rear Glass Replacement, iOpener Heating: passo 1, imagem 2 %32
    • We recommend that you clean your microwave before proceeding, as any nasty gunk on the bottom may end up stuck to the iOpener.

    • Place the iOpener in the center of the microwave.

    • For carousel microwaves: Make sure the plate spins freely. If your iOpener gets stuck, it may overheat and burn.

  2. Samsung Galaxy S6 Edge Rear Glass Replacement: passo 2, imagem 1 %32
    • Heat the iOpener for thirty seconds.

    • Throughout the repair procedure, as the iOpener cools, reheat it in the microwave for an additional thirty seconds at a time.

    • Be careful not to overheat the iOpener during the repair. Overheating may cause the iOpener to burst. Do not attempt to heat over 100˚C (212˚F).

    • Never touch the iOpener if it appears swollen.

    • If the iOpener is still too hot in the middle to touch, continue using it while waiting for it to cool down some more before reheating. A properly heated iOpener should stay warm for up to 10 minutes.

  3. Samsung Galaxy S6 Edge Rear Glass Replacement: passo 3, imagem 1 %32
    • Remove the iOpener from the microwave, holding it by one of the two flat ends to avoid the hot center.

    • The iOpener will be very hot, so be careful when handling it. Use an oven mitt if necessary.

  4. Samsung Galaxy S6 Edge Rear Glass Replacement, Alternate iOpener heating method: passo 4, imagem 1 %32 Samsung Galaxy S6 Edge Rear Glass Replacement, Alternate iOpener heating method: passo 4, imagem 2 %32
    • If you don't have a microwave, follow this step to heat your iOpener in boiling water.

    • Fill a pot or pan with enough water to fully submerge an iOpener.

    • Heat the water to a boil. Turn off the heat.

    • Place an iOpener into the hot water for 2-3 minutes. Make sure the iOpener is fully submerged in the water.

    • Use tongs to extract the heated iOpener from the hot water.

    • Thoroughly dry the iOpener with a towel.

    • The iOpener will be very hot, so be careful to hold it only by the end tabs.

    • Your iOpener is ready for use! If you need to reheat the iOpener, heat the water to a boil, turn off the heat, and place the iOpener in the water for 2-3 minutes.

  5. Samsung Galaxy S6 Edge Rear Glass Replacement, Rear Glass: passo 5, imagem 1 %32 Samsung Galaxy S6 Edge Rear Glass Replacement, Rear Glass: passo 5, imagem 2 %32
    • Opening your phone will compromise its waterproof seals. Have replacement adhesive ready before you proceed, or take care to avoid liquid exposure if you reassemble your phone without replacing the adhesive.

    • If your glass is shattered, put packing tape over the entire panel to hold it together during the removal process.

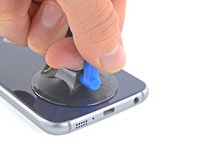
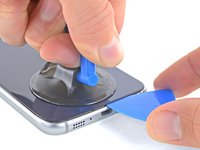
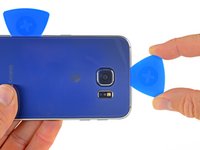
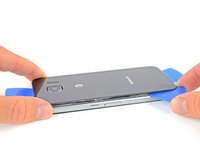
    • Lay the heated iOpener over the rear panel for about two minutes to loosen the adhesive around the edge of the glass.

    • You may need to reheat and reapply the iOpener several times to get the phone warm enough. Follow the iOpener instructions to avoid overheating.

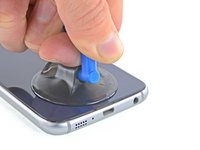
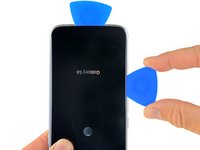
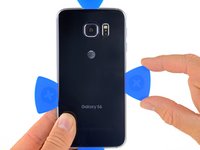
    • Shift the iOpener to heat the remaining section of the panel for another two minutes.

    • A hair dryer, heat gun, or hot plate may also be used, but be careful not to overheat the phone—the OLED display and internal battery are both susceptible to heat damage.

  6. Samsung Galaxy S6 Edge Rear Glass Replacement: passo 6, imagem 1 %32 Samsung Galaxy S6 Edge Rear Glass Replacement: passo 6, imagem 2 %32 Samsung Galaxy S6 Edge Rear Glass Replacement: passo 6, imagem 3 %32
    • Once the rear glass is hot to the touch, apply a suction cup near the bottom edge of the glass.

    • Lift on the suction cup to create a small gap underneath the rear glass, and insert an opening pick into the gap.

    • Optionally, once the pick is inserted, you can add a few drops of isopropyl alcohol into the gap to help weaken the adhesive in the following steps.

  7. Samsung Galaxy S6 Edge Rear Glass Replacement: passo 7, imagem 1 %32 Samsung Galaxy S6 Edge Rear Glass Replacement: passo 7, imagem 2 %32
    • Slide the pick along the bottom edge of the phone to slice through the adhesive securing the rear glass.

    • Afterward, it may help to leave the pick in place and grab a second pick as you proceed to the next step. Leaving the pick inserted can help prevent the glue you just separated from re-adhering.

    • Re-heat the rear glass as needed to prevent the glue from cooling and hardening.

  8. Samsung Galaxy S6 Edge Rear Glass Replacement: passo 8, imagem 1 %32 Samsung Galaxy S6 Edge Rear Glass Replacement: passo 8, imagem 2 %32 Samsung Galaxy S6 Edge Rear Glass Replacement: passo 8, imagem 3 %32
    • Repeat the heating and cutting procedure for the remaining three sides of the phone.

    • Leave an opening pick under each edge to prevent the adhesive from resealing.

  9. Samsung Galaxy S6 Edge Rear Glass Replacement: passo 9, imagem 1 %32 Samsung Galaxy S6 Edge Rear Glass Replacement: passo 9, imagem 2 %32
    • Use an opening pick to slice through any remaining adhesive.

    • Remove the rear glass.

  10. Samsung Galaxy S6 Edge Rear Glass Replacement: passo 10, imagem 1 %32 Samsung Galaxy S6 Edge Rear Glass Replacement: passo 10, imagem 2 %32
    • To install new rear glass:

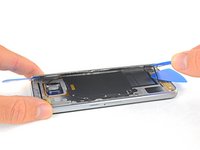
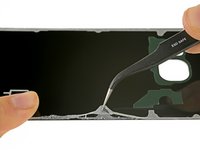
    • Use tweezers to peel away any remaining adhesive from the phone's chassis.

    • Clean the adhesion areas with high concentration isopropyl alcohol (at least 90%) and a lint-free cloth. Swipe in one direction only, not back and forth. This will help prep the surface for the new adhesive.

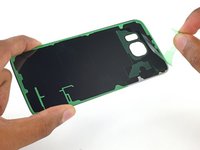
    • Peel the adhesive backing off of the new rear glass, carefully line up one edge of the glass against the phone chassis, and firmly press the glass onto the phone.

    • If you're reinstalling the old rear glass, or using rear glass without adhesive pre-installed, follow this guide.

Conclusão

Follow this guide to reinstall the rear glass.

14 outras pessoas executaram este guia.

Sam Goldheart

Membro desde: 10/18/12

465.119 Reputação

Autoria de 538 guias

Equipe

iFixit Membro de iFixit

Staff

Membros da 135

Autoria de 16.476 guias

3 comentários

Thanks for taking the time to make this guide

Jeff Moore - Responder

How would you but replacement glass back on? What kind of adhesive would i need?

shentonaj - Responder

Hey Guys! I have found that if you squirt just a touch of 100% isopropyl alcohol at the bottom corner of iPhone, Samsung, etc. and can work enough of it in, that adhesive will instantly dissolve and allow you to get an opening to slide a pick under to slice the adhesive all the way around. The key is not use too much that it goes onto the screen causing delamination if you are removing a screen you plan to reuse. On the Ultra 21, that back glass is INCREDIBLY fragile especially at the edges plus the very extreme contouring of that glass, thus using alcohol all the way around to dissolve and loosen adhesive is the way to go, and preventing a shattered back glass. (Learned the hard way on my 1st one....doh.)

Robert S - Responder

Adicione um comentário

Exibir estatísticas:

Últimas 24 horas: 0

Últimos 7 dias: 4

Últimos 30 dias: 15

Duração total: 8,581