Ir para o conteúdo principal

Samsung Galaxy Note Front Facing Camera Assembly Replacement

O que você precisa

  1. Samsung Galaxy Note Front Facing Camera Assembly Replacement, Stylus: passo 1, imagem 1 %32 Samsung Galaxy Note Front Facing Camera Assembly Replacement, Stylus: passo 1, imagem 2 %32
    • Grasp the cap of the stylus and remove it from its slot in the midframe.

  2. Samsung Galaxy Note Front Facing Camera Assembly Replacement, Rear Case: passo 2, imagem 1 %32 Samsung Galaxy Note Front Facing Camera Assembly Replacement, Rear Case: passo 2, imagem 2 %32
    • Pry with a plastic opening tool, or your fingernail, in the divot to the right of the rear-facing camera, near the volume rocker.

  3. Samsung Galaxy Note Front Facing Camera Assembly Replacement: passo 3, imagem 1 %32 Samsung Galaxy Note Front Facing Camera Assembly Replacement: passo 3, imagem 2 %32
    • Lift and remove the rear case from the phone.

  4. Samsung Galaxy Note Front Facing Camera Assembly Replacement, Battery: passo 4, imagem 1 %32 Samsung Galaxy Note Front Facing Camera Assembly Replacement, Battery: passo 4, imagem 2 %32
    • Insert your finger in the notch of the battery compartment.

    • Press the battery toward the rear facing camera while pulling outward.

  5. Samsung Galaxy Note Front Facing Camera Assembly Replacement, MicroSD Card: passo 5, imagem 1 %32 Samsung Galaxy Note Front Facing Camera Assembly Replacement, MicroSD Card: passo 5, imagem 2 %32 Samsung Galaxy Note Front Facing Camera Assembly Replacement, MicroSD Card: passo 5, imagem 3 %32
    • Use the flat end of a spudger, or your fingernail, to press the microSD card slightly deeper into its slot until you hear a click.

    • After the click, release the card and it will pop out of its slot.

    • For reassembly, push the microSD card into the slot until it clicks in place.

  6. Samsung Galaxy Note Front Facing Camera Assembly Replacement: passo 6, imagem 1 %32
    • Remove the microSD card from its slot in the midframe.

  7. Samsung Galaxy Note Front Facing Camera Assembly Replacement, SIM Card: passo 7, imagem 1 %32 Samsung Galaxy Note Front Facing Camera Assembly Replacement, SIM Card: passo 7, imagem 2 %32
    • Use a plastic opening tool, or your fingernail, to push the SIM card out of its compartment.

  8. Samsung Galaxy Note Front Facing Camera Assembly Replacement: passo 8, imagem 1 %32 Samsung Galaxy Note Front Facing Camera Assembly Replacement: passo 8, imagem 2 %32
    • Slide the SIM card out the rest of the way with your thumb and remove it from the device.

  9. Samsung Galaxy Note Front Facing Camera Assembly Replacement, Midframe: passo 9, imagem 1 %32
    • Remove the nine 3.4 mm Phillips #00 screws securing the midframe to the display assembly.

  10. Samsung Galaxy Note Front Facing Camera Assembly Replacement: passo 10, imagem 1 %32 Samsung Galaxy Note Front Facing Camera Assembly Replacement: passo 10, imagem 2 %32
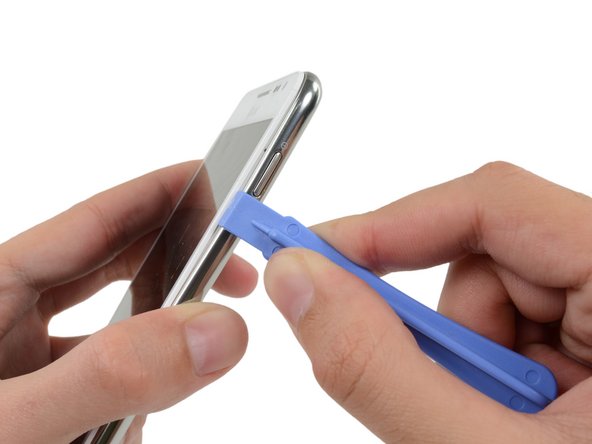
    • Insert your plastic opening tool to the left of the power button between the midframe and the front panel assembly and pry.

  11. Samsung Galaxy Note Front Facing Camera Assembly Replacement: passo 11, imagem 1 %32 Samsung Galaxy Note Front Facing Camera Assembly Replacement: passo 11, imagem 2 %32 Samsung Galaxy Note Front Facing Camera Assembly Replacement: passo 11, imagem 3 %32
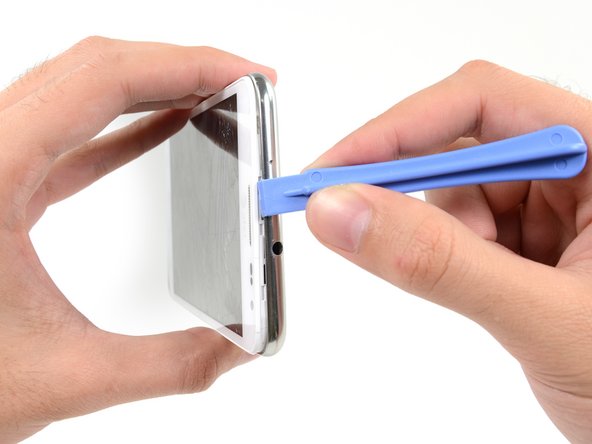
    • Slide the plastic opening tool down the seam.

  12. Samsung Galaxy Note Front Facing Camera Assembly Replacement: passo 12, imagem 1 %32 Samsung Galaxy Note Front Facing Camera Assembly Replacement: passo 12, imagem 2 %32 Samsung Galaxy Note Front Facing Camera Assembly Replacement: passo 12, imagem 3 %32
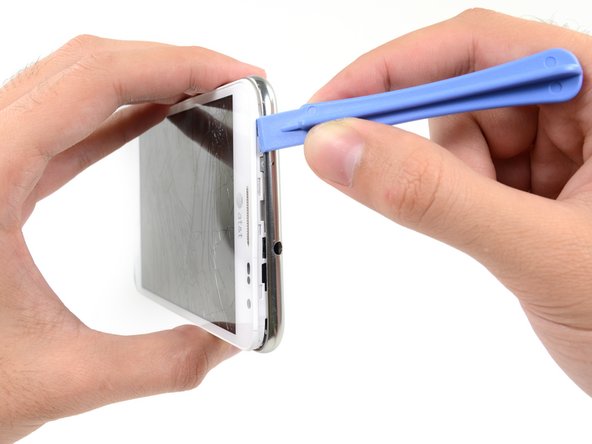
    • Insert your plastic opening tool to the left of the headphone jack between the midframe and the display assembly.

    • Slide the opening tool along the top edge of the phone.

    • Continue to run the plastic opening tool around the perimeter of the phone until the midframe is separated.

  13. Samsung Galaxy Note Front Facing Camera Assembly Replacement: passo 13, imagem 1 %32 Samsung Galaxy Note Front Facing Camera Assembly Replacement: passo 13, imagem 2 %32
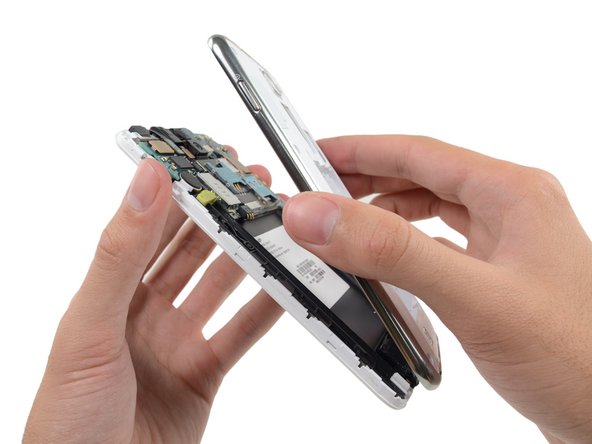
    • Remove the midframe from the display assembly.

  14. Samsung Galaxy Note Front Facing Camera Assembly Replacement, Upper Display Assembly Bracket: passo 14, imagem 1 %32
    • Use the flat end of a spudger to disconnect the headphone jack/earpiece speaker assembly cable connector.

  15. Samsung Galaxy Note Front Facing Camera Assembly Replacement: passo 15, imagem 1 %32
    • Remove the two 3 mm Phillips #00 screws securing the upper display assembly bracket.

  16. Samsung Galaxy Note Front Facing Camera Assembly Replacement: passo 16, imagem 1 %32 Samsung Galaxy Note Front Facing Camera Assembly Replacement: passo 16, imagem 2 %32
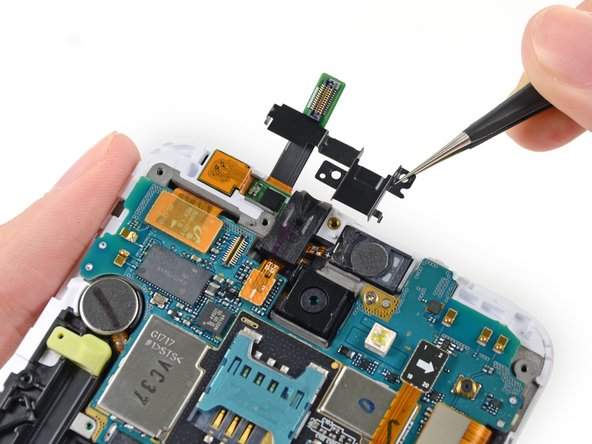
    • Use a pair of tweezers, or your fingers, to remove the upper display assembly bracket.

  17. Samsung Galaxy Note Front Facing Camera Assembly Replacement, Front Facing Camera Assembly: passo 17, imagem 1 %32 Samsung Galaxy Note Front Facing Camera Assembly Replacement, Front Facing Camera Assembly: passo 17, imagem 2 %32
    • Using tweezers, or your fingers, remove the front-facing camera assembly.

Conclusão

To reassemble your device, follow these instructions in reverse order.

6 outras pessoas executaram este guia.

Sam Goldheart

Membro desde: 10/18/12

465.602 Reputação

Autoria de 538 guias

Equipe

iFixit Membro de iFixit

Staff

Membros da 135

Autoria de 16.718 guias

0 comentários

Adicione um comentário

Exibir estatísticas:

Últimas 24 horas: 0

Últimos 7 dias: 3

Últimos 30 dias: 3

Duração total: 5,182