Ir para o conteúdo principal

Samsung Galaxy J3 Eclipse Display Assembly Replacement

O que você precisa

  1. Samsung Galaxy J3 Eclipse Display Assembly Replacement, Display Assembly: passo 1, imagem 1 %32
    • Use a heat gun or hair dryer to heat up the front edges of the phone for about two minutes. Stay approximately six inches away from the screen to prevent phone damage.

    • Do not apply heat to any one edge of the phone for longer than a few seconds. Instead, use a continuous motion around the phone's edges.

  2. Samsung Galaxy J3 Eclipse Display Assembly Replacement: passo 2, imagem 1 %32 Samsung Galaxy J3 Eclipse Display Assembly Replacement: passo 2, imagem 2 %32
    Ferramenta utilizada nesse passo:
    Plastic Cards
    $2.99
    Comprar
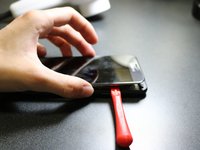
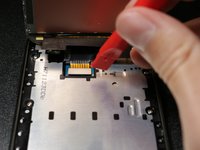
    • While the screen adhesive is still warm and flexible, insert a pry tool or plastic card between the glass display and the frame of the phone.

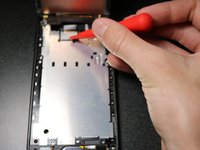
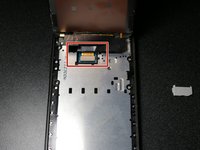
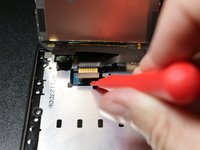
    • Slowly slide another pry tool around all the edges of the phone in order to break the adhesive's bond to the display.

    • When using the pry tool, do not use too much force or the phone's internals could be damaged.

    • Do not insert your tool more than 1cm into the top edge of the phone to avoid damaging the fragile cables.

  3. Samsung Galaxy J3 Eclipse Display Assembly Replacement: passo 3, imagem 1 %32 Samsung Galaxy J3 Eclipse Display Assembly Replacement: passo 3, imagem 2 %32 Samsung Galaxy J3 Eclipse Display Assembly Replacement: passo 3, imagem 3 %32
    • Gently lift lower side and loosen all edges to hinge screen up from bottom.

    • Do not try to completely remove the display from the frame yet. Simply try to loosen up all the edges.

  4. Samsung Galaxy J3 Eclipse Display Assembly Replacement: passo 4, imagem 1 %32 Samsung Galaxy J3 Eclipse Display Assembly Replacement: passo 4, imagem 2 %32 Samsung Galaxy J3 Eclipse Display Assembly Replacement: passo 4, imagem 3 %32
    • Use your prying tool to slowly pry up on the bottom right corner of the white cable guard, exposing a thin ribbon cable connector.

  5. Samsung Galaxy J3 Eclipse Display Assembly Replacement: passo 5, imagem 1 %32 Samsung Galaxy J3 Eclipse Display Assembly Replacement: passo 5, imagem 2 %32 Samsung Galaxy J3 Eclipse Display Assembly Replacement: passo 5, imagem 3 %32
    • Pry up the ribbon cable connector revealed from under the cable guard and remove the display from the device.

    • Clean the residue from the phone edges before re-assembling phone with new screen.

Conclusão

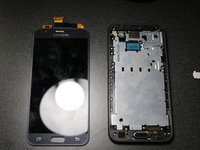
To reassemble your device, connect all cables, apply fresh screen adhesive and follow these instructions in reverse order.

12 outras pessoas executaram este guia.

0 comentários

Adicione um comentário

Exibir estatísticas:

Últimas 24 horas: 0

Últimos 7 dias: 3

Últimos 30 dias: 13

Duração total: 3,804