Esta versão pode conter edições incorretas. Mude para o último instantâneo verificado.
O que você precisa
-
Este passo não foi traduzido. Ajude a traduzi-lo
-
Press button on back of phone below camera.
-
While button is depressed, remove the back panel of the phone by it sliding off (not shown in picture).
-
-
Este passo não foi traduzido. Ajude a traduzi-lo
-
Grasp the bottom corners of the battery with two fingers and gently lift.
-
-
Este passo não foi traduzido. Ajude a traduzi-lo
-
Using an iPod opening tool, remove the screw cover in the top left corner by lifting it up.
-
-
Este passo não foi traduzido. Ajude a traduzi-lo
-
Use a Phillips #00 screwdriver to remove the six screws on the back of the phone. Three are evenly spaced on each side.
-
-
Este passo não foi traduzido. Ajude a traduzi-lo
-
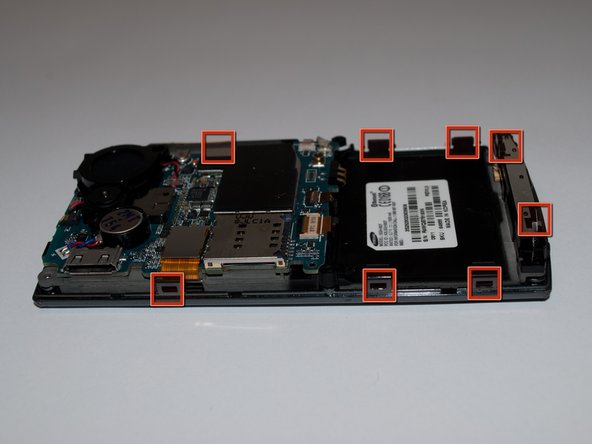
Slide the iPod opening tool into the seam on the side of the phone and turn it slightly to unhook the eight clips.
-
-
Este passo não foi traduzido. Ajude a traduzi-lo
-
Once all eight of the clips have been unhooked, lift the back panel off of the phone.
-
-
Este passo não foi traduzido. Ajude a traduzi-lo
-
Remove the circular battery from the plastic holder by inserting a 1 mm flat head screwdriver under the battery where the red and blue wires connect and lifting gently.
-
-
Este passo não foi traduzido. Ajude a traduzi-lo
-
Using a Phillips #00 screwdriver, unscrew the two 3.5mm screws that connect the speaker to the motherboard.
-
-
Este passo não foi traduzido. Ajude a traduzi-lo
-
With the iPod opening tool, unclip the red and black wires connecting the speaker to the motherboard.
-
Lift the speaker off of the motherboard.
-


Cancelar: não concluí este guia.
Uma outra pessoa concluiu este guia.
Equipe

Cal Poly, Team 15-15, Regan Spring 2011 Membro de Cal Poly, Team 15-15, Regan Spring 2011
CPSU-REGAN-S11S15G15
Membros da 5
Autoria de 5 guias