Ir para o conteúdo principal

Samsung Chromebook 4 Plus XE350XBA-K05US Device Screen Replacement

O que você precisa

  1. Samsung Chromebook 4 Plus XE350XBA-K05US Device Screen Replacement, Battery: passo 1, imagem 1 %32 Samsung Chromebook 4 Plus XE350XBA-K05US Device Screen Replacement, Battery: passo 1, imagem 2 %32 Samsung Chromebook 4 Plus XE350XBA-K05US Device Screen Replacement, Battery: passo 1, imagem 3 %32
    • Hold down the power button until the device powers off

    • Close the device and flip it over

    • Remove the four rubber sockets near the corners of the device

    • Then remove the four 4.6 mm Phillips #00 screws

  2. Samsung Chromebook 4 Plus XE350XBA-K05US Device Screen Replacement: passo 2, imagem 1 %32 Samsung Chromebook 4 Plus XE350XBA-K05US Device Screen Replacement: passo 2, imagem 2 %32
    • Use the metal spudger to pop the back off. Near the hinges is typically an easier place to start.

    • Continue along the edges until the back is completely detached.

  3. Samsung Chromebook 4 Plus XE350XBA-K05US Device Screen Replacement: passo 3, imagem 1 %32 Samsung Chromebook 4 Plus XE350XBA-K05US Device Screen Replacement: passo 3, imagem 2 %32
    • Locate the long grey box with the black band, which is labeled "Laptop Battery."

    • Remove the gray piece labeled "bracket battery BA61 - 03983A" located over the golden band connecting the battery and motherboard by unscrewing the two 4 mm Phillips #00 screws

  4. Samsung Chromebook 4 Plus XE350XBA-K05US Device Screen Replacement: passo 4, imagem 1 %32
    • Unplug the golden band coming from the battery to the motherboard.

    • Using the Philips #000 remove the four 4mm screws holding the battery in place.

  5. Samsung Chromebook 4 Plus XE350XBA-K05US Device Screen Replacement, Screen: passo 5, imagem 1 %32 Samsung Chromebook 4 Plus XE350XBA-K05US Device Screen Replacement, Screen: passo 5, imagem 2 %32
    • Face hinge side towards you

    • Unscrew three 4.55mm Philips #000 screws (pointed by the arrow heads) from the each of left and right hinges

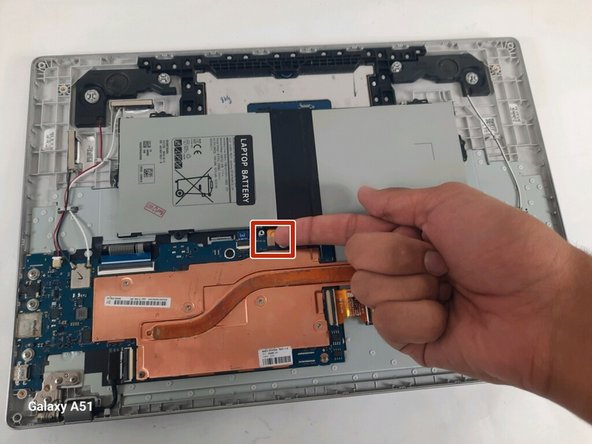
    • Pull out the black film connected to the motherboard in the white slot

  6. Samsung Chromebook 4 Plus XE350XBA-K05US Device Screen Replacement: passo 6, imagem 1 %32 Samsung Chromebook 4 Plus XE350XBA-K05US Device Screen Replacement: passo 6, imagem 2 %32
    • Open up chromebook hold onto the hinges as you open to make it easier

    • Separate the keyboard and screen and put the keyboard off to the side

    • Use the ifixit opening tool to pop the outer edge of the scree up

  7. Samsung Chromebook 4 Plus XE350XBA-K05US Device Screen Replacement: passo 7, imagem 1 %32 Samsung Chromebook 4 Plus XE350XBA-K05US Device Screen Replacement: passo 7, imagem 2 %32
    • Remove the four 3mm Phillips #000 screws

    • Lift the screen up slowly

    • Find the black wire on the back and lift the metal clamp

    • Pull the black film to remove the wire

Conclusão

To reassemble your device, follow these instructions in reverse order.

Uma outra pessoa concluiu este guia.

0 comentários

Adicione um comentário

Exibir estatísticas:

Últimas 24 horas: 0

Últimos 7 dias: 4

Últimos 30 dias: 17

Duração total: 117