Ir para o conteúdo principal

Samsung A3 2016 Model - A310F Display / LCD Replacement

O que você precisa

  1. Samsung A3 2016 Model - A310F Display / LCD Replacement, Display / LCD: passo 1, imagem 1 %32
    • Remove the SIM tray from the phone.

  2. Samsung A3 2016 Model - A310F Display / LCD Replacement, Removing the battery cover: passo 2, imagem 1 %32
    • Use a heat gun or iOpener to heat the back of the phone.

    • Insert a spudger or thin bladed tool between the batery cover and frame.

    • Slide all the way around to release the adhesive holding the cover.

    • The battery cover is also glass and can break if too much pressure is applied when removeing.

  3. Samsung A3 2016 Model - A310F Display / LCD Replacement: passo 3, imagem 1 %32 Samsung A3 2016 Model - A310F Display / LCD Replacement: passo 3, imagem 2 %32
    • Remove all 16 screws from the housing

  4. Samsung A3 2016 Model - A310F Display / LCD Replacement: passo 4, imagem 1 %32
    • Hold the edge of the housing and push on the battery to release the display and mainboard from the housing.

    • You may need to go around the edge of the glass with a pick to remove any remaining adhesive

  5. Samsung A3 2016 Model - A310F Display / LCD Replacement: passo 5, imagem 1 %32
    • Remove the Philips screw securing the mainboard.

    • Remove the cable attached to the mainboard

    • Disconnect the display and camera connectors from the mainboard

  6. Samsung A3 2016 Model - A310F Display / LCD Replacement: passo 6, imagem 1 %32 Samsung A3 2016 Model - A310F Display / LCD Replacement: passo 6, imagem 2 %32
    • Disconnect the daughter board from the mainboard

  7. Samsung A3 2016 Model - A310F Display / LCD Replacement: passo 7, imagem 1 %32
    • Using a heatgun, heat the front of the display.

    • Use a spudger or pick to work the display and LCD free from the plastic housing. NOTE: The LCD is also glued to the frame and will probably break as well.

    • When mounting the new display, the display cable slots through a gap in the plastic frame and attaches to the mainboard.

  8. Samsung A3 2016 Model - A310F Display / LCD Replacement: passo 8, imagem 1 %32 Samsung A3 2016 Model - A310F Display / LCD Replacement: passo 8, imagem 2 %32 Samsung A3 2016 Model - A310F Display / LCD Replacement: passo 8, imagem 3 %32
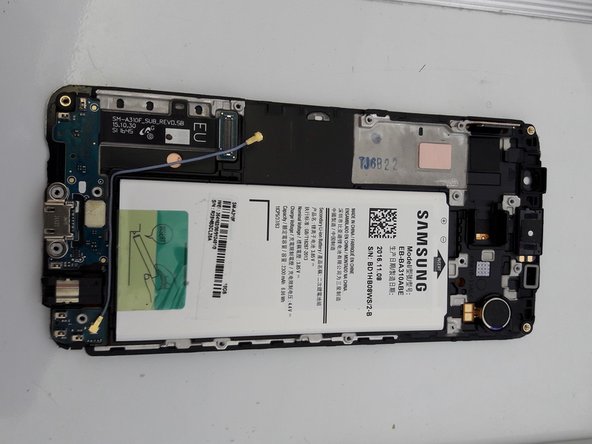
    • Reattach the daughter board connector to the mainboard.

    • When re-inserting the mainboard, use a plastic spudger to push the battery pins in so the mainboard sits properly in the frame and the pins make a good contact with the battery.

    • Re-connect the display connector, camera and cable to the mainboard.

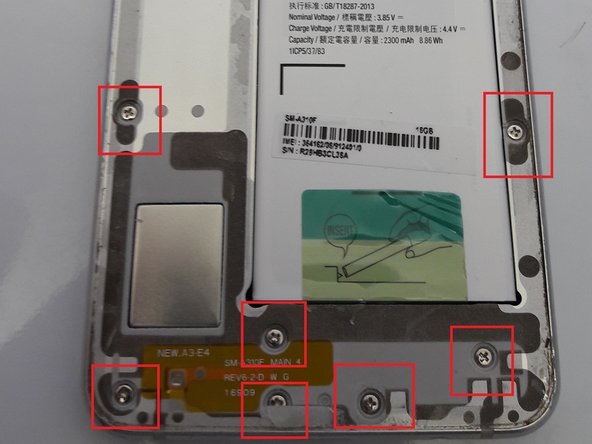
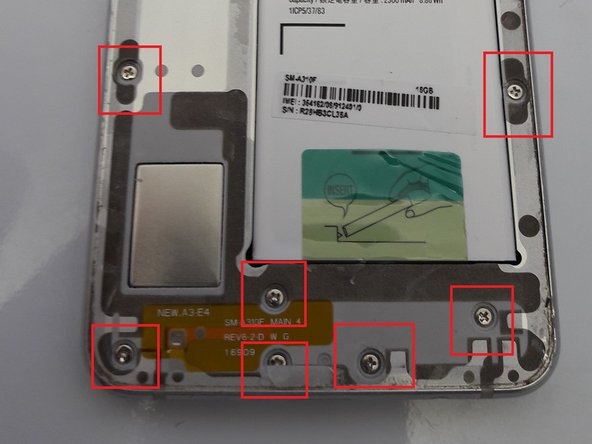
    • Screw the mainboard to the frame

  9. Samsung A3 2016 Model - A310F Display / LCD Replacement: passo 9, imagem 1 %32
    • Turn the phone on and test the display before removing the adhesive on the back of the display.

    • If everything works, remove the adhesive and attach the display to the plastic frame.

    • Push the display into the metal housing so it fits snugly.

  10. Samsung A3 2016 Model - A310F Display / LCD Replacement: passo 10, imagem 1 %32 Samsung A3 2016 Model - A310F Display / LCD Replacement: passo 10, imagem 2 %32
    • Replace the 16 screws that were removed in step 3.

    • Replace the battery cover and you are done.

Conclusão

To reassemble your device, follow these instructions in reverse order.

5 outras pessoas executaram este guia.

Harvey

Membro desde: 02/15/16

5.235 Reputação

Autoria de 10 guias

0 comentários

Adicione um comentário

Exibir estatísticas:

Últimas 24 horas: 1

Últimos 7 dias: 8

Últimos 30 dias: 24

Duração total: 3,537