Introdução
Saitek X52 Pro is a great Flight System Controller, however it is not without flaws.
For me as well as for some other users, the shooting trigger sometimes stops working. This doesn't mean you have to throw it away, instead with a little bit of patience, you can fix it yourself.
O que você precisa
-
-
Patience :)
-
You need 2 small screw drives with a Phillips (cross) PH1 head and Torx (star) T10 head.
-
A list of screw drive heads can be hound here http://en.wikipedia.org/wiki/List_of_scr...
-
-
-
With the Phillips screwdrive unscrew the #1 to #4 screws in Fig. 1.
-
Using the Torx T10 head, unscrew the #5 (Fig. 1), #6, #7 and #8 screws (Fig. 2)
-
Using your hand, unscrew #9 (Fig. 2). Please note that you cannot completely remove this screw, but you don't need to do this anyway.
-
-
-
-
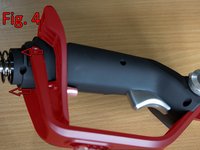
Carefully remove the plastic bracket and the support holding the "Pinkie trigger" by pushing it towards the trigger (Fig. 4).
-
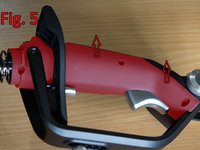
Remove the stick cover that will expose the contacts and wiring (Fig. 5)
-
-
-
Note the small metal plate.
-
Bend it just a little from the middle so that pushing the trigger actually pushes the small blue switch inside the stick.
-
Test the trigger before putting back the plastic cover
-


To reassemble your device, follow these instructions in reverse order.
To reassemble your device, follow these instructions in reverse order.
Cancelar: não concluí este guia.
22 outras pessoas executaram este guia.

25 comentários
Amazing this is what I was exactly looking for!! My trigger stopped work but only heard a single click. Once i opened it up one of the contacts was stuck down. A little adjustment and once again it was working. Getting the hand guard off was very tricky. I did damage the cable guide thing for the pinky switch but it still works. Thank you soo much!!!
Fixed it!! Thank you so much for this guide! I ended up over bending it and then tried to straighten it out again and then it shot off somewhere, but luckily the piece fits back in and then i tweaked it until it worked! -Nate
This helped a great deal! The Thumb POV had a screw that dropped out and prevented it from going left. By using this I found out why it wasn't working by disassembling it and solved my problem. Thanks!