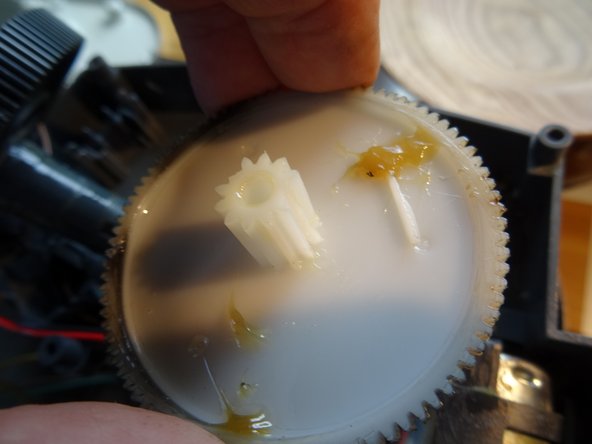
Ir para o conteúdo principal

Saeco Royal Cogwheel replacement

O que você precisa

  1. Saeco Royal Cogwheel replacement, Preparing: passo 1, imagem 1 %32
    • Unplug!

    • Remove all attachments like water tank, brewing unit etc.

    • The pictures show a Royal Cappucino One Touch HD8930, but the opening procedure is similar to all models.

  2. Saeco Royal Cogwheel replacement, Top: passo 2, imagem 1 %32 Saeco Royal Cogwheel replacement, Top: passo 2, imagem 2 %32
    • The coffeebean supply is fixed with two screws. Unscrew them and lift it off.

    • There is a black rubber lid under the bean hopper that you can easily lift off, leaving a large opening.

    • The adjuster of the grinder has to be solved. Mark the position or just take a picture. This type is fixed with a screw, others are only sticked together.

  3. Saeco Royal Cogwheel replacement, Rear side: passo 3, imagem 1 %32
    • There are two screws to be turned out.

  4. Saeco Royal Cogwheel replacement, Front: passo 4, imagem 1 %32 Saeco Royal Cogwheel replacement, Front: passo 4, imagem 2 %32 Saeco Royal Cogwheel replacement, Front: passo 4, imagem 3 %32
    • The screws are situated on the underneath of the cover. This type is held by four screws.

  5. Saeco Royal Cogwheel replacement, Lift cover off: passo 5, imagem 1 %32 Saeco Royal Cogwheel replacement, Lift cover off: passo 5, imagem 2 %32
    • Now the cover can be raised: first grip on left and right rear side and lift about 10 cm (4 in). Sometimes the cover jams a little bit.

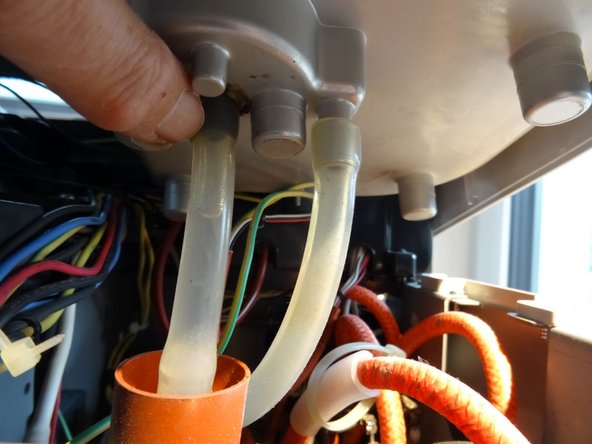
    • Solve the hoses which lead to the water tank. Perhaps you have to pull out some contacts, (e.g. the yellow-green protection lead), don´t forget to put them on again later.

    • The cover can be drawn aslant towards the front, sliding it over the hot water pipe.

    • Most repairs can be done with the cover being laid up partially , it must not be completely removed.

  6. Saeco Royal Cogwheel replacement, Remove thermoblock: passo 6, imagem 1 %32
    • This is what the removed thermoblock looks like. This one was 14 years old and leaking in various places.

  7. Saeco Royal Cogwheel replacement: passo 7, imagem 1 %32 Saeco Royal Cogwheel replacement: passo 7, imagem 2 %32
    • A look into the open device. The thermoblock is hidden under a pile of cables and tubes.

  8. Saeco Royal Cogwheel replacement: passo 8, imagem 1 %32
    • It's safer to number the cable connectors on the electronics. You probably just need to disconnect the slightly hidden # 14 connector on the two green cables at the very bottom and # 7 on the blue cable on the top.

  9. Saeco Royal Cogwheel replacement: passo 9, imagem 1 %32
    • The thermoblock is attached to the wall behind the brew group with only two Phillips screws.

    • Remove the two Phillips screws circled in red.

  10. Saeco Royal Cogwheel replacement: passo 10, imagem 1 %32
    • Take out the thermoblock and place it on the machine.

    • Hold on! The thermoblock is still connected to the machine by many cables and hoses. Don't attempt to completely remove it just yet!

  11. Saeco Royal Cogwheel replacement: passo 11, imagem 1 %32 Saeco Royal Cogwheel replacement: passo 11, imagem 2 %32
    • Pull the clamp on the hose to the steam valve off.

    • Pull the hose circled in orange out.

    • There are two seals at the end of the hose that stick to the hose. Exchange them during re-assembly.

  12. Saeco Royal Cogwheel replacement: passo 12, imagem 1 %32
    • Remove the metal holder of the thermal fuse.

    • My thermal fuse holder is heavily rusted, this may or may not be the case for you.

  13. Saeco Royal Cogwheel replacement: passo 13, imagem 1 %32
    • Pull first the clamp, and then the second pressure hose out of the thermoblock.

    • There are two seals at the end of the hose. They stay stuck either at the end of the hose or afterwards, so don't try to remove them. Exchange them during re-assembly.

  14. Saeco Royal Cogwheel replacement: passo 14, imagem 1 %32 Saeco Royal Cogwheel replacement: passo 14, imagem 2 %32
    • Disconnect the connector with the two gray cables from the thermal switch.

  15. Saeco Royal Cogwheel replacement: passo 15, imagem 1 %32
    • The blue cable from the thermoblock leads to the connector on the electronics, which is marked with 7 here. This particular plug stuck a lot, so force was required to pull it out.

  16. Saeco Royal Cogwheel replacement: passo 16, imagem 1 %32 Saeco Royal Cogwheel replacement: passo 16, imagem 2 %32 Saeco Royal Cogwheel replacement: passo 16, imagem 3 %32
    • The Allen screw, which holds the holder of the two thermocouples, was not easy to open...

    • This can also be a Phillips screw. It may vary which appears for you.

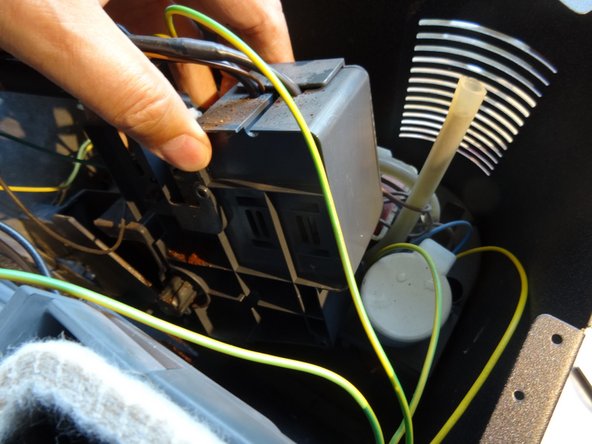
    • Therefore, the plug on the electronics with the two green cables was pulled out. The plug has the mark 14 and is at the very bottom of the electronics.

    • Disconnect the plug with the yellow-green grounding wire from the support valve.

  17. Saeco Royal Cogwheel replacement: passo 17, imagem 1 %32
    • Thread the green and blue cables out.

    • The thermoblock is free. Lift it out of the machine.

    • To replace the thermoblock, the attached components must be removed from the old block and transferred to the new part.

  18. Saeco Royal Cogwheel replacement, Cogwheel in the gearbox: passo 18, imagem 1 %32
    • The brewing group is likely stuck in the machine, this is because the inlet nozzle gets stuck in the support valve.

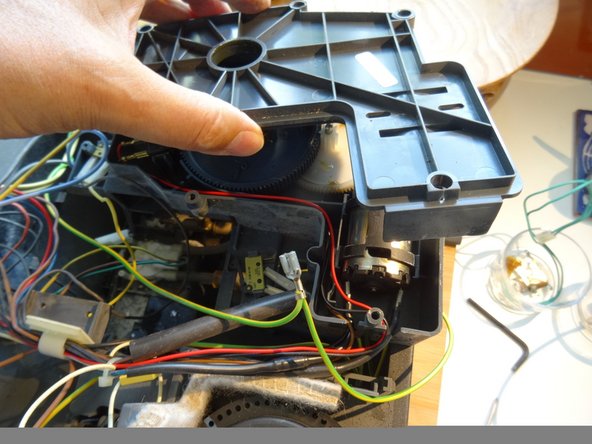
    • In order to remove the brewing group, you first have to unscrew the Phillips screw with which the inlet nozzle is fastened.

    • Then, you can take the brew group out with a lot of force. At the same time, the inlet nozzle loosens and gets stuck in the support valve, which there it can be easily removed.

  19. Saeco Royal Cogwheel replacement: passo 19, imagem 1 %32 Saeco Royal Cogwheel replacement: passo 19, imagem 2 %32 Saeco Royal Cogwheel replacement: passo 19, imagem 3 %32
    • The gearbox is attached to the center wall with five Phillips screws. Remove them.

    • Take out the gearbox and set it down on the machine.

    • All cables can remain connected to the gearbox during repair.

  20. Saeco Royal Cogwheel replacement: passo 20, imagem 1 %32 Saeco Royal Cogwheel replacement: passo 20, imagem 2 %32
    • Remove the five Phillips screws securing the gear cover.

    • Lift off the gearbox cover.

  21. Saeco Royal Cogwheel replacement: passo 21, imagem 1 %32 Saeco Royal Cogwheel replacement: passo 21, imagem 2 %32 Saeco Royal Cogwheel replacement: passo 21, imagem 3 %32
    • The white gear has lost a few teeth.

    • Lift up the gray gear, you can then remove the white gear.

  22. Saeco Royal Cogwheel replacement: passo 22, imagem 1 %32 Saeco Royal Cogwheel replacement: passo 22, imagem 2 %32
    • When installing, insert the gray gear so that the zero mark points to the axis of the white gear.

    • Apply suitable grease to the gears before assembly.

  23. Saeco Royal Cogwheel replacement: passo 23, imagem 1 %32
    • The machine can only function when three microswitches are switched on: one at the front of the middle wall, which is switched by the pomace drawer, one at the top of the middle wall, which is switched by the brewing group and one at the top right outside, which is switched from the side door (in the picture not shown).

    • The brew group is unlikely to be used properly because the drive shaft is not yet in the correct position. The machine does it by itself, but the microswitches have to be tricked into it: insert small cardboard strips until the switches click.

    • Engage the machine without brew group and the engine should go to it's home position. Now you can remove the cardboard strips and insert the brewing group.

Conclusão

To re-assembly your device, follow the steps above in reverse order.

2 outras pessoas executaram este guia.

Um agradecimento especial a esses tradutores:

de en

100%

Estes tradutores estão nos ajudando a consertar o mundo! Quer contribuir?
Comece a traduzir ›

VauWeh

Membro desde: 10/19/15

201.618 Reputação

Autoria de 246 guias

Equipe

Repair is War on Entropy Membro de Repair is War on Entropy

Community

Membros da 24

Autoria de 1.097 guias

0 comentários

Adicione um comentário

Exibir estatísticas:

Últimas 24 horas: 3

Últimos 7 dias: 10

Últimos 30 dias: 51

Duração total: 5,822