Ir para o conteúdo principal

Este guia tem alterações mais recentes. Mudar para a última versão não verificada.

Rug Doctor Handle Replacement

Pré-requisito somente
Este guia destina-se apenas a ser usado como pré-requisito para outros guias. É incompleto por si só.

O que você precisa

  1. Rug Doctor Handle Replacement, Handle: passo 1, imagem 1 %32
    • Before you begin disassembly, make sure that the Rug Doctor is not plugged in and that all reservoirs are empty of liquids.

    • Unclip the clear hose from the back of the Rug Doctor.

  2. Rug Doctor Handle Replacement: passo 2, imagem 1 %32 Rug Doctor Handle Replacement: passo 2, imagem 2 %32
    • Use a 7/16" (11 mm OK) wrench to hold the handle axle while you use a 7/16" socket to remove the cap nut securing the axle end.

  3. Rug Doctor Handle Replacement: passo 3, imagem 1 %32 Rug Doctor Handle Replacement: passo 3, imagem 2 %32
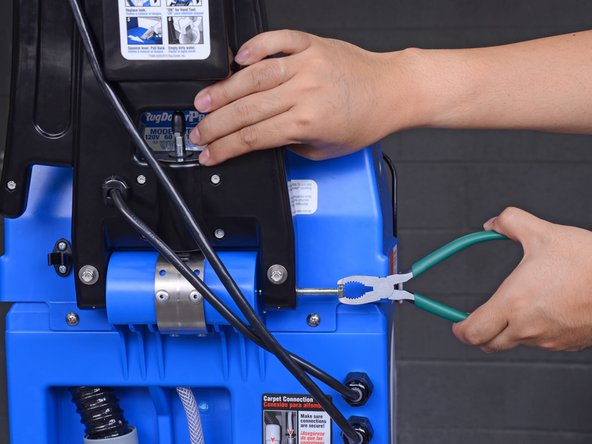
    • Support the handle with one hand. It will be loose after this step.

    • Use fingers or pliers to pull out the handle axle.

    • If the axle feels hard to pull out, squeeze the handle release lever to release pressure on the axle.

  4. Rug Doctor Handle Replacement: passo 4, imagem 1 %32
    • Detach the handle from the Rug Doctor and set it down.

    • If you need more cable slack, you can set the Rug Doctor on its side.

Conclusão

To reassemble your device, follow these instructions in reverse order.

Arthur Shi

Membro desde: 01/03/18

252.729 Reputação

Autoria de 526 guias

Equipe

iFixit Membro de iFixit

Staff

Membros da 135

Autoria de 16.817 guias

0 comentários

Adicione um comentário

Exibir estatísticas:

Últimas 24 horas: 0

Últimos 7 dias: 0

Últimos 30 dias: 0

Duração total: 28