Ir para o conteúdo principal

Rocketfish RF-WHTIB-A Sender Wireless Audio Module Chip Replacement

O que você precisa

  1. Rocketfish RF-WHTIB-A Sender Wireless Audio Module Chip Replacement, How to Open the Rocketfish RF-WHTIB-A Sender: passo 1, imagem 1 %32
    • Remove the four rubber tabs from the bottom of the sender.

    • Pull hard to peel off the rubber tabs, as they are attached with adhesive.

  2. Rocketfish RF-WHTIB-A Sender Wireless Audio Module Chip Replacement: passo 2, imagem 1 %32
    • Use a Phillips #1 screwdriver to unscrew the four 12 mm screws on the bottom of the device.

  3. Rocketfish RF-WHTIB-A Sender Wireless Audio Module Chip Replacement: passo 3, imagem 1 %32 Rocketfish RF-WHTIB-A Sender Wireless Audio Module Chip Replacement: passo 3, imagem 2 %32
    • Flip the device over and remove the top casing from the sender.

  4. Rocketfish RF-WHTIB-A Sender Wireless Audio Module Chip Replacement, Sender Wireless Audio Module Chip: passo 4, imagem 1 %32
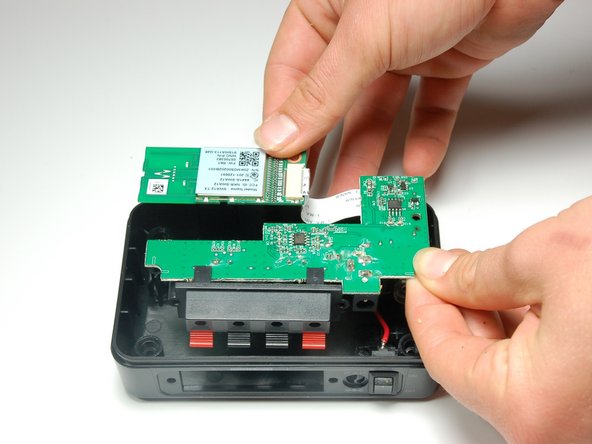
    • Use a Phillips #1 screwdriver to unscrew the 10 mm screw, securing the wireless audio module chip.

  5. Rocketfish RF-WHTIB-A Sender Wireless Audio Module Chip Replacement: passo 5, imagem 1 %32
    • Use a Phillips #1 screwdriver to unscrew the 10 mm screw, securing the motherboard.

  6. Rocketfish RF-WHTIB-A Sender Wireless Audio Module Chip Replacement: passo 6, imagem 1 %32
    • Use a Phillips #1 screwdriver to unscrew the two 10 mm screws located on either side of the speakers.

    • Secure the front speaker input terminal to release the motherboard.

  7. Rocketfish RF-WHTIB-A Sender Wireless Audio Module Chip Replacement: passo 7, imagem 1 %32 Rocketfish RF-WHTIB-A Sender Wireless Audio Module Chip Replacement: passo 7, imagem 2 %32
    • Using both thumbs, push the front speaker input terminal back towards the inside part of the device.

  8. Rocketfish RF-WHTIB-A Sender Wireless Audio Module Chip Replacement: passo 8, imagem 1 %32
    • Flip over the motherboard and wireless audio module chip.

  9. Rocketfish RF-WHTIB-A Sender Wireless Audio Module Chip Replacement: passo 9, imagem 1 %32
    • Gently slide the black retaining flap back, securing the ribbon wire gently away from the white bar.

    • There should only be a small separation between the white bar and the black retaining flap.

    • Tweezers are recommended for this step.

  10. Rocketfish RF-WHTIB-A Sender Wireless Audio Module Chip Replacement: passo 10, imagem 1 %32
    • Using your fingers, pull the ribbon wire out from the black retaining flap in order to completely disconnect the wireless audio module chip.

Conclusão

To install the new wireless module chip, follow these instructions in reverse order.

Once the sender has been put back together, plug in the device and initiate the connection mode between the sender and receiver to ensure the new wireless module chip has been properly assembled.

Equipe

Baylor, Team 4-2, Williams Spring 2015 Membro de Baylor, Team 4-2, Williams Spring 2015

BU-WILLIAMS-S15S4G2

Membros da 3

Autoria de 6 guias

2 comentários

Does Rocketfish offer a replacement board?

Bob David - Responder

“No Parts Required” is a joke . Where are the replacement boards available from?

Petie Martin - Responder

Adicione um comentário

Exibir estatísticas:

Últimas 24 horas: 0

Últimos 7 dias: 5

Últimos 30 dias: 10

Duração total: 1,390