O que você precisa
-
-
Flip over the right controller and locate the four screws.
-
Remove the four PH0 screws.
-
-
-
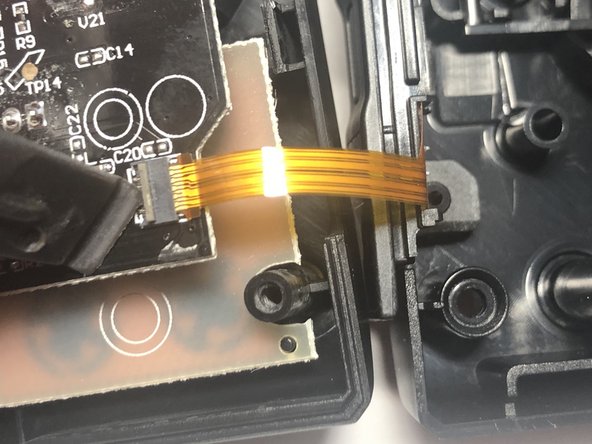
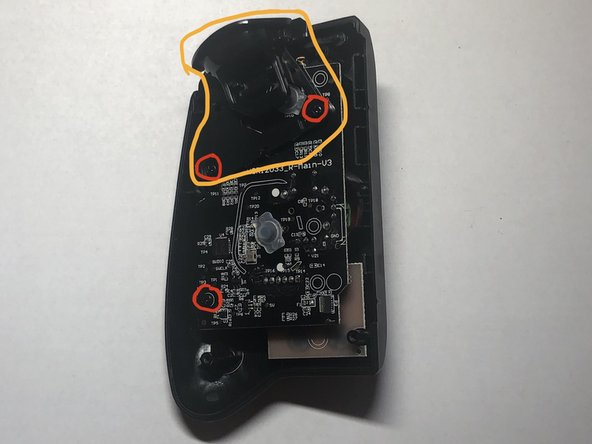
Lift the back half slightly off the front half and fold it open along the right edge.
-
The ribbon cable is circled in the image.
-
-
-
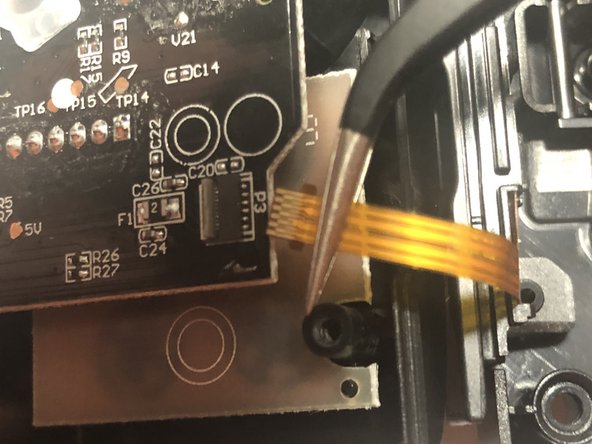
Use a plastic spudger to flip the ribbon cable latch up as shown in the first two images.
-
Remove the ribbon cable from the slot by pulling to the right with tweezers or fingers gently.
-
-
-
-
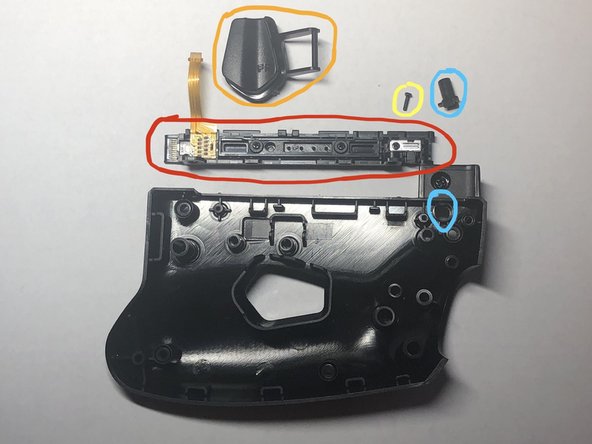
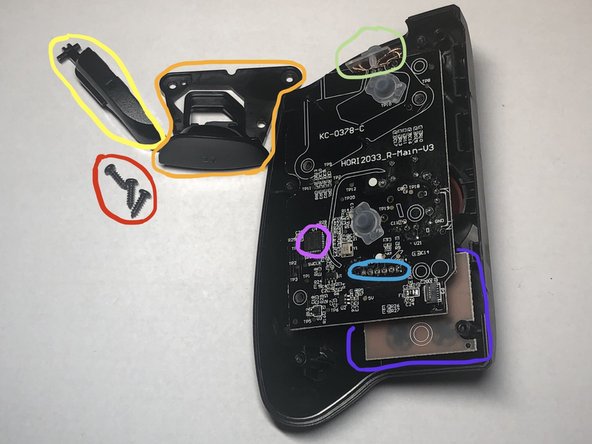
Remove one PH00 screw that is securing the rail to the back half.
-
The FR button can be removed by placing a lever/spudger under the circled area.
-
The rail connector can be removed once the yellow circled screw is removed.
-
The button that releases the buckle lock can be removed after the rail and goes in the hole circled on the back half of the controller.
-
The one remaining screw (not marked) does not need to be removed as it only secures a bit of plastic.
-
-
-
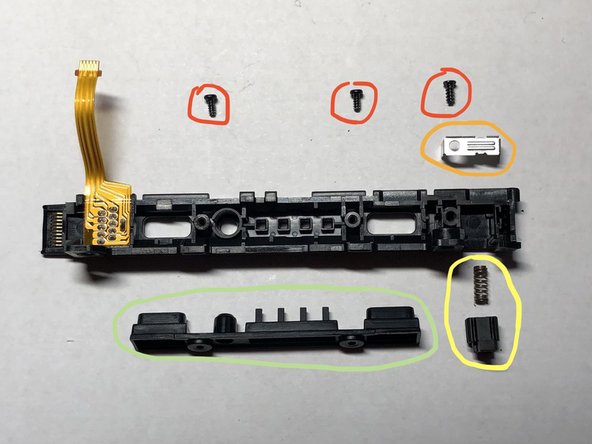
Remove the three PH00 screws.
-
Pry out the metal cover over the buckle lock. Be gentle so as not to bend the metal.
-
The spring loaded buckle lock can then be removed. NOTE: Do not loose the spring when disassembling. Reassembly can be tricky because the spring needs to be compressed to get back in place.
-
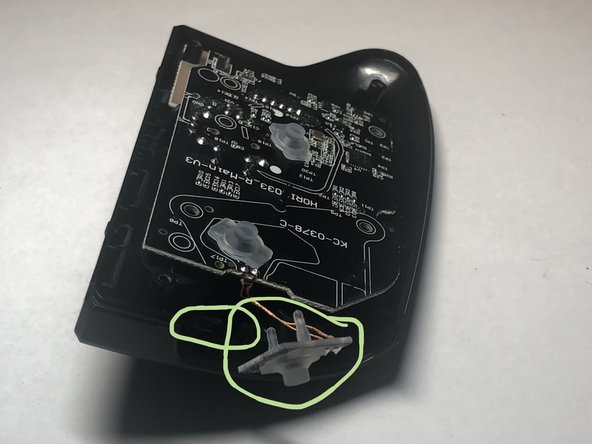
The plastic cover over the holes in the middle of the rail can be removed. This is where the SL, SR, and connect buttons would be on a normal Joy Con controller and also the lights indicating which controller number it is.
-
-
-
The ZR button can be removed once the red circled screws are removed.
-
The R button is underneath the ZR button and is easily removed once the ZR button is out of the way. There is a small hole that one end of the R button fits into.
-
Remove three PH0 screws, two that hold the ZR button plastics and one on the top main board.
-
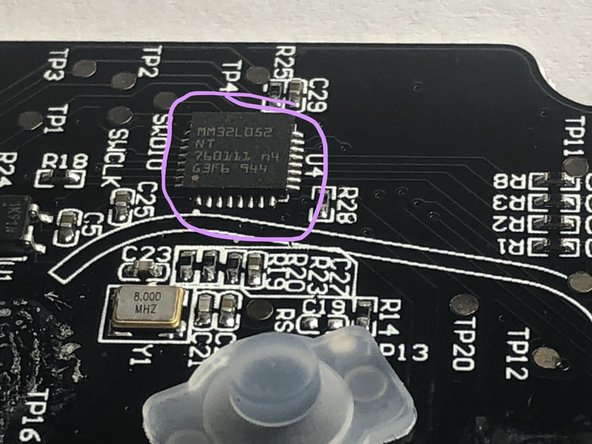
The processor for the controller can be seen on the top main board. See the details in Step 9??
-
The connector between the top and bottom boards is shown here.
-
The bottom board on the right controller is small and only picks up the bottom three buttons which using a small 6 pin connector.
-
Warning: Do not try to remove the top main board before you remove this small button board in the next step.
-
-
-
The small R button board is slid into a slot and has delicate wires that connect it to the top main board.
-
Clasp on both sides of the small R button board with your fingers and wiggle it out.
-
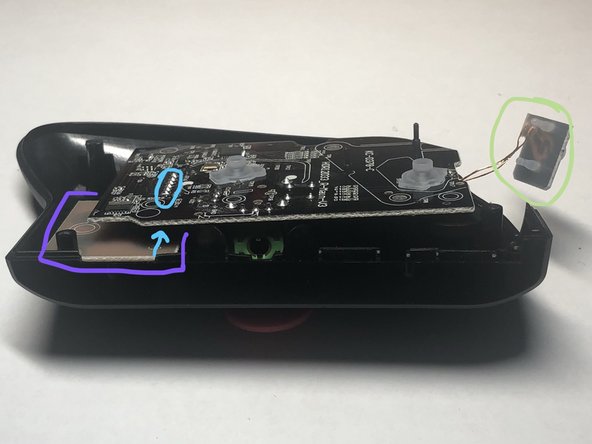
The top main board is connected to the bottom board with a connector.
-
The bottom board is small and underneath the top main board.
-
-
-
Pull straight up on the top main board and the two boards will disconnect. The connection between them is circled in light-blue. Notice the joystick controller is on the top main board.
-
The bottom board is still secured with one screw.
-
Remove one PH0 screw.
-
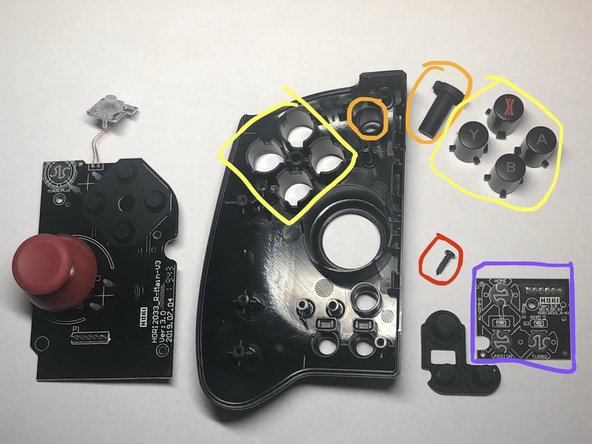
Remove the plus (+) button.
-
Remove the X, A, B, & Y buttons.
-
The bottom board can be removed as well as the last rubberized bottom three buttons.
-
Notice that this top main board has the same processor as the main motherboard of the left controller. It is MM32L052NT which is a ARM Cortex(TM) M0.
-


To reassemble your device, follow these instructions in reverse order.
To reassemble your device, follow these instructions in reverse order.
Cancelar: não concluí este guia.
4 outras pessoas executaram este guia.
12 comentários
Hey there, thanks for having this guide made. I had an issue with the locking button not pushing in and Hori took 3 months to do nothing so I decided to see if I could fix it myself but because this guide was made I didn’t need to go in blind. Now it’s working and I can lock the controller into my Switch properly! Thanks again!
So very glad that it could help you out. I’m just a normal user of iFixit; anyone can contribute. Find where there is a lack of guides and add one. Do your part for the right to repair!
What is the best method to reattach the ribbon cable in step 3 during reassembly?
Lay the two halves next to each other, lift the locking bar on the board-side connector, use tweezers to hold the cable (like in pic 3 of Step 3), insert the end of the cable into into the board-side connecter (make sure to insert it all of the way), then lower the locking bar.
Bonjour est-ce que quelqu'un serait quel module de joystick est utilisé je dois remplacer le mien car il a du drift merci
Sorry, but I didn't get the joystick model number or anything when I tore it down. I hope someone else can help you out. However, if you look at the back of the board, the layout of the pins is similar to older xbox controller joysticks.
How do I take off the joystick?
The joystick is soldered to boards inside the controllers using thru-hole leads. You would want to de/un-solder the existing joystick using a de-soldering gun or soldering iron with a solder sucker or desoldering wick/braid. There are various techniques for de/un-soldering large thru-hole components. All are painful processes. Please do your research.
I replaced my right pad’s joystick with a pro controller joystick replacement. Works flawlessly. BUT I noticed my assign button no longer works. But turbo does. Do you think you know where I went wrong putting it back together?
In Step 8 picture 1, you see the light-blue connector to the button board with the assign/turbo buttons. I would carefully inspect the rubber buttons, the boards, the connectors on both boards, and all of the traces on the boards around that area to make sure that nothing was damaged during your successful joystick replacement. It could be something simple like a knocked of component, damaged trace, cracked/cold solder on one of the connectors, or a number of other possibilities. Your best bet is to find the traces that go to the assign button and trace them back to the processor chip. Try doing some continuity tests using an electronic multi meter.
Hello, I have bought a second hand split pad pro and the right side keep connecting/disconnecting when railed in the switch.
Bending slightly the pad toward me re establish the connection. It looks like the rail mechanism ha some kind of faulty contacts. What should I replace in order to fix it? Thanks a lot.
Hi do you know of anywhere I can buy a the button that actually releases the controller somehow that has broken