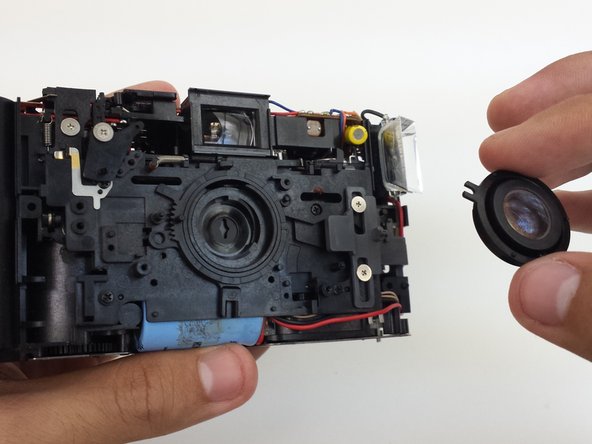
Ir para o conteúdo principal

Ricoh YF-20 Super Lens Replacement

O que você precisa

  1. Ricoh YF-20 Super Lens Replacement, Front Cover: passo 1, imagem 1 %32 Ricoh YF-20 Super Lens Replacement, Front Cover: passo 1, imagem 2 %32
    • Use the screwdriver to unscrew the indicated screws from the left, right, bottom, and back sides of the camera.

  2. Ricoh YF-20 Super Lens Replacement: passo 2, imagem 1 %32 Ricoh YF-20 Super Lens Replacement: passo 2, imagem 2 %32 Ricoh YF-20 Super Lens Replacement: passo 2, imagem 3 %32
    • Loosen the back cover from both the left and the right sides of the camera. Take off the back cover.

    • The lid of the battery compartment may fall off because it is not attached to anything.

  3. Ricoh YF-20 Super Lens Replacement: passo 3, imagem 1 %32 Ricoh YF-20 Super Lens Replacement: passo 3, imagem 2 %32 Ricoh YF-20 Super Lens Replacement: passo 3, imagem 3 %32
    • Open the film compartment.

    • Press your finger on top of the grey latch on the left side of the camera.

  4. Ricoh YF-20 Super Lens Replacement: passo 4, imagem 1 %32 Ricoh YF-20 Super Lens Replacement: passo 4, imagem 2 %32 Ricoh YF-20 Super Lens Replacement: passo 4, imagem 3 %32
    • Removing the film compartment door is optional. However, it may aid maneuverability in future steps.

    • Use a thin object like a toothpick or a small screwdriver to push down on the metal pin holding the film compartment door in place.

    • Use your fingers to completely remove the metal pin.

    • Remove the film compartment door.

  5. Ricoh YF-20 Super Lens Replacement: passo 5, imagem 1 %32 Ricoh YF-20 Super Lens Replacement: passo 5, imagem 2 %32
    • Use a thin shaft screwdriver and unscrew the two indicated screws within the film compartment.

  6. Ricoh YF-20 Super Lens Replacement: passo 6, imagem 1 %32 Ricoh YF-20 Super Lens Replacement: passo 6, imagem 2 %32 Ricoh YF-20 Super Lens Replacement: passo 6, imagem 3 %32
    • Loosen the front cover from the left and right sides of the camera.

    • Take off the front cover.

  7. Ricoh YF-20 Super Lens Replacement, Lens: passo 7, imagem 1 %32 Ricoh YF-20 Super Lens Replacement, Lens: passo 7, imagem 2 %32 Ricoh YF-20 Super Lens Replacement, Lens: passo 7, imagem 3 %32
    • The lens is only attached to the main camera body. Set the front and back covers aside.

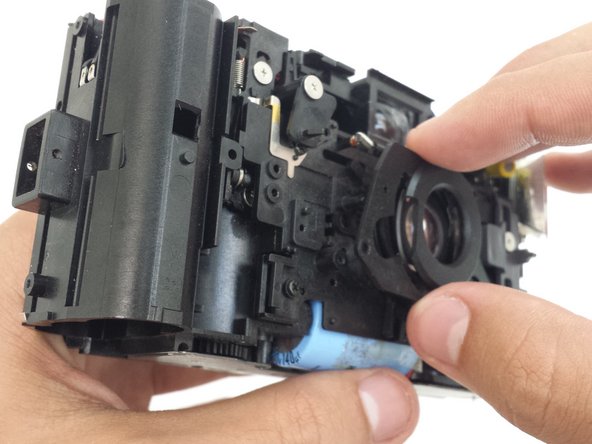
    • Unscrew three screws from the outermost plastic plate covering the lens.

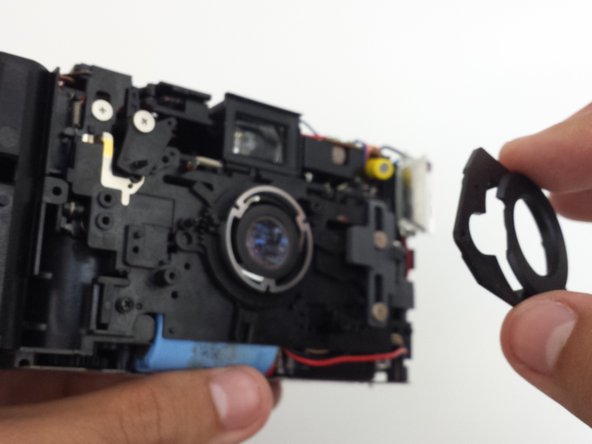
    • After the screws are removed, the outermost plate can be removed.

  8. Ricoh YF-20 Super Lens Replacement: passo 8, imagem 1 %32 Ricoh YF-20 Super Lens Replacement: passo 8, imagem 2 %32 Ricoh YF-20 Super Lens Replacement: passo 8, imagem 3 %32
    • Remove the ring shaped metal brace.

    • Using fingers or tweezers, remove the lens from the camera.

Conclusão

To reassemble your device, follow these instructions in reverse order.

Eric Dazet

Membro desde: 04/10/12

352 Reputação

Autoria de 5 guias

Equipe

Cal Poly, Team 6-21, Amido Spring 2012 Membro de Cal Poly, Team 6-21, Amido Spring 2012

CPSU-AMIDO-S12S6G21

Membros da 4

Autoria de 18 guias

0 comentários

Adicione um comentário

Exibir estatísticas:

Últimas 24 horas: 0

Últimos 7 dias: 1

Últimos 30 dias: 2

Duração total: 645