Esta tradução pode não refletir as atualizações mais recentes do guia de fontes. Ajude a atualizar a tradução ou veja guia de fontes.
Introdução
Você não sabe bem o que fazer com todas as tiras adesivas de seu kit para tampa traseira? Você está no lugar certo! Este guia mostra como usar o kit adesivo para tampa traseira para as séries Galaxy S com traseira em vidro (S7 e mais recentes). Ele também inclui instruções sobre como transferir e instalar vários componentes para instalação na traseira, tais como o bisel traseiro e sensor de impressão digital.
Pode ser que você não precise usar todas as tiras adesivas inclusas no kit. Se você estiver transferindo o sensor de impressão digital, pode ser que você precise de um pouco de fita adesiva dupla face.
Para obter uma lista de tiras adesivas para o Galaxy S, [[ invalid parts link ]].
Caso esteja aplicando tiras adesivas como essas, aqui vão algumas dicas:
- Em geral, as tiras adesivas possuem um lado colorido e um lado incolor (em papel ou plástico transparente). O lado incolor determina em qual superfície a tira deve ser aplicada primeiro.
- Para facilitar a aplicação do adesivo, você pode alinhar uma tira descoberta em sua posição prevista no smartphone e, então, virar uma ponta dela para baixo, a fim de fixá-la em sua posição. Isso lhe permitirá descascar as películas de proteção e descobrir o adesivo sem perder o alinhamento.
O que você precisa
-
-
Para instalar o adesivo para bateria, vá para este guia.
-
Para transferir e instalar o sensor de impressão digital e o vedante, comece pelo próximo passo.
-
Para transferir e instalar o bisel traseiro, pule até o passo 5.
-
Para instalar o adesivo do suporte para a traseira, pule até o passo 9.
-
Para instalar a borda adesiva para capa traseira, pule até o passo 13.
-
-
-
Aqueça uma iOpener (bolsa térmica de gel) e deixe-a encostada no sensor de impressão digital por um minuto.
-
Use uma ferramenta de abertura para liberar cuidadosamente o sensor de impressão digital pela fenda inferior, onde ele encosta na capa traseira.
-
Não tente liberar o sensor pela fenda superior, onde se encontra o sulco do vedante do sensor de impressão digital.
-
-
-
Use uma ferramenta de abertura para liberar o sensor de impressão digital de seu vedante.
-
Remova a película de proteção em plástico colorido do vedante substituto para descobrir o adesivo.
-
Com cuidado, alinhe e deite o sensor de impressão digital no lado pegajoso do vedante.
-
Uma vez alinhado, pressione para baixo com seu dedo para fazer a união adesiva.
-
-
-
Para fixar o sensor de impressão digital na nova tampa traseira, use um adesivo cortado sob medida ou passe na borda do sensor uma fita adesiva dupla face, como a fita da tesa.
-
Alinhe o sensor de impressão digital no recorte da tampa traseira e pressione para baixo com firmeza usando seu dedo para fazer a união adesiva.
-
-
-
Aqueça uma iOpener (bolsa térmica de gel) e deixe-a encostada no bisel traseiro por um minuto.
-
Começando pelo lado virado para fora da capa traseira, empurre o bisel para dentro com um dedo, para liberar o bisel do recorte onde se encontra.
-
Como alternativa, você pode fazer alavanca ao redor do bisel usando uma ferramenta de abertura, para liberá-lo do recorte onde se encontra.
-
-
-
-
Descasque a película de proteção transparente da tira adesiva para o bisel para descobrir o adesivo.
-
Cuidadosamente, alinhe o adesivo ao recorte da capa traseira.
-
Uma vez alinhado, pressione o adesivo fixando-o em sua posição com o dedo.
-
Descasque a película de proteção transparente do adesivo para descobrir a sua superfície.
-
-
-
Descubra como a tira do suporte está alinhada com as superfícies comparando os contornos da tira adesiva com os restos de adesivo e a estrutura do smartphone.
-
Use uma ferramenta de abertura e álcool isopropílico em alta concentração para remover todos os restos de adesivo da estrutura do smartphone.
-
Caso esteja planejando reaproveitar a tampa traseira, remova todos os restos de adesivo dela.
For my Galaxy S7, it appeared to me there were some minor placement inconsistencies (a millimeter or two) where the Back Cover Support adhesive pads (support strips) were on the backing sheet versus the actual phone. Difficult to know for sure since it is hard to tell where the original pads were after the back cover is pried off. I removed the clear backing to expose the strips and blocks, but placed the clear backing covering 80% of the phone as I transferred one portion of the unconnected adhesive strips at a time where they best appeared to be needed. This falls in the category of tweaking.
The adhesive sheet for the back cover was 100% accurate.
-
-
-
Descasque a película transparente da tira adesivo do suporte para descobrir o adesivo.
-
Cuidadosamente, deite a tira com o lado colante virado para cima sobre a estrutura do telefone, tomando cuidado para não tocar na superfície colante.
-
Alinhe a tira adesiva posicionando-a sobre a estrutura do smartphone, de forma que os contornos do adesivo cubram os da estrutura.
-
Caso você tenha suas tiras de suporte pequenas, execute o procedimento para cada uma delas.
This process of putting the colored plastic with adhesive onto the phone and then sandwiching the back panel on top seemed counter-intuitive so I decided to remove the colored plastic and place the adhesive + clear plastic onto the back of the phone’s guts.
DON’T BE ME!
Follow the instructions and save yourself close to an hour of hassle. The adhesive loves the colored plastic way more than the clear.
It actually worked!!!
-
-
-
Cuidadosamente, abaixe a tampa traseira sobre as tiras de suporte descobertas. Isso garante com que o adesivo seja colocado corretamente na tampa traseira.
I found it easier to lower the back cover onto the support strips using a suction cup. I felt like this gave me more control over placement and my fingers didn't get in the way on the edges.
-
-
-
Os passos restantes mostram como instalar o adesivo da borda da tampa traseira.
-
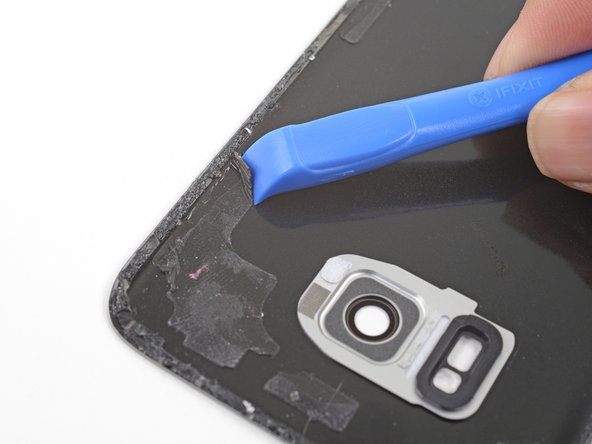
Use uma ferramenta de abertura e álcool isopropílico de alta concentração para remover todos os restos de cola da estrutura do smartphone.
-
Caso esteja planejando reaproveitar a tampa traseira, remova todos os restos de adesivo da tampa traseira.
Scrape and peel the adhesive, using goo gone only after systematically scraping the adhesive as much as possible. The goo gone should only be used to clean up residue once manual scraping has been completed, otherwise the adhesive will become tacky and only scrape off in microscopic layers at a time, which takes forever to remove.
-
-
-
Descasque a película transparente da tira adesiva para a borda, a fim de descobrir o adesivo.
-
Segura a tira por suas abas e alinhe cuidadosamente uma longa ponta do adesivo adhesive à ponta da tampa traseira.
-
Coloque o adesivo sobre a tampa traseira e pressione-o firmemente contra a ela usando os seus dedos.
-
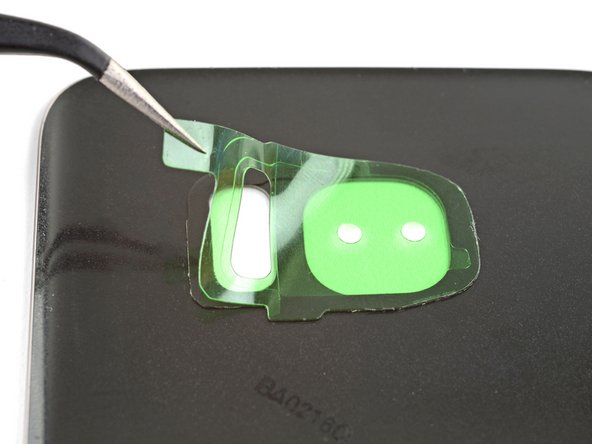
Descasque e remova a película de proteção colorida da tira adesiva para borda, a fim de descobrir o adesivo.
(Galaxy S7 kit): I peeled away the clear liner (Step 1), aligned it to the cover edge (Step 2) and pressed it down (Step 3).
When I peeled off the tabbed "coloured" liner (Step 4), it turned out to be two layers: a clear, tabbed one that came away and a green one consisting of a central part and a thin, outer strip that still covered the adhesive.
This thin strip had been partially lifted by the removal of the clear tabbed layer, so I started to remove it all. As I slowly and carefully pulled it, it tried to lift the adhesive strip itself off the cover so I held that down with the tweezer points. That still left the main green part in the centre of the case, but that was easily removed.
However, when I turned the back cover over I saw that where the adhesive strip had lifted slightly it had detached some of the cover's coloured film, leaving it buckled and a bit of a mess.
When I tried to pull away the cover strip, the adhesive stuck to it. I also have no idea why the clear liner and green liner are attached to each other.
The pictures don’t match what is received for the Galaxy S8+. It’s also not clear where to attach the perimeter adhesive. On the lip of the back cover or just inside the well area. In addition, after exposing the adhesive (after removing the clear side), no matter how weel you pre-align the position, you can’t count on the adhesive to stick to whichever method questioned above, without some of it not releasing cleanly from the colored backing. Yes. firm pressure was applied before moving a little further down. At times the adhesive stuck so strongly to the colored backing, it stretched the adhesive out of shape.
I have repaired hundreds of laptops and all in ones, so I understand there are subtleties in a repair, and I found it quite confusing replacing the battery and fingerprint sensor and other necessary parts related to doing that repair with the either inaccurate, outdated, or lack of detail provided (but much needed) in this guide.
If you're like most people and the original back glass (S8) cracked upon removal, and you've ordered and received a plastic replacement from iFixit, remove the adhesive that comes on the replacement plastic back panel, and use the adhesive in this kit. The back panel adhesive in this kit is THICC and seems like it would create a much better seal than what comes preinstalled on the replacement back panel.
-


Cancelar: não concluí este guia.
124 outras pessoas executaram este guia.
Um agradecimento especial a esses tradutores:
66%

Udo Baingo está nos ajudando a consertar o mundo! Quer contribuir?
Comece a traduzir ›


14 comentários
The flex cable for the fingerprint sensor is so short and delicate that it’s fiendishly difficult to locate and snap in. You only have a very narrow gap between the back cover and the phone, it wants to jump out of position if you misalign at all, and you can’t reach under there with normal size fingers. Not only that, it’s done with the rear cover adhesive in place so if that touches, it sticks.
I got it snapped on, and the flex cable broke at the same moment. So, no fingerprint sensor for me. Also, the new back cover arrived broken. If it was usable, the way to do it IMHO is to attach the flex cable first, then push the fingerprint sensor assembly on to the new back cover adhesive (it goes on from behind), then close the back cover.
Hey William,
If you bought the back cover from iFixit, please contact our support team here and we will get a replacement sorted out for you!
P.S. I got the battery and cover because the old cover was warped and separated, figured may as well replace the battery in a 2-year-old phone. Turns out, the battery was swollen and huge and it had pushed the back cover open. Not a good situation. So if your back cover is coming off, suspect that battery.
P.P.S. The fingerprint sensor flex cable connector probably could be manipulated into position with the tweezers from the tool kit and pressed down into place with the plastic screwdriver thingy, Just hover the back cover over it with your third hand (or a helper).
Will the phone still be water-resistant after this repair?
Hi Shai,
The phone won’t be as water resistant compared to when it is brand new. However, this is true even if you didn’t repair the phone—adhesive seals break down and lose water resistance over time.
Do you have custom-cut adhesive strips for Samsung galaxy s9+? Can’t find it in store.
Hi Michael,
We are currently in the process of sourcing the adhesive. Please check back in the future!
where i can buy the adhesive
It’s a little confusing going through the battery removal for the Samsung S10+ and then being sent to the Samsung S10 installation process instead of the Samsung S10+ install. Although moderately intuitive, it would be nice to have a specific article for a specific phone that identifies the actual process with the physical parts involved since The S10 and the S10+ are not the same back covers and the same parts involved.
Additionally, the inner wireless connector plate NEEDS to be connected to validate a connection otherwise the battery will not power the phone. This is a Requirement on the S10+.
I need to do the front gasket...is there an article for the front, I'm replacing my screen. Also, my child lost the earpiece mesh, is there something else I can use? Thanks
I got the S9 battery kit and all of the precut adhesive pieces had been cut backwards. The stiff green/blue plastic was on the wrong side. I had to remove the adhesive pieces entirely and try to use the clear plastic backing as the transfer agent instead of the stiffer, cut plastic pieces. I eventually did get it installed but it took a lot longer than planned.