Ir para o conteúdo principal

Replacing Sonos Play 1 Power and Volume switch board.

O que você precisa

  1. Replacing Sonos Play 1 Power and Volume switch board., Exterior Screen: passo 1, imagem 1 %32 Replacing Sonos Play 1 Power and Volume switch board., Exterior Screen: passo 1, imagem 2 %32
    Ferramenta utilizada nesse passo:
    Tweezers
    $4.99
    Comprar
    • Remove the rubber footing from the bottom of the device. Pry it up from one end using one of the plastic opening tools.

    • Once you pry open one end, use precision tweezers to remove rubber footing.

  2. Replacing Sonos Play 1 Power and Volume switch board.: passo 2, imagem 1 %32 Replacing Sonos Play 1 Power and Volume switch board.: passo 2, imagem 2 %32
    • Using a metal spudger, pry open a corner of the adhesive tape.

    • Use precision tweezers to remove the adhesive tape.

  3. Replacing Sonos Play 1 Power and Volume switch board.: passo 3, imagem 1 %32 Replacing Sonos Play 1 Power and Volume switch board.: passo 3, imagem 2 %32
    • Remove the four 10 mm Torx security #10 screws that hold the base together.

    • Remove the base by lifting it vertically away from the bulk of the device.

  4. Replacing Sonos Play 1 Power and Volume switch board.: passo 4, imagem 1 %32 Replacing Sonos Play 1 Power and Volume switch board.: passo 4, imagem 2 %32
    • Remove the 10 mm Torx security #10 screw that holds down the exterior screen.

    • Using precision tweezers, remove the metal bracket.

  5. Replacing Sonos Play 1 Power and Volume switch board.: passo 5, imagem 1 %32
    • Remove the exterior screen by lifting it away from the bulk of the device.

  6. Replacing Sonos Play 1 Power and Volume switch board., Sonos Play 1 Top Cover Disassembly: passo 6, imagem 1 %32
    • Remove the four 9 mm Torx Security #9 head screws. There are two on each side.

  7. Replacing Sonos Play 1 Power and Volume switch board.: passo 7, imagem 1 %32 Replacing Sonos Play 1 Power and Volume switch board.: passo 7, imagem 2 %32 Replacing Sonos Play 1 Power and Volume switch board.: passo 7, imagem 3 %32
    • Using a plastic opening tool, pry open the top cap containing the power and volume button.

    • Vertically remove the top cap.

    • Be sure to not jerk the top cap when removing , as to not damage the cable linking the switchboard to the motherboard.

  8. Replacing Sonos Play 1 Power and Volume switch board.: passo 8, imagem 1 %32 Replacing Sonos Play 1 Power and Volume switch board.: passo 8, imagem 2 %32
    • Using a plastic opening tool, pry open the circuit flap.

    • Once flap is loosened, use your hand to remove the circuit wire.

  9. Replacing Sonos Play 1 Power and Volume switch board., Power and Volume Switch Board: passo 9, imagem 1 %32
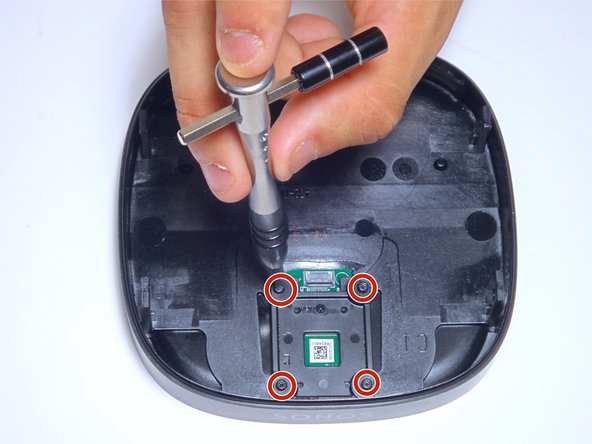
    • Using a screwdriver with a Torx T6 bit, remove the four highlighted 7mm screws.

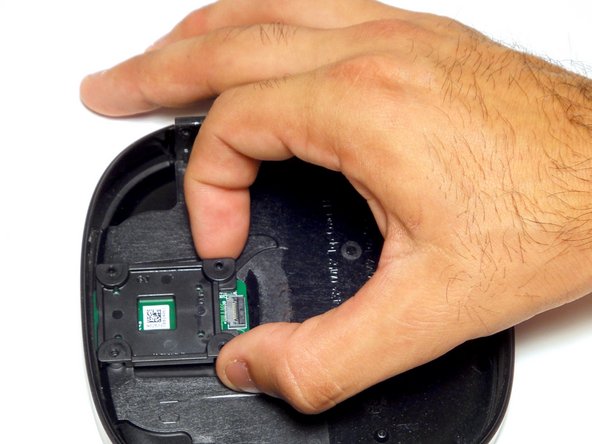
    • Using you fingers remove the protective plastic plate covering the device.

  10. Replacing Sonos Play 1 Power and Volume switch board.: passo 10, imagem 1 %32 Replacing Sonos Play 1 Power and Volume switch board.: passo 10, imagem 2 %32
    • Using your fingers remove the plastic cover plate securing the switchboard.

    • Using your fingers, remove the power/volume switch board.

Conclusão

To reassemble your device, follow these instructions in reverse order.

4 outras pessoas executaram este guia.

Patty

Membro desde: 09/01/15

450 Reputação

Autoria de 1 guia

Equipe

USF Tampa, Team 8-4, Eyestone Fall 2015 Membro de USF Tampa, Team 8-4, Eyestone Fall 2015

USFT-EYESTONE-F15S8G4

Membros da 4

Autoria de 16 guias

9 comentários

Where can I get the replacement power button?

Teresa Rosales - Responder

I would like to know as well

hung pham - Responder

Dear Patty

Where can I buy the switchboard?

Thanks in advance. :-)

/Kenneth

Kenneth - Responder

Same quesion here from DK

Lars Jürgensen - Responder

where can i find board

craigmdyer - Responder

Adicione um comentário

Exibir estatísticas:

Últimas 24 horas: 3

Últimos 7 dias: 13

Últimos 30 dias: 74

Duração total: 8,713