Introdução
You need to disconnect or replace the fans on your Dell XPS 13 9380, this guide is for you!
O que você precisa
-
-
Use a Torx T5 driver to unscrew the eight screws securing the back panel.
-
Use a spudger to pry up and loosen the back panel.
-
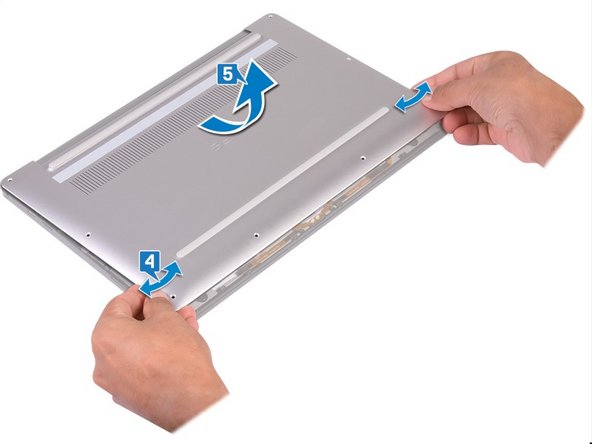
Lift the back panel up slightly from the non-hinged edge.
-
Pull the back panel away from the hinged edge, wiggling it back and forth to loosen the clips.
-
When the back panel clips are free, remove the back panel.
-
-
-
-
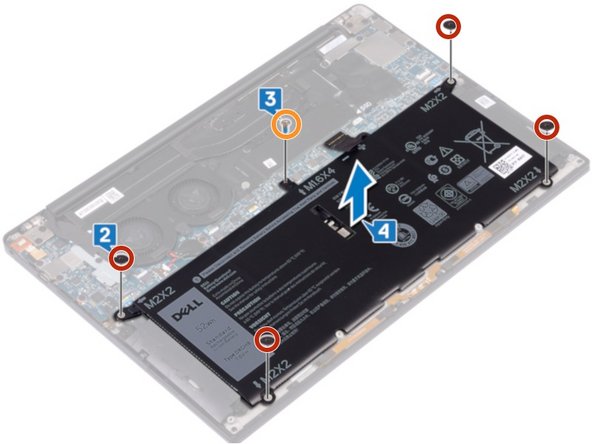
Disconnect the cable from the battery by pulling the connector towards the battery.
-
Remove the four screws (M2 x 2) securing the battery.
-
Remove the screw (M1.6 x 4) securing the battery.
-
Remove the battery from its recess.
-
-
-
1- Remove the screw (M1.6 x 3) that fixes the WiFi card and the cable holder the webcam on the motherboard.
-
2- Remove the WiFi card and the cable holder for the webcam from the motherboard.
-
3- Disconnect and lift the webcam cable from the motherboard. You will need to remove the adhesive tape that attaches the cable.
-
4- Disconnect the power cable from the right fan of the motherboard.
-
5- Disconnect the power cable from the left fan of the motherboard.
-
6- Remove the two screws (M1.6 x 3) that attach the fans to the motherboard.
-
7- Remove the fans from the motherboard.
-


To reassemble your device, follow the instructions in reverse order.
To reassemble your device, follow the instructions in reverse order.
Cancelar: não concluí este guia.
Uma outra pessoa concluiu este guia.
Um agradecimento especial a esses tradutores:
100%

Schwarzer está nos ajudando a consertar o mundo! Quer contribuir?
Comece a traduzir ›

Equipe

Um comentário
I do apologise if this is a redundant question. Would the bits included with the IFIXIT Essential Toolkit be sufficient to proceed with this operation, or is a more extensive kit like the Mako used here be a necessity? Thanks for the help!