Introdução
For all those who have defective Røde NTG2 shotgun miss, meaning sound in and out, as if some wiring has come loose and signal is cutting in and out when you connect/disconnect it. This Guide shows how to open it up, examine for the broken/disconnected wiring, and how to repair and reassemble as to prevent future disconnections.
O que você precisa
-
-
Get your workspace ready. Rubber mat, all tools laid out, soldering iron heating up.
-
-
-
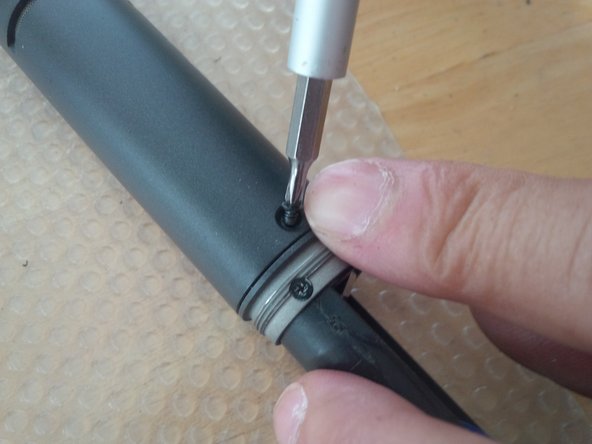
Using a Philipps #00 tip, Remove all visible screws, and set them aside in different piles/containers.
-
-
-
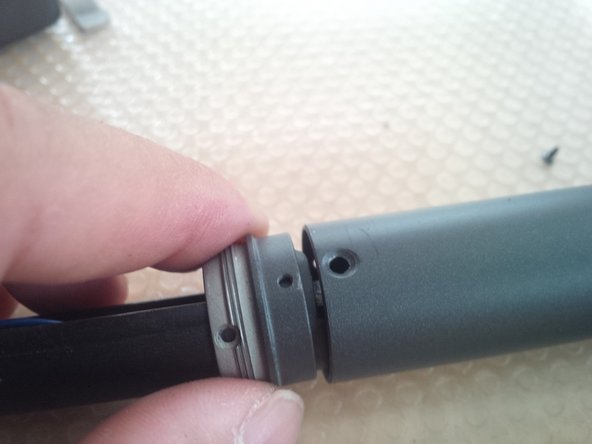
Identify a flange/ring that holds the top capsule tube in place. Gently loosen and pull down, in order to release the tube.
-
-
-
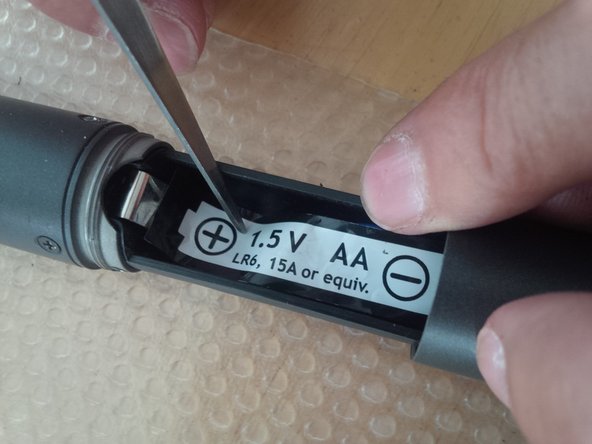
Remove capsule from head tube. Be gentle. There is a rubber gasket that holds it in place. Gently extricate the gasket, and the capsule will slide right out.
-
-
-
-
Time to locate defective or loose wiring. If this is the capsule, then this is easy to re-solder.
-
Locate the broken/loose wire, strip back a few mm's of insulation coating, and prepare to solder back in. Use the helping hands with clips to secure both sides in place before spot soldering.
-
-
-
IF no loose wires on top capsule end, then we will need to look at the bottom connector end.
-
This gets a bit tricky, as we will need to slide the round flange off the top of the tube, in order to push the bottom tube all the way to expose the connectors.
-
Locate the single silver screw holding the circuit board in place, remove that.
-
In order to do this, you will need to disconnect the capsule from the circuit board, as well as the bottom cables leading to the battery terminal.
-
Before you disconnect, take photos of the wiring for both ends of the board so you can re-solder them correctly!
-
-
-
After disconnecting the wires to both mic capsule and connectors, gently lift up the circuit board from the housing.
-
Slowly slide the flange off the mi capsule end of the housing.
-
Slide the bottom tube in the same direction, until bottom connectors are exposed. Check for loose/broken wiring.
-
-
-
Reverse the process, and return both the bottom tube AND the flange BEFORE re-soldering connector leads back to circuit board.
-
-
-
Resolder all wires back to Circuit Board, once the bottom tube and flange have been slid back into place.
-
Gently return circuit board to housing, and return silver screw.
-
-
-
Here's where you reverse Steps 5 to 1 to put it all back together. Don't forget all the screws!
-
Test your mic!
-


To reassemble your device, follow these instructions in reverse order.
To reassemble your device, follow these instructions in reverse order.
Cancelar: não concluí este guia.
8 outras pessoas executaram este guia.
9 comentários
Do you know where you can get replacement parts for this microphone/
I need help on this, How do you fix the xlr connector/pins from coming out of the housing when pulling xlr cable out of microphone? It has to be anchored down some other way than just wires i would think? Mine is loose man and warranty might not cover it since I bought it second hand. help! @JLGGCENTRAL
Collar can be squeezed past the circuit board for this repair without any de-soldering, at least on my model. Made it a much easier repair. Be sure to remove the low-end rolloff switch by pulling it straight up before bringing it up to the top of the mic though.