Ir para o conteúdo principal

Removing back panel and components to to get to CPU

O que você precisa

  1. Removing back panel and components to to get to CPU, Removing back panel and components to to get to CPU: passo 1, imagem 1 %32 Removing back panel and components to to get to CPU, Removing back panel and components to to get to CPU: passo 1, imagem 2 %32
    • Tools your need, flat head screwdriver. Phillips screwdriver just for the heatsink on CPU/GPU.

    • Unplug everything and then press the power button twice. Obviously it will not power on, this is to just remove stored power in the capacitors for safety.

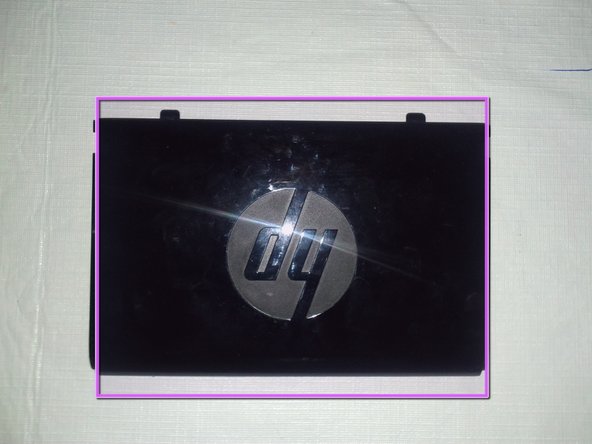
    • You'll need to have the screen side laying down.

    • Make sure to put the screen side on a clear soft surface to not damage the touch screen.

  2. Removing back panel and components to to get to CPU: passo 2, imagem 1 %32 Removing back panel and components to to get to CPU: passo 2, imagem 2 %32
    • Make sure you have the kickstand out as if it was up right.

    • Lift up the kickstand with your hand.

  3. Removing back panel and components to to get to CPU: passo 3, imagem 1 %32 Removing back panel and components to to get to CPU: passo 3, imagem 2 %32
    • Remove the two screws with a flat head screwdriver.

    • Back panel screw compared to other sizes screws that will be removed later.

    • Step 14 has a note on all the screws removed in this guide.

  4. Removing back panel and components to to get to CPU: passo 4, imagem 1 %32 Removing back panel and components to to get to CPU: passo 4, imagem 2 %32 Removing back panel and components to to get to CPU: passo 4, imagem 3 %32
    • After the screws are removed, slide out off side panels.

    • Then left them up and remove them off to the side.

    • What the back side panels look like.

    • Remove both side panels.

  5. Removing back panel and components to to get to CPU: passo 5, imagem 1 %32
    • Back side panels should now be removed.

    • Memory Ram Sticks, SO-DIMM

    • SATA Hard Drive 3.5"

    • DVD/CD-rom Drive

  6. Removing back panel and components to to get to CPU: passo 6, imagem 1 %32 Removing back panel and components to to get to CPU: passo 6, imagem 2 %32 Removing back panel and components to to get to CPU: passo 6, imagem 3 %32
    • Next we'll be removing this panel.

    • Put your finger under the plastic panel and left up with your finger. The panel should put up a bit, then do the same thing on the other side.

    • Panel once removed.

  7. Removing back panel and components to to get to CPU: passo 7, imagem 1 %32 Removing back panel and components to to get to CPU: passo 7, imagem 2 %32
    • Now remove the last panel, just like you did with the last one. It should pop up with your figner and be removed.

    • Put one of your fingers under the plastic and pull up.

    • What the panel looks like once removed.

  8. Removing back panel and components to to get to CPU: passo 8, imagem 1 %32 Removing back panel and components to to get to CPU: passo 8, imagem 2 %32 Removing back panel and components to to get to CPU: passo 8, imagem 3 %32
    • Now remove the HB screws to remove the kickstand. Use a flat head screwdriver to remove the four screws.

    • Note: Slide the kickstand down so the hook in the metal gets released. This will let you left up and remove the kickstand.

    • What the kickstand looks like once removed.

  9. Removing back panel and components to to get to CPU: passo 9, imagem 1 %32 Removing back panel and components to to get to CPU: passo 9, imagem 2 %32 Removing back panel and components to to get to CPU: passo 9, imagem 3 %32
    • Now remove the three TC screws to remove the heatsink cover.

    • Note: I took the picture after I removed the three screws. Also side note, the TC screws are the same size at the CB screws removed later.

    • What heatsink cover looks like removed.

    • The back of the HP Touchsmart 300 after the heatsink cover was removed.

  10. Removing back panel and components to to get to CPU: passo 10, imagem 1 %32 Removing back panel and components to to get to CPU: passo 10, imagem 2 %32
    • Remove the nine screws labeled "CB" for the fans cover, with a flat head screwdriver. These are the 8 shown circled, plus 1 more in the central black area.

    • After the CB screws are removed, lift up the fans cover. It will be tethered by connecting wires to the motherboard. Some repairs can be done without untethering, just shifting the cover.

    • To remove the metal panel entirely (assumed below), you will have to unplug 2+ connectors from the motherboard. (More if you have a model with active external connectors like CATV, etc.) An alternative may be to detach the external-connector plate from the fans cover with the 3 screws label "IO-C", leaving just that small plate tethered.

    • I don't have a picture of this fans cover. Just be aware it is the biggest metal panel removed.

  11. Removing back panel and components to to get to CPU: passo 11, imagem 1 %32
    • When remove the CPU heatsink it's best to heat up the heatsink with a blow dryer so the thermal paste heats up. This way you don't rip the CPU out of the motherboard socket.

    • Remove the CPU heatsink screws.

    • Make sure you do the normal CPU unscrew method. For example, start with the upper left, unscrew just a bit, then go to the lower right and unscrew just a bit. Next jump to the lower left, unscrew just a bit, then next the upper right. Continue this until you can remove it.

    • If the heatsink doesn't easily left up, heat it up more with a blow dryer. To make sure you don't rip out the CPU. Ripping out the CPU from the motherboards socket could damage the CPU and the motherboard.

  12. Removing back panel and components to to get to CPU: passo 12, imagem 1 %32
    • CPU after removing the heatsink.

    • GPU after removing the heatsink, aka video card.

    • WiFi mini PCI card.

    • Fan for the CPU/GPU heatsink.

    • Power supply fan.

    • Now you can replace the CPU.

    • It's best to clean out both fans, if your having overheating issues. Or to prevent it from happening in the future.

  13. Removing back panel and components to to get to CPU: passo 13, imagem 1 %32 Removing back panel and components to to get to CPU: passo 13, imagem 2 %32
    • This part is about cleaning.

    • There is a plastic tray just below the heatsink fan. This can be removed and cleaned if there is a lot of dust in it.

    • Plastic tray once removed.

  14. Removing back panel and components to to get to CPU: passo 14, imagem 1 %32
    • Types of screws that have been removed. This is to help when putting back together everything.

    • TC and CB screws. For the heatsink cover and fans cover metal panels. 11 total

    • HB screws. For the kickstand. 4 total

    • Screws for the side panels. 2 total

    • The penny is to help with scale.

Conclusão

To reassemble your device, follow these instructions in reverse order.

12 outras pessoas executaram este guia.

Ashton

Membro desde: 04/28/12

565 Reputação

Autoria de 1 guia

0 comentários

Adicione um comentário

Exibir estatísticas:

Últimas 24 horas: 0

Últimos 7 dias: 7

Últimos 30 dias: 25

Duração total: 22,543