Ir para o conteúdo principal

RIDGID Belt Sander R2740 On/Off Switch Replacement

O que você precisa

  1. RIDGID Belt Sander R2740 On/Off Switch Replacement, Power Cord: passo 1, imagem 1 %32 RIDGID Belt Sander R2740 On/Off Switch Replacement, Power Cord: passo 1, imagem 2 %32
    • Orient the belt sander so that the RIDGID logo is facing you.

    • Remove the six 19 mm and three 51 mm T20 screws that hold the cover into place.

    • Remove the cover from the belt sander.

    • Make sure you remember the correct placement of each screw.

  2. RIDGID Belt Sander R2740 On/Off Switch Replacement: passo 2, imagem 1 %32 RIDGID Belt Sander R2740 On/Off Switch Replacement: passo 2, imagem 2 %32
    • Remove the two 16 mm T10 screws.

    • Remove the support bracket that holds the power cord into place.

  3. RIDGID Belt Sander R2740 On/Off Switch Replacement: passo 3, imagem 1 %32 RIDGID Belt Sander R2740 On/Off Switch Replacement: passo 3, imagem 2 %32 RIDGID Belt Sander R2740 On/Off Switch Replacement: passo 3, imagem 3 %32
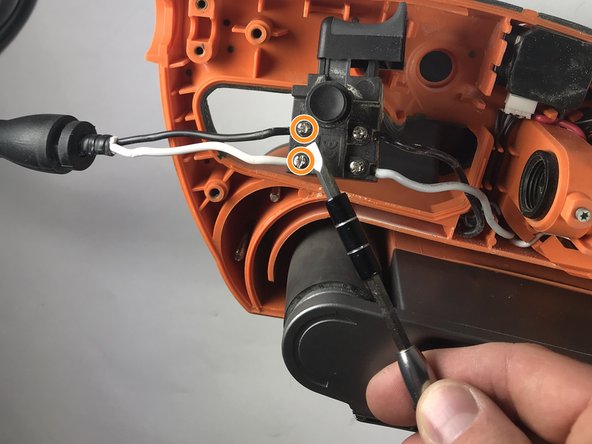
    • Lift the power cord from the resting grooves.

    • Rotate the switch so that the lock-on button is facing you.

    • Loosen the two 8 mm Phillips #3 screws.

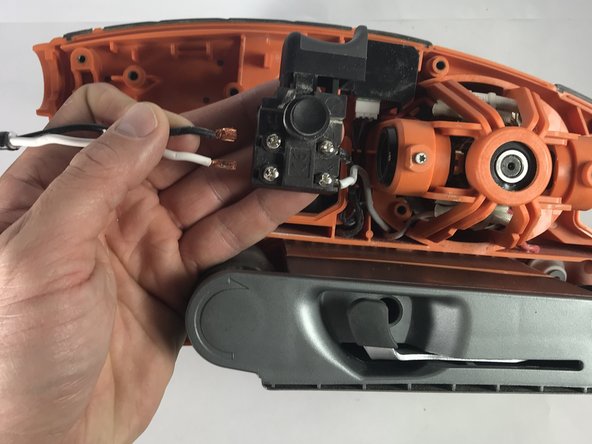
    • Pull the two wires away from the switch.

  4. RIDGID Belt Sander R2740 On/Off Switch Replacement, On/Off Switch: passo 4, imagem 1 %32
    • Undo the two screws on the backside of the switch with a Phillips #3 screw driver.

  5. RIDGID Belt Sander R2740 On/Off Switch Replacement: passo 5, imagem 1 %32
    • Pull out the wires from the switch.

Conclusão

To reassemble your device, follow these instructions in reverse order.

Uma outra pessoa concluiu este guia.

0 comentários

Adicione um comentário

Exibir estatísticas:

Últimas 24 horas: 1

Últimos 7 dias: 5

Últimos 30 dias: 9

Duração total: 801