Ir para o conteúdo principal

Proctor Silex Model 24215 Toaster Lever Repair

O que você precisa

  1. Proctor Silex Model 24215 Toaster Lever Repair, Proctor Silex Model 24215 Toaster Lever Repair: passo 1, imagem 1 %32
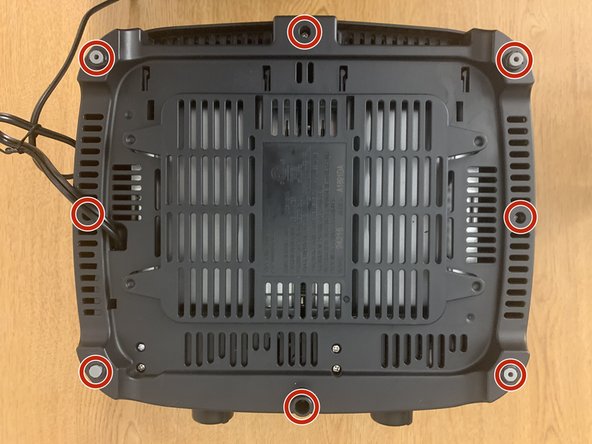
    • Unplug the toaster before disassembly.

  2. Proctor Silex Model 24215 Toaster Lever Repair: passo 2, imagem 1 %32 Proctor Silex Model 24215 Toaster Lever Repair: passo 2, imagem 2 %32
    • Turn the toaster upside down to shake out any excess crumbs and remove any crumbs from the crumb tray, as well.

    • Consider doing this step over the sink or place a sheet under your toaster to collect any crumbs that fall out.

  3. Proctor Silex Model 24215 Toaster Lever Repair: passo 3, imagem 1 %32
    • Reach into the shell of the toaster and grab the back of the lever.

    • Hold the lever with both your index finger and middle finger. Next, pull it.

    • Repeat this on the other side.

  4. Proctor Silex Model 24215 Toaster Lever Repair: passo 4, imagem 1 %32 Proctor Silex Model 24215 Toaster Lever Repair: passo 4, imagem 2 %32 Proctor Silex Model 24215 Toaster Lever Repair: passo 4, imagem 3 %32
    • Turn the toaster over and using a tweezer, remove the four rubber feet.

    • Using the Phillips #1 screwdriver, remove eight 12.7 mm screws on the bottom perimeter of the toaster.

    • Do NOT remove the 4 other screws as these are connected to the plastic wedge inside of the toaster.

  5. Proctor Silex Model 24215 Toaster Lever Repair: passo 5, imagem 1 %32 Proctor Silex Model 24215 Toaster Lever Repair: passo 5, imagem 2 %32
    • Put the toaster right side up and gently lift up on the shell of the toaster.

    • Be careful when lifting the shell that you don't rip the connectors that are attached to the circuit board.

    • Disconnect the two connectors attached to the circuit board on each side of the toaster (4 total wires should be removed).

  6. Proctor Silex Model 24215 Toaster Lever Repair: passo 6, imagem 1 %32 Proctor Silex Model 24215 Toaster Lever Repair: passo 6, imagem 2 %32 Proctor Silex Model 24215 Toaster Lever Repair: passo 6, imagem 3 %32
    • Carefully remove the shell of the toaster by lifting up to get to the inside.

  7. Proctor Silex Model 24215 Toaster Lever Repair: passo 7, imagem 1 %32 Proctor Silex Model 24215 Toaster Lever Repair: passo 7, imagem 2 %32
    • After the shell is removed, take a cotton swab and clean the electromagnets that allow the lever to stay down.

    • Often the source of a broken lever is simply the build-up of crumbs.

  8. Proctor Silex Model 24215 Toaster Lever Repair: passo 8, imagem 1 %32 Proctor Silex Model 24215 Toaster Lever Repair: passo 8, imagem 2 %32 Proctor Silex Model 24215 Toaster Lever Repair: passo 8, imagem 3 %32
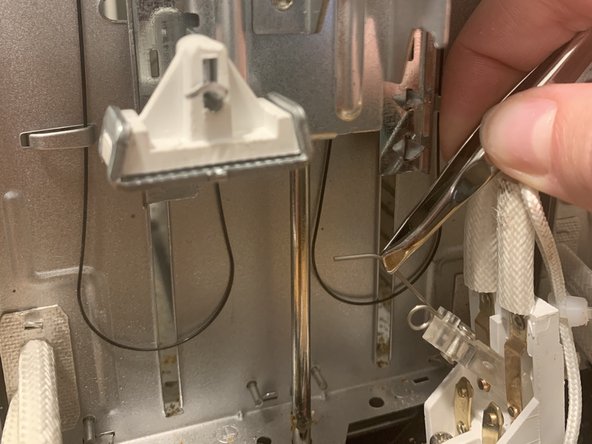
    • If this does not work, locate the white plastic wedges (on both sides), otherwise known as the extension, which forces the contact between the lever and the electromagnet.

    • Using a tweezer, align the contact points so that the two pieces make are able to make contact.

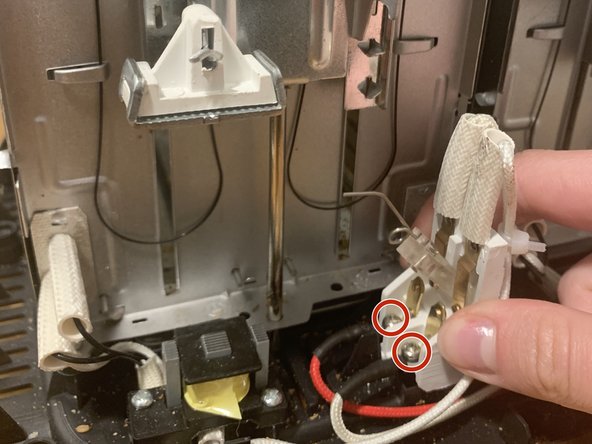
    • Also, make sure that the four screws you did not remove from the toaster are screwed into both of the plastic wedges on each side of the toaster (2 screws per wedge). A loose wedge could be the cause of a broken lever.

    • Once this has been done, plug your toaster back in and check to see if your toaster lever stays down.

Conclusão

To reassemble your device, follow these instructions in reverse order.

Amy Wysocki

Membro desde: 03/31/21

157 Reputação

Autoria de 1 guia

Equipe

Marist, Team S2-G3, Chaterdon Spring 2021 Membro de Marist, Team S2-G3, Chaterdon Spring 2021

MARS-CHATERDON-S21S2G3

Membros da 2

1 Guia de autoria

0 comentários

Adicione um comentário

Exibir estatísticas:

Últimas 24 horas: 0

Últimos 7 dias: 1

Últimos 30 dias: 15

Duração total: 668