Esta versão pode conter edições incorretas. Mude para o último instantâneo verificado.
O que você precisa
-
Este passo não foi traduzido. Ajude a traduzi-lo
-
Turn the keyboard locking screw so that it is parallel to the space bar.
-
Pull the keyboard release tabs toward you and lift up on the keyboard until it pops free.
-
Lift the keyboard out by pulling it up and away from you. Rest the keyboard, face down, on top of the track pad.
-
-
Este passo não foi traduzido. Ajude a traduzi-lo
-
Pull the keyboard ribbon straight up from the logic board. Place the keyboard aside.
-
-
Este passo não foi traduzido. Ajude a traduzi-lo
-
Remove the two silver Phillips #1 screws that attach the heat shield to the internal metal framework.
-
Lift the heat shield up and pull it toward you.
-
-
Este passo não foi traduzido. Ajude a traduzi-lo
-
Firmly grasp the plastic tab attached to the Airport card and pull up and then to the right.
-
-
-
Este passo não foi traduzido. Ajude a traduzi-lo
-
Disconnect the antenna cable from the Airport card.
-
-
Este passo não foi traduzido. Ajude a traduzi-lo
-
Remove the long silver Phillips #1 screw from the heat sink.
-
Remove the two T8 Torx screws that attach the heat sink to the processor.
-
-
Este passo não foi traduzido. Ajude a traduzi-lo
-
Lift the heat sink up from the left side and pull it out.
-
-
Este passo não foi traduzido. Ajude a traduzi-lo
-
Grasp the plastic tab on the processor's right side and pull it directly up.
-
-
Este passo não foi traduzido. Ajude a traduzi-lo
-
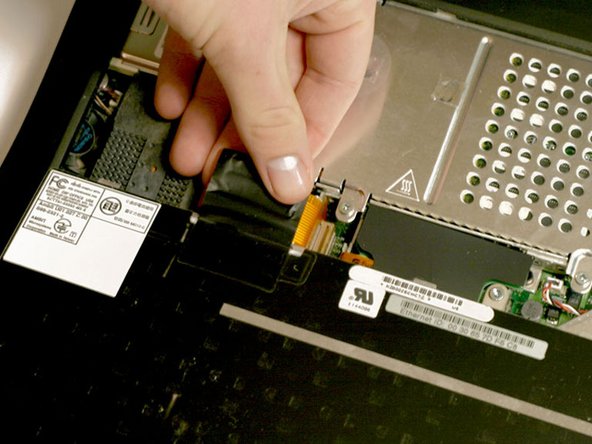
Grasp the orange cable at the left end of the hard drive and disconnect it from the logic board.
-
-
Este passo não foi traduzido. Ajude a traduzi-lo
-
Grasp the plastic tab and pull the hard drive up and to the left, making sure that the metal bracket doesn't catch on the black plastic casing.
-
-
Este passo não foi traduzido. Ajude a traduzi-lo
-
Remove the four black Torx screws located at the four corners of the hard drive bracket.
-
-
Este passo não foi traduzido. Ajude a traduzi-lo
-
Pull the connector cable out from the hard drive, applying even pressure while gently rocking up and down.
-


Cancelar: não concluí este guia.
29 outras pessoas executaram este guia.
Documentos anexados

4 comentários
In my humble opinion steps 6-12 are unnecessary. You can take out the harddrive cage without removing the processor card. Granted, you have to replace the drive in the cage while the cage is still connected to the PowerBook, but at the same time it saves you from having to remove/reapply the thermal paste on the CPU. I think for most of us that's a fair trade-off.
The Torx-T8 is unnecessary; eliminate step 8 and 9 unless you explicitly haven't yet changed the thermal interface material on your processor.
Removing the phillips-head screw in the area of the heatsink above the modem card (The yellow-circled screw in step 8's photo) and then lifting the plastic tab on the processor as shown in step 10, while sliding the processor slightly to the right, will permit a clean removal. Reverse procedure is to slide the processor in so that the tabs engage the metal cage, and then applying pressure to the processor board (remove RAM in the top slot first!) to engage the LIF connection.
Hope this saves someone a few minutes of rooting around for a torx driver.
I can confirm, you need not to remove the processor card. Remove the heat shield, lay down an antistatic foil on the processor card, carefully lift up the drive cage on the left side. Disconnect the drive on the right side of cage, remove the 4 screws holding the drive.
My Pismo had an old 12GB drive, changed it to an IDE SSD drive (KingSpec 64GB). Now I have 3 partions: MacOSX 10.2, MacOSX10.4.11 and MacOS9.2.2. It works very well without any problems!
Remember: must be Apple partions, not GUID!
Not only does this work great, I can confirm that in the year of our lord 2022 you can use an mSATA drive with an mSATA to IDE adapter in the Pismo. Search on 68kmla for the information if you want to know 100% the drive you’re trying is going to work.
I can’t believe my Pismo has a 128G SSD in it! It’s faster, and though I don’t carry it around, it’s a little lighter too.
(and also, THANK YOU Erik, steps 6-12 aren’t needed just to swap the HDD, though I do recommend thermal paste of course for anyone who is able to do it).