Esta versão pode conter edições incorretas. Mude para o último instantâneo verificado.
O que você precisa
-
Este passo não foi traduzido. Ajude a traduzi-lo
-
Using the PH00 screwdriver, remove the two 4mm screws located on both the left and right sides of the charging port on the bottom of the tablet.
-
-
Este passo não foi traduzido. Ajude a traduzi-lo
-
Using the plastic opening tool, insert it into the crease where the glass screen meets the housing of the rest of the tablet. Once inserted, keep inserted and run along the edges to separate the plastic clips from each other to dislodge the back plastic away from the glass and internal components.
-
-
Este passo não foi traduzido. Ajude a traduzi-lo
-
Using the PH00 screwdriver, unscrew the four 4.4 mm screws that are anchoring the circuit board down to the rest of the tablet.
-
-
-
Este passo não foi traduzido. Ajude a traduzi-lo
-
Using your fingernail, gently lift up the connectors on the two tabs that are holding the ribbons in place to the circuit board.
-
-
Este passo não foi traduzido. Ajude a traduzi-lo
-
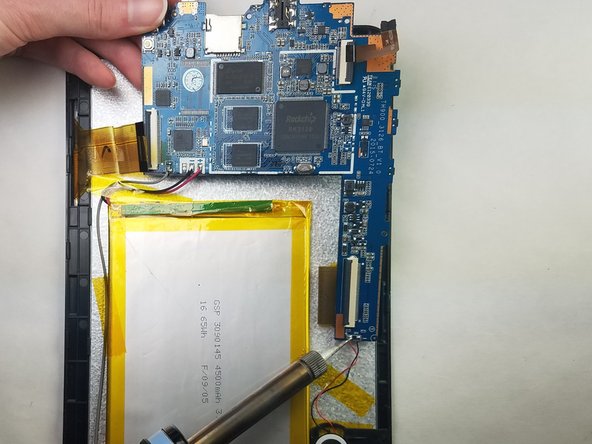
Using a soldering iron, desolder the points circled on the picture until the solder has liquefied enough to be able to remove the wires from the circuit board.
-
-
Este passo não foi traduzido. Ajude a traduzi-lo
-
Place the tip of the soldering iron on the four points circled in the image long enough to liquefy the surrounding solder.
-
-
Este passo não foi traduzido. Ajude a traduzi-lo
-
Using tweezers, remove the charging port from the circuit board.
-


Equipe

IUPUI, Team S2-G2, Harley Spring 2018 Membro de IUPUI, Team S2-G2, Harley Spring 2018
IUPUI-HARLEY-S18S2G2
Membros da 3
Autoria de 4 guias