Ir para o conteúdo principal

PlayStation Vita Speakers Replacement

O que você precisa

  1. PlayStation Vita Speakers Replacement, Case Separation: passo 1, imagem 1 %32 PlayStation Vita Speakers Replacement, Case Separation: passo 1, imagem 2 %32
    • Power off and remove the memory card.

    • Using a Phillips #00 screwdriver, remove the four 6.4mm screws on the back casing.

  2. PlayStation Vita Speakers Replacement: passo 2, imagem 1 %32 PlayStation Vita Speakers Replacement: passo 2, imagem 2 %32 PlayStation Vita Speakers Replacement: passo 2, imagem 3 %32
    • Using your fingernail or a spudger, pry open the accessory port cover on the top of the device.

    • Using a Phillips #00 screwdriver, remove the two 5.4mm screws hidden beneath the accessory port cover.

  3. PlayStation Vita Speakers Replacement: passo 3, imagem 1 %32 PlayStation Vita Speakers Replacement: passo 3, imagem 2 %32
    • Remove the two 5.4mm Phillips #00 screws on the bottom of the device near the charging port.

  4. PlayStation Vita Speakers Replacement: passo 4, imagem 1 %32 PlayStation Vita Speakers Replacement: passo 4, imagem 2 %32 PlayStation Vita Speakers Replacement: passo 4, imagem 3 %32
    • Beginning at the sides of the device, use a plastic opening tool to separate the front and rear cases.

    • Continue working your way around the device gently prying it open.

    • There are still wires holding the front and rear cases together. You may damage the connections if you yank the cases completely apart.

  5. PlayStation Vita Speakers Replacement: passo 5, imagem 1 %32 PlayStation Vita Speakers Replacement: passo 5, imagem 2 %32
    • Gently separate the two cases, minding the battery and the touch screen controller connectors holding the two cases together.

  6. PlayStation Vita Speakers Replacement: passo 6, imagem 1 %32
    • Using a spudger, free the touch screen controller flex cable by gently prying up the connection.

  7. PlayStation Vita Speakers Replacement: passo 7, imagem 1 %32
    • Free the battery cable by gently prying up on the connection with a spudger.

  8. PlayStation Vita Speakers Replacement: passo 8, imagem 1 %32
    • Separate the front and rear cases.

  9. PlayStation Vita Speakers Replacement, Speakers: passo 9, imagem 1 %32 PlayStation Vita Speakers Replacement, Speakers: passo 9, imagem 2 %32
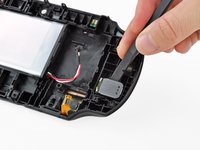
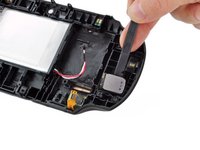
    • Gently insert a spudger along the side of the speaker on the back casing assembly. Pry the speaker off the casing and remove it.

    • The speaker is adhered to the casing with light tape, which may give the speaker light resistance.

Conclusão

To reassemble your device, follow these instructions in reverse order.

3 outras pessoas executaram este guia.

Brittany McCrigler

Membro desde: 03/05/12

89.011 Reputação

Autoria de 131 guias

Equipe

iFixit Membro de iFixit

Staff

Membros da 135

Autoria de 16.732 guias

2 comentários

My Ps vita is still not playing sound with the volume all the way up. Think this could be electrical?

Sarah - Responder

my ps vita 3G model get washed, i dismantle the console and both speakers to let it dry. 1 month later my vita woke up but now the speakers sound bad, is there a way to fix them?

Luis Hernández - Responder

Adicione um comentário

Exibir estatísticas:

Últimas 24 horas: 3

Últimos 7 dias: 18

Últimos 30 dias: 104

Duração total: 12,170