Ir para o conteúdo principal

PlayStation 4 Slim Power Supply Replacement

O que você precisa

  1. PlayStation 4 Slim Power Supply Replacement, Bottom Cover: passo 1, imagem 1 %32 PlayStation 4 Slim Power Supply Replacement, Bottom Cover: passo 1, imagem 2 %32 PlayStation 4 Slim Power Supply Replacement, Bottom Cover: passo 1, imagem 3 %32
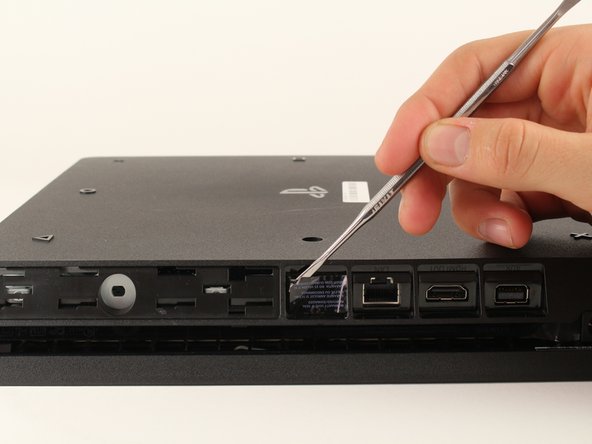
    • Locate the plastic warranty sticker next to the three ports on the side of the console.

    • Remove the warranty sticker by peeling it off with any kind of spudger.

    • Removing the warranty sticker will NOT cause your warranty to be null and void.

  2. PlayStation 4 Slim Power Supply Replacement: passo 2, imagem 1 %32 PlayStation 4 Slim Power Supply Replacement: passo 2, imagem 2 %32
    • Unscrew and remove the 5.0mm screw that was behind the sticker using a T8 security Torx screwdriver with a counter-clockwise motion.

  3. PlayStation 4 Slim Power Supply Replacement: passo 3, imagem 1 %32 PlayStation 4 Slim Power Supply Replacement: passo 3, imagem 2 %32 PlayStation 4 Slim Power Supply Replacement: passo 3, imagem 3 %32
    • Place the Playstation 4 Slim upside down with the side of the screw you just removed facing you.

    • Pry up on the two corners that are facing you with your fingers.

    • This may take a bit of force to open up and you will hear a fairly loud click when the bottom cover detaches.

    • Remove the bottom cover by sliding it towards the back corners and lifting up.

  4. PlayStation 4 Slim Power Supply Replacement, Power Supply: passo 4, imagem 1 %32 PlayStation 4 Slim Power Supply Replacement, Power Supply: passo 4, imagem 2 %32 PlayStation 4 Slim Power Supply Replacement, Power Supply: passo 4, imagem 3 %32
    • Place the Playstation 4 Slim right side up, with the PS logo on top and the side with the words "SONY" and "PS4" facing you.

    • Pry up on the two corners that are facing you with your fingers.

    • This may take a bit of force to open and you will hear a fairly loud click when the top cover detaches.

    • Remove the top cover by sliding it towards the back corners and lifting up.

  5. PlayStation 4 Slim Power Supply Replacement: passo 5, imagem 1 %32 PlayStation 4 Slim Power Supply Replacement: passo 5, imagem 2 %32 PlayStation 4 Slim Power Supply Replacement: passo 5, imagem 3 %32
    • Unscrew and remove the two screws (left one 31.0mm and right one 24.0mm) using a T8 screwdriver with a counter-clockwise motion.

    • Unscrew and remove the 3.0mm screw using a Phillips #1 screwdriver with a counter-clockwise motion.

  6. PlayStation 4 Slim Power Supply Replacement: passo 6, imagem 1 %32
    • Remove the four 16mm Philips screws holding the power supply in place.

  7. PlayStation 4 Slim Power Supply Replacement: passo 7, imagem 1 %32 PlayStation 4 Slim Power Supply Replacement: passo 7, imagem 2 %32
    • Remove the metal sheet from the top of the power supply by grabbing and lifting up with your hands.

  8. PlayStation 4 Slim Power Supply Replacement: passo 8, imagem 1 %32 PlayStation 4 Slim Power Supply Replacement: passo 8, imagem 2 %32
    • Remove the antenna from the top of the power supply by guiding the wire with your fingers through the groves underneath the metal panel.

  9. PlayStation 4 Slim Power Supply Replacement: passo 9, imagem 1 %32 PlayStation 4 Slim Power Supply Replacement: passo 9, imagem 2 %32
    • Flip the Playstation 4 Slim onto its back.

    • Unscrew and remove the 4.0mm screw using a Phillips #1 screwdriver with a counter-clockwise motion.

  10. PlayStation 4 Slim Power Supply Replacement: passo 10, imagem 1 %32 PlayStation 4 Slim Power Supply Replacement: passo 10, imagem 2 %32 PlayStation 4 Slim Power Supply Replacement: passo 10, imagem 3 %32
    • Use a plastic opening tool to make space between the power supply and console by wedging and wiggling it in-between the two.

    • Lift the power supply up and onto its back on the metal sheet using your hands.

  11. PlayStation 4 Slim Power Supply Replacement: passo 11, imagem 1 %32 PlayStation 4 Slim Power Supply Replacement: passo 11, imagem 2 %32 PlayStation 4 Slim Power Supply Replacement: passo 11, imagem 3 %32
    • Disconnect the wire connection from the power supply by firmly gripping it with your fingers or tweezers and pulling out.

    • Remove the power supply completely by grabbing and lifting up with your hands.

Conclusão

To reassemble your device, follow these instructions in reverse order.

70 outras pessoas executaram este guia.

Hernan Rodriguez

Membro desde: 01/24/18

3.620 Reputação

Autoria de 3 guias

Equipe

Cal Poly, Team S19-G4, Livingston Winter 2018 Membro de Cal Poly, Team S19-G4, Livingston Winter 2018

CPSU-LIVINGSTON-W18S19G4

Membros da 4

Autoria de 35 guias

6 comentários

Can the N15-160P1A power supply work on a PS4 system that originally came with N17-160P1A?

derasky4u - Responder

My PS4 not turning on

Khai Stering - Responder

This was awesome. Thanks for the assist

Christopher Gorgon - Responder

I need help figuring out what I did to my ps4 and what needs replacement I had the new nba 2k 22 in the disc drive and the game was partly finished downloading so as it was doing that I brought shinobi striker which I previously had to use someone’s account to play it so the game popped up as light so I deleted it the first time and redownloaded it and it still said lite so then I deleted again but this time I double tapped the PlayStation button and it went to Home Screen slowed down then froze so I unplugged it plugged it back up and it wouldn’t turn on

Deontay - Responder

My PS4 runs for 10 minutes and turns off again and again

HITESH MAKWANA - Responder

Adicione um comentário

Exibir estatísticas:

Últimas 24 horas: 34

Últimos 7 dias: 256

Últimos 30 dias: 1,160

Duração total: 91,305