Ir para o conteúdo principal

PlayStation 4 Slim Bottom Cover Replacement

O que você precisa

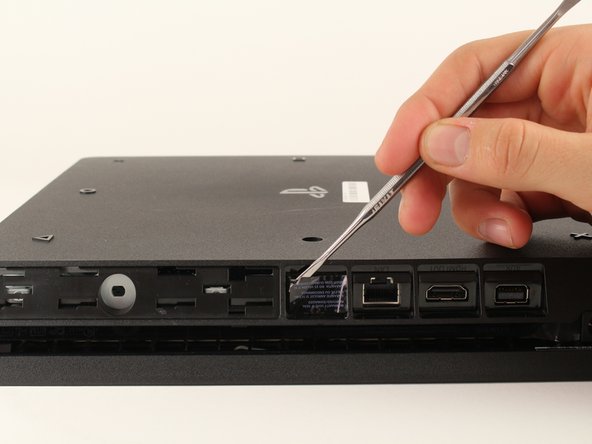
  1. PlayStation 4 Slim Bottom Cover Replacement, Bottom Cover: passo 1, imagem 1 %32 PlayStation 4 Slim Bottom Cover Replacement, Bottom Cover: passo 1, imagem 2 %32 PlayStation 4 Slim Bottom Cover Replacement, Bottom Cover: passo 1, imagem 3 %32
    • Locate the plastic warranty sticker next to the three ports on the side of the console.

    • Remove the warranty sticker by peeling it off with any kind of spudger.

    • Removing the warranty sticker will NOT cause your warranty to be null and void.

  2. PlayStation 4 Slim Bottom Cover Replacement: passo 2, imagem 1 %32 PlayStation 4 Slim Bottom Cover Replacement: passo 2, imagem 2 %32
    • Unscrew and remove the now exposed 5.0mm screw using a T8 security Torx screwdriver with a counter-clockwise motion.

  3. PlayStation 4 Slim Bottom Cover Replacement: passo 3, imagem 1 %32 PlayStation 4 Slim Bottom Cover Replacement: passo 3, imagem 2 %32 PlayStation 4 Slim Bottom Cover Replacement: passo 3, imagem 3 %32
    • Place the Playstation 4 Slim upside down with the side of the screw you just removed facing you.

    • Pry up on the two corners that are facing you with your fingers.

    • This may take a bit of force to open up and you will hear a fairly loud click when the bottom cover detaches.

    • Remove the bottom cover by sliding it towards the back corners and lifting up.

Conclusão

To reassemble your device, follow these instructions in reverse order.

36 outras pessoas executaram este guia.

Hernan Rodriguez

Membro desde: 01/24/18

3.642 Reputação

Autoria de 3 guias

Equipe

Cal Poly, Team S19-G4, Livingston Winter 2018 Membro de Cal Poly, Team S19-G4, Livingston Winter 2018

CPSU-LIVINGSTON-W18S19G4

Membros da 4

Autoria de 35 guias

2 comentários

Wo kann man die Bodenplatte kaufen?

Emre Kaman - Responder

Adicione um comentário

Exibir estatísticas:

Últimas 24 horas: 25

Últimos 7 dias: 143

Últimos 30 dias: 790

Duração total: 47,412