Esta versão pode conter edições incorretas. Mude para o último instantâneo verificado.
O que você precisa
-
Este passo não foi traduzido. Ajude a traduzi-lo
-
Remove the side HDD bay cover by sliding the panel towards the back of the device.
-
-
Este passo não foi traduzido. Ajude a traduzi-lo
-
Remove all three black 9.8mm long screws with a T-8 security screwdriver.
-
Remove the blue 7.9mm long screw with a Phillips #1 screwdriver.
-
-
Este passo não foi traduzido. Ajude a traduzi-lo
-
On the bottom of the device, pry out the three rubber feet covers with the metal spudger.
-
Remove the four black 36.3mm long screws underneath with a Phillips #1 screwdriver.
-
-
Este passo não foi traduzido. Ajude a traduzi-lo
-
On the top of the device, unlatch the hook on the furthest right beneath the front panel, lift the panel slightly and apply pressure.
-
Unlatch the second right-side hook by sliding a plastic opening tool in the marked area.
-
Slide the panel to the left to unlatch the rest of the hooks.
-
-
-
Este passo não foi traduzido. Ajude a traduzi-lo
-
Remove the back panel by pressing down the tab on the right side of the device, and sliding the panel to the left.
-
-
Este passo não foi traduzido. Ajude a traduzi-lo
-
Remove the five silver 20.8mm long screws with a Phillips #1 screwdriver.
-
Remove the two black 9.9mm long screws in the disc reader with a T-8 security screwdriver.
-
Remove the top black plastic shell.
-
-
Este passo não foi traduzido. Ajude a traduzi-lo
-
Move the optical drive to the side to reveal one of the silver 8.8mm long screws.
-
Remove the two silver 8.8mm long screws on either side with a Phillips #1 screwdriver.
-
-
Este passo não foi traduzido. Ajude a traduzi-lo
-
Remove the cable from the plug and remove the wires from the two plastic hooks.
-
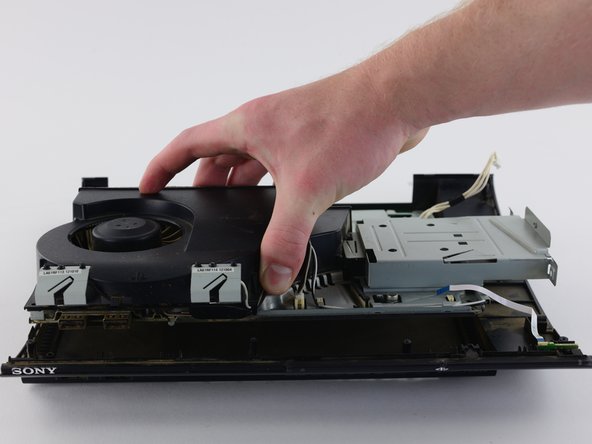
Remove the power supply unit.
-
-
Este passo não foi traduzido. Ajude a traduzi-lo
-
Remove the front white flex-ribbon cable by pulling upward from its base.
-
Remove the black and blue flex-ribbon cable behind it by pulling upward on the black tab, then pulling out the cable.
-
-
Este passo não foi traduzido. Ajude a traduzi-lo
-
Rotate the device 180 degrees.
-
Remove the back white flex-ribbon cable by pulling upward from its base.
-
Remove the optical drive.
-
-
Este passo não foi traduzido. Ajude a traduzi-lo
-
Locate the white flex ribbon cable that connects the power button to the motherboard. Pull this cable out from the motherboard end.
-
Remove the five black 8.3mm long screws with a Phillips #1 screwdriver.
-
Remove the two silver 12.8mm long screws with a Phillips #1 screwdriver.
-
Remove the device from the bottom shell casing.
-
-
Este passo não foi traduzido. Ajude a traduzi-lo
-
Remove the two black 8.3mm long screws with a Phillips #1 screwdriver from the Wi-Fi antennas.
-
Lift the Wi-Fi antennas off their mount.
-
-
Este passo não foi traduzido. Ajude a traduzi-lo
-
Use a plastic opening tool to remove the Wi-Fi wires from their sockets on the motherboard.
-
Remove the wires from the hooks around the motherboard and fan cover to completely remove the antennas.
-


Cancelar: não concluí este guia.
13 outras pessoas executaram este guia.
Equipe

Cal Poly, Team 34-13, Maness Spring 2016 Membro de Cal Poly, Team 34-13, Maness Spring 2016
CPSU-MANESS-S16S34G13
Membros da 4
Autoria de 21 guias
4 comentários
Hola que tal,abri la ps3 pero solamente tenia 1 cable la angena de wifi,sera que es asi? Por que en las imagenes que nos muestra son dos negro y blanco yo solamente tengo el negro.se podria hacer algo?
A mi me pasa lo mismo tengo una ps3 Super Slim con un solo cable y solamente tiene un solo conector que es el de BT
Joss1995 -
Excelente trabajo!! muy bien explicado ! eternamente agradecido
I would remove the disk drive before removing the PSU. Moving it over risks damaging the ribbon cables. Other than that, good guide.