Esta versão pode conter edições incorretas. Mude para o último instantâneo verificado.
O que você precisa
-
Este passo não foi traduzido. Ajude a traduzi-lo
-
Use the tip of a spudger to remove the black rubber screw cover from the side of the PS3.
-
-
Este passo não foi traduzido. Ajude a traduzi-lo
-
Remove the single 8.5 mm T10 Security Torx screw from the smart plate.
-
-
Este passo não foi traduzido. Ajude a traduzi-lo
-
Pull the smart plate toward the hard drive bay, then lift it off the body of the PS3.
-
-
Este passo não foi traduzido. Ajude a traduzi-lo
-
Remove the following seven screws:
-
Six 52 mm Phillips screws
-
One 30 mm Phillips screw
-
-
Este passo não foi traduzido. Ajude a traduzi-lo
-
Lift the top cover from its rear edge and rotate it toward the front of the PS3.
-
Remove the top cover.
-
There is a plastic hook located in a hole on the top back right hand side corner. Carefully push the plastic hook a bit from the rear of the machine with a spudger to release the rear right of the casing.
-
-
Este passo não foi traduzido. Ajude a traduzi-lo
-
Disconnect the Blu-ray power cable from the motherboard.
-
-
-
Este passo não foi traduzido. Ajude a traduzi-lo
-
Lift the Blu-ray drive from the edge nearest the power supply and rotate it away from the chassis enough to access its ribbon cable.
-
-
Este passo não foi traduzido. Ajude a traduzi-lo
-
Use your fingernail to flip up the retaining flap on the Blu-ray ribbon cable socket.
-
Pull the ribbon cable out of its socket.
-
Remove the Blu-ray drive from the PS3.
-
-
Este passo não foi traduzido. Ajude a traduzi-lo
-
Pull the control board ribbon cable straight up and out of its socket on the motherboard.
-
-
Este passo não foi traduzido. Ajude a traduzi-lo
-
Remove the two 12 mm Phillips screws securing the control board to the lower case.
-
Remove the control board and its attached cable from the PS3.
-
-
Este passo não foi traduzido. Ajude a traduzi-lo
-
Remove the following eight screws securing the motherboard assembly to the lower case:
-
Seven 12 mm Phillips screws (ph2)
-
One 30 mm Phillips screw
-
-
Este passo não foi traduzido. Ajude a traduzi-lo
-
Use the flat end of a spudger to pry the hard drive bay cover away from the lower case.
-
Remove the hard drive bay cover.
-
-
Este passo não foi traduzido. Ajude a traduzi-lo
-
Lift the motherboard assembly out of the lower case.
-
-
Este passo não foi traduzido. Ajude a traduzi-lo
-
De-route the fan cables from under the plastic finger molded into the heat sink.
-
-
Este passo não foi traduzido. Ajude a traduzi-lo
-
Remove the three 5.7 mm #0 Phillips screws securing the fan to the heat sink.
-
-
Este passo não foi traduzido. Ajude a traduzi-lo
-
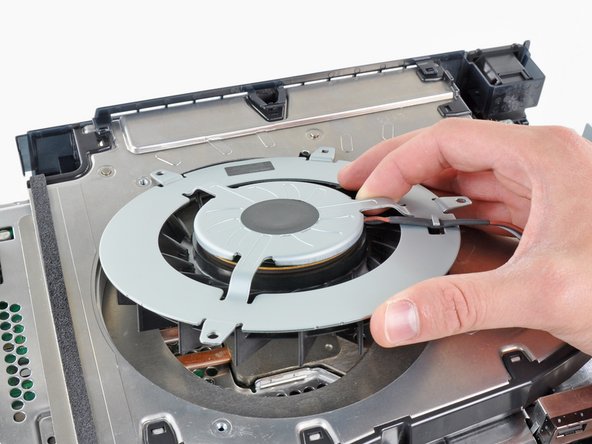
Remove the fan from the heat sink, minding its cables that may get caught.
-


Cancelar: não concluí este guia.
56 outras pessoas executaram este guia.

5 comentários
I'm quite happy to have found this guide and would give the author the +30 points if the suggested changes to the orange/red circles on the photos had been made - its been three years since the original comment and I, too, have trouble discerning those two colors.