Ir para o conteúdo principal

Philips HD9252 Transformer Replacement

O que você precisa

  1. Philips HD9252 Transformer Replacement, Top: passo 1, imagem 1 %32
    • Insert a nylon spudger underneath the top of the device.

    • Leverage the tool and pop off each of the eight tabs holding the plastic cover in place.

  2. Philips HD9252 Transformer Replacement: passo 2, imagem 1 %32
    • Remove the four 12.4 mm screws in each of the corners using a JIS #1 screwdriver.

  3. Philips HD9252 Transformer Replacement: passo 3, imagem 1 %32
    • Remove the top by lifting it upwards and setting it down.

  4. Philips HD9252 Transformer Replacement, Transformer: passo 4, imagem 1 %32
    • Remove the two 39.5 mm screws attached to the black piece of the transformer using a JIS #1 screwdriver.

  5. Philips HD9252 Transformer Replacement: passo 5, imagem 1 %32
    • Remove the top piece, using a Phillips #2 screwdriver, to get the whole transformer.

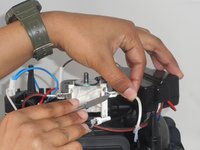
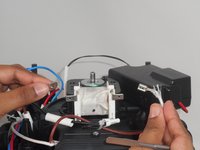
  6. Philips HD9252 Transformer Replacement: passo 6, imagem 1 %32 Philips HD9252 Transformer Replacement: passo 6, imagem 2 %32
    • Remove the brown and white wire attached to the transformer using a spudger.

    • Disconnect both the brown and white cables.

  7. Philips HD9252 Transformer Replacement: passo 7, imagem 1 %32
    • Replace the transformer.

Conclusão

To reassemble your device, follow these instructions in reverse order.

Um comentário

This is not the transformer, it is the coil of the shaded-pole motor.

Werner Hinzmann - Responder

Comentar

Exibir estatísticas:

Últimas 24 horas: 2

Últimos 7 dias: 17

Últimos 30 dias: 52

Ao todo: 445