Introdução
History / Backstory
The steam iron is a device which allows us to iron our clothes to remove wrinkles. First known use of the iron was in china where they used hot metal to "iron" their clothes. Henry W. Seeley in 1882, invented the first electric iron, which lead to the development of the current steam iron. An everyday device to make our clothes always look sharp and neat.
Credits
Special thanks to all contributors within this project:
- Rick Kamikura
- Han Sang Ryu
- Tevin Rillera
- Kalwin Cheung
O que você precisa
-
-
This is the steam iron prior to disassembly.
-
Model no. - Philips EasySpeed 2100W Steam Iron
-
-
-
Remove the temperature dial from the clothes iron by prying it off with a chisel
-
Be careful when doing this as the dial may snap due to force.
-
-
-
Pull out the spray and steam button from the iron. This should be able to do through a bit of force.
-
Tip: if it is not coming out easily, a little wiggle would help in pulling out the buttons.
-
Try not to twist the buttons around too much as it may snap from excessive force.
-
-
-
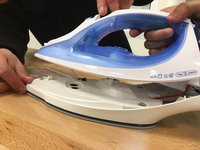
Remove the back plastic piece of the clothes iron through carefully prying it off with a chisel.
-
Warning: As this piece is quite fragile, it can snap easily during this step.
-
The second image displays what the back cover looks like when removed.
-
-
-
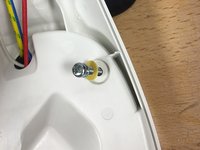
Using a small pin, carefully pry out the rubber plug used to keep the crew underneath from rusting.
-
Then using a screw driver, remove the screw underneath the plug. You should then be able to remove the upper portion of the clothes iron.
-
-
-
-
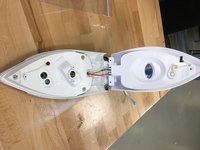
After removing the screw in the prior step, gentle pull the upper portion of the clothes iron apart.
-
The casing should now be released from the sole plate.
-
The second photo displays what it should look like when this step has been executed.
-
-
-
Remove the screw with a screw driver, which keeps together the sole plate and the housing cover for it.
-
There should be 2 screws on either ends of the bottom plate.
-
The second picture shows what the sole plate will look like when this step has been executed.
-
-
-
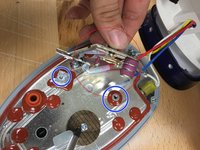
Next remove the 2 screws which attaches the contact strips of the sole plate.
-
The location of the 2 screws are highlighted in image 2.
-
-
-
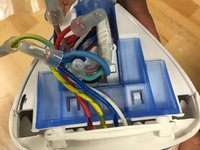
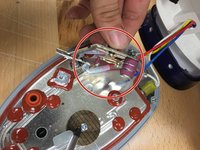
Carefully pry the upper casing off to reveal the circuit board.
-
The casing may be difficult to remove, use a flat tool like a chisel or flathead screwdriver to act as a lever, gently lifting the casing off
-
-
-
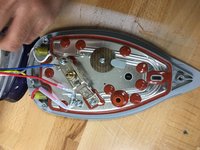
Remove circuit board from housing.
-
Note - Circuit board cannot be removed along with the wiring of the clothes iron, due to it being a hazard.
-
Note - The circuit board has a clear plastic casing which can easily be unclipped from the board.
-
-
-
Pull out the settings switch for the clothes iron, this is very easy as it is not held in place by any fasteners.
-
-
-
Carefully clip off the blue casing which covers the spray nozzle.
-
This is quite difficult as the hinges are small, ideal to use a thin flat object to pry it out.
-


Although disassembling the Philips EasySpeed 2100W Steam Iron was not hard. It does feature many small fasteners which it is advised that you use zip-lock bags to reduce the risk of losing a part. Also it is noted that the wiring is something which cannot be removed due to it being a safety hazard.
Although disassembling the Philips EasySpeed 2100W Steam Iron was not hard. It does feature many small fasteners which it is advised that you use zip-lock bags to reduce the risk of losing a part. Also it is noted that the wiring is something which cannot be removed due to it being a safety hazard.
Cancelar: não concluí este guia.
23 outras pessoas executaram este guia.
Documentos anexados
4 comentários
Excelente explicación paso a paso con muy buenas ilustraciones!