Ir para o conteúdo principal

Panasonic Lumix DMC-G5 Back Panel Replacement

O que você precisa

  1. Panasonic Lumix DMC-G5 Back Panel Replacement, Back Panel: passo 1, imagem 1 %32
    • Remove four JIS #000 screws from the bottom part of the camera.

  2. Panasonic Lumix DMC-G5 Back Panel Replacement: passo 2, imagem 1 %32 Panasonic Lumix DMC-G5 Back Panel Replacement: passo 2, imagem 2 %32
    • Remove two JIS #000 screws from both sides of the camera.

  3. Panasonic Lumix DMC-G5 Back Panel Replacement: passo 3, imagem 1 %32
    • Remove two JIS #000 screws under the viewfinder.

  4. Panasonic Lumix DMC-G5 Back Panel Replacement: passo 4, imagem 1 %32 Panasonic Lumix DMC-G5 Back Panel Replacement: passo 4, imagem 2 %32
    • Remove the viewfinder lid.

    • Then, remove the two JIS #000 screws on the viewfinder.

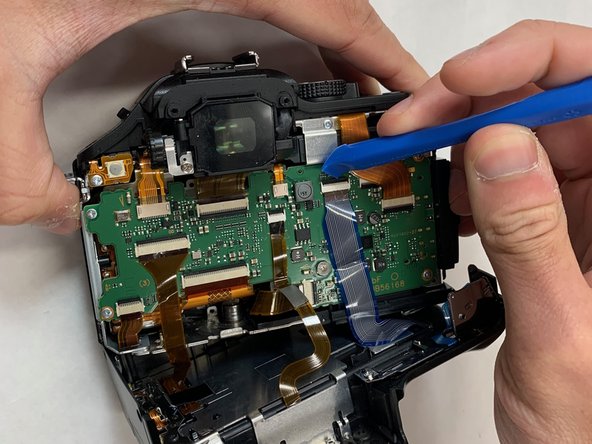
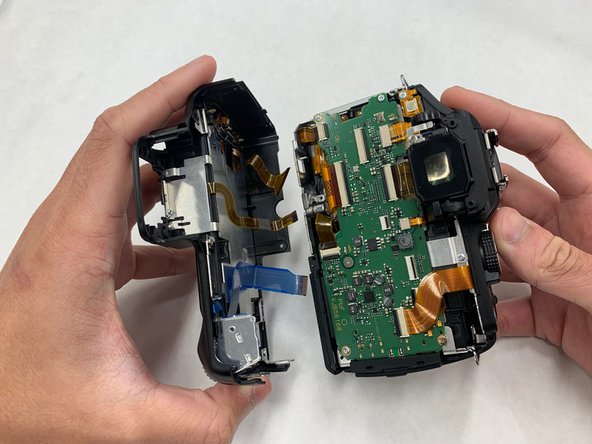
  5. Panasonic Lumix DMC-G5 Back Panel Replacement: passo 5, imagem 1 %32 Panasonic Lumix DMC-G5 Back Panel Replacement: passo 5, imagem 2 %32 Panasonic Lumix DMC-G5 Back Panel Replacement: passo 5, imagem 3 %32
    • Gently remove the back panel from the camera.

    • Unclip the ribbon cable from the motherboard using Wide Plastic Opening Tools and pull the cable gently.

Conclusão

To reassemble your device, follow these instructions in reverse order.

Uma outra pessoa concluiu este guia.

Khairul Samsudin

Membro desde: 05/22/19

412 Reputação

Autoria de 4 guias

Equipe

IUPUI, Team S1-G4, Harley Summer 2019 Membro de IUPUI, Team S1-G4, Harley Summer 2019

IUPUI-HARLEY-SU19S1G4

Membros da 3

Autoria de 8 guias

0 comentários

Adicione um comentário

Exibir estatísticas:

Últimas 24 horas: 0

Últimos 7 dias: 4

Últimos 30 dias: 9

Duração total: 644