Ir para o conteúdo principal

Palm Pilot Professional 3com LCD Screen Replacement

O que você precisa

  1. Palm Pilot Professional 3com LCD Screen Replacement, Keypad: passo 1, imagem 1 %32
    • Unscrew the three screws on the back of the Palm Pilot.

  2. Palm Pilot Professional 3com LCD Screen Replacement: passo 2, imagem 1 %32 Palm Pilot Professional 3com LCD Screen Replacement: passo 2, imagem 2 %32
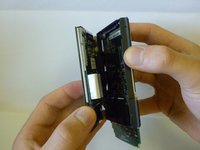
    • Pull the back cover from the bottom of the device and separate the interlocking tabs on the top to remove the back cover.

  3. Palm Pilot Professional 3com LCD Screen Replacement: passo 3, imagem 1 %32
    • The front plastic cover is now free to be removed from the rest of the device.

  4. Palm Pilot Professional 3com LCD Screen Replacement: passo 4, imagem 1 %32
    • The keypad is now free to be removed from the rest of the device.

  5. Palm Pilot Professional 3com LCD Screen Replacement, LCD Screen: passo 5, imagem 1 %32
    • Looking at the back of the device hold one of the white tabs on the ribbon cable connector down and use tweezers to push in the other white tab toward the device at the same time.

  6. Palm Pilot Professional 3com LCD Screen Replacement: passo 6, imagem 1 %32
    • The ribbon cable is now loose. Use the tweezers to carefully slide the ribbon cable out of the connector.

  7. Palm Pilot Professional 3com LCD Screen Replacement: passo 7, imagem 1 %32 Palm Pilot Professional 3com LCD Screen Replacement: passo 7, imagem 2 %32
    • The screen is now disconnected from the rest of the device and can now be removed.

Conclusão

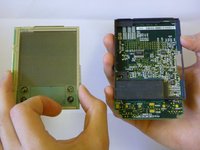
To reassemble your device, follow these instructions in reverse order.

Kevin Santos

Membro desde: 03/09/12

1 Reputação

Autoria de 4 guias

Equipe

Clemson, Team 2-4, Benson Spring 2012 Membro de Clemson, Team 2-4, Benson Spring 2012

CLEM-BENSON-S12S2G4

Membros da 3

Autoria de 5 guias

0 comentários

Adicione um comentário

Exibir estatísticas:

Últimas 24 horas: 2

Últimos 7 dias: 3

Últimos 30 dias: 4

Duração total: 1,493