Ir para o conteúdo principal

PSP Go Directional Pad Replacement

O que você precisa

  1. PSP Go Directional Pad Replacement, Back Cover: passo 1, imagem 1 %32 PSP Go Directional Pad Replacement, Back Cover: passo 1, imagem 2 %32
    • Unscrew the four Phillips screws on the back of the PSP Go.

    • Rotate the PSP so you can see the top of the device.

    • Unscrew the two Phillips screws next to the volume buttons.

  2. PSP Go Directional Pad Replacement: passo 2, imagem 1 %32 PSP Go Directional Pad Replacement: passo 2, imagem 2 %32
    • Use a plastic opening tool around the perimeter of the back cover to loosen it on all sides.

    • Open the back cover by gently lifting the right side, and rotating it to the left side (as if you were opening a book).

    • Be careful not to rotate the back cover from the bottom, as you will break the plastic screw holes on top of the device.

  3. PSP Go Directional Pad Replacement, Top Cover: passo 3, imagem 1 %32
    • Pull the top cover upwards gently from its housing.

  4. PSP Go Directional Pad Replacement, Left Trigger: passo 4, imagem 1 %32
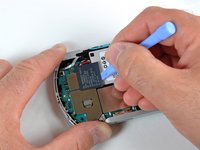
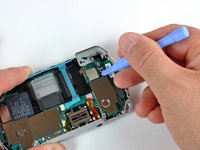
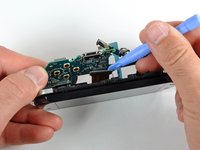
    • Use a plastic opening tool to gently flip up the left trigger connector.

  5. PSP Go Directional Pad Replacement: passo 5, imagem 1 %32 PSP Go Directional Pad Replacement: passo 5, imagem 2 %32
    • Unscrew the lone Phillips screw holding the trigger in place. Remove both trigger and retaining plate from the PSP Go.

    • If necessary, repeat steps 2 and 3 to remove the right trigger button.

  6. PSP Go Directional Pad Replacement, Battery: passo 6, imagem 1 %32 PSP Go Directional Pad Replacement, Battery: passo 6, imagem 2 %32 PSP Go Directional Pad Replacement, Battery: passo 6, imagem 3 %32
    • Do not peel the sticker away from the left EMI shield. It will expose the "VOID VOID" lettering that will void your warranty!

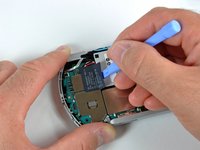
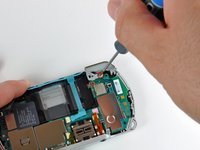
    • Use the plastic opening tool to gently peel away at the "Warranty Void" sticker. Start on one edge, as shown, and slide the tool from side to side until the sticker is removed from just the battery.

  7. PSP Go Directional Pad Replacement: passo 7, imagem 1 %32
    • Gently pull the sticker away from the battery connector, just enough so that the connector is visible.

    • Wedge a plastic opening tool in between the connector and logic board, and gently pull the connector upwards.

    • Make sure not to disconnect the white connector socket on the logic board, and just the connector itself.

  8. PSP Go Directional Pad Replacement: passo 8, imagem 1 %32 PSP Go Directional Pad Replacement: passo 8, imagem 2 %32
    • Use a plastic opening tool to pop out the battery, being careful not to snag the "Warranty Void" sticker in the process.

    • When putting a new battery into the PSP Go, make sure you hold the "Warranty Sticker" so you don't put the battery on top of it.

  9. PSP Go Directional Pad Replacement, Logic Board: passo 9, imagem 1 %32
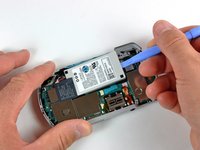
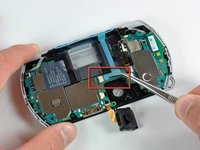
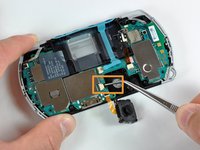
    • Remove the single Phillips screw securing the logic board to the inner case.

  10. PSP Go Directional Pad Replacement: passo 10, imagem 1 %32 PSP Go Directional Pad Replacement: passo 10, imagem 2 %32
    • Use a plastic opening tool to gently flip up the right trigger connector.

    • Unscrew the lone Phillips screw holding the trigger in place. Remove both trigger and retaining plate from the PSP Go.

  11. PSP Go Directional Pad Replacement: passo 11, imagem 1 %32 PSP Go Directional Pad Replacement: passo 11, imagem 2 %32
    • Use a #00 Phillips screwdriver to unscrew both bottom plate screws.

    • Remove the bottom plate by lifting it away from the device.

  12. PSP Go Directional Pad Replacement: passo 12, imagem 1 %32
    • Remove both headphone jack and analog joystick screws using your #00 Phillips screwdriver.

  13. PSP Go Directional Pad Replacement: passo 13, imagem 1 %32 PSP Go Directional Pad Replacement: passo 13, imagem 2 %32
    • Be very careful when disconnecting the following cables. The connectors do not have flip-up tabs; just hold each cable steady and pull it out of the connector.

    • Unplug the volume button cable using a pair of tweezers. Be careful not to damage the cable.

    • Unplug the Start/Select button cable the same way. Make sure to grasp the black plastic pull tab of the cable.

  14. PSP Go Directional Pad Replacement: passo 14, imagem 1 %32
    • Use a pair of tweezers to pull out the battery's clear plastic cover.

    • Notice the little metal tab and slot (marked in red) where the clear plastic cover slides into. Make sure you slide the cover into place properly when reassembling the PSP Go.

  15. PSP Go Directional Pad Replacement: passo 15, imagem 1 %32
    • The logic board is still connected to the display, so do not fully remove it from its housing!

    • Gently lift the logic board slightly out of its housing.

  16. PSP Go Directional Pad Replacement: passo 16, imagem 1 %32 PSP Go Directional Pad Replacement: passo 16, imagem 2 %32
    • Use a plastic opening tool to disconnect the display cable from the logic board.

    • The D-pad may come loose while prying the logic board.

    • The logic board should now be free from the rest of the device.

    • During reassembly, make sure to properly line up the power button with the power button lever on the logic board.

  17. PSP Go Directional Pad Replacement, Directional Pad: passo 17, imagem 1 %32
    • Use a plastic opening tool to take out the directional pad buttons.

Conclusão

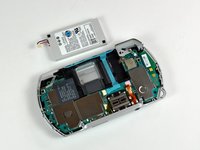
To reassemble your device, follow these instructions in reverse order.

3 outras pessoas executaram este guia.

0 comentários

Adicione um comentário

Exibir estatísticas:

Últimas 24 horas: 1

Últimos 7 dias: 5

Últimos 30 dias: 31

Duração total: 8,956