Esta versão pode conter edições incorretas. Mude para o último instantâneo verificado.
O que você precisa
-
Este passo não foi traduzido. Ajude a traduzi-lo
-
Before you begin, switch off your phone.
-
Remove the SIM card tray.
-
-
Este passo não foi traduzido. Ajude a traduzi-lo
-
Remove the two Torx T2 screws (2.5 mm length).
-
The OnePlus 5T doesn't use a lot of adhesive to secure the backcover, however the clamps are very strong and require some force during the opening procedure.
-
-
Este passo não foi traduzido. Ajude a traduzi-lo
-
Insert an opening tool between the display and the backcover at the bottom end of the phone.
-
Use the opening tool to create a gap between back cover and display.
-
Insert an opening pick in the gap you created with the opening tool.
-
-
Este passo não foi traduzido. Ajude a traduzi-lo
-
Slide the opening pick to the bottom right corner of the phone.
-
Insert a second opening pick and slide it to the bottom left corner of the phone.
-
-
Este passo não foi traduzido. Ajude a traduzi-lo
-
Slide the opening pick around the bottom left corner and then up along the left edge of the phone to open the plastic clamps that secure the backcover.
-
-
Este passo não foi traduzido. Ajude a traduzi-lo
-
Slide the opening pick around the bottom right corner and then up along the right edge of the phone to open the plastic clamps that secure the backcover.
-
-
Este passo não foi traduzido. Ajude a traduzi-lo
-
Try not to remove the backcover all the way yet. The fingerprint and the charging port and headphone flex cables are still connected to the motherboard.
-
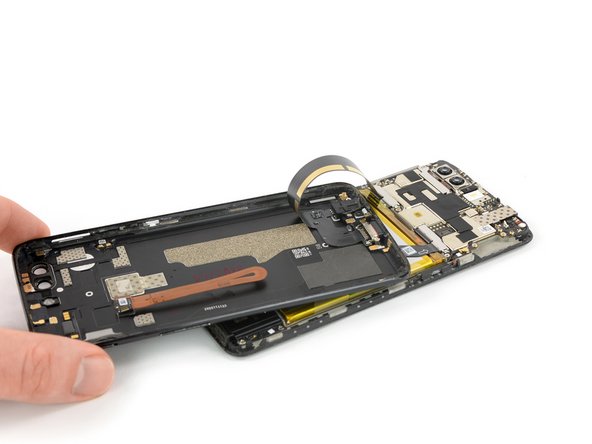
Flip your phone and carefully lift the bottom end of the backcover away from the phone assembly. Fold it to left and hold it at an 80° angle.
-
-
-
Este passo não foi traduzido. Ajude a traduzi-lo
-
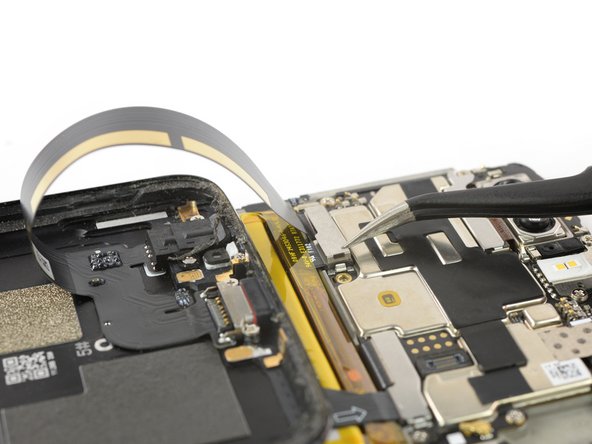
Use a spudger to pry up and disconnect the fingerprint flex cable.
-
-
Este passo não foi traduzido. Ajude a traduzi-lo
-
Twist the backcover around 180° and lay it down to align the bottom end of the backcover the top edge of the battery.
-
-
Este passo não foi traduzido. Ajude a traduzi-lo
-
Use a pair of tweezers to remove the small metal shield which covers the battery and the charging port and headphone jack flex cable connectors.
-
-
Este passo não foi traduzido. Ajude a traduzi-lo
-
Use a spudger to pry up and disconnect the charging port and headphone jack flex cable.
-
-
Este passo não foi traduzido. Ajude a traduzi-lo
-
Use a spudger to pry up and disconnect the battery flex cable.
-
-
Este passo não foi traduzido. Ajude a traduzi-lo
-
Use a pair of tweezers to unhinge and remove the small metal shield that covers the main and interconnect flex cable connectors.
-
-
Este passo não foi traduzido. Ajude a traduzi-lo
-
Use a spudger to pry up and disconnect the main flex cable.
-
-
Este passo não foi traduzido. Ajude a traduzi-lo
-
Fold the main flex cable out of your way to get better access to the battery.
-
-
Este passo não foi traduzido. Ajude a traduzi-lo
-
Pull up the green adhesive strip to lift the battery out of its recess.
-
Swing the battery up to an upright position.
-
Peel the battery off the remaining adhesive.
-
Remove the battery.
-
-
Este passo não foi traduzido. Ajude a traduzi-lo
-
Peel the battery's adhesive sticker off the midframe.
-


Cancelar: não concluí este guia.
65 outras pessoas executaram este guia.


25 comentários
my flex cable is stuck to the top of the metal protector wtf
My was stuck too, but with little bit of trying and patience, I was able to separate them by holding metal with pair of tweezers and gently prying it with very thin flat screwdriver bit.
Any place to get the battery adhesive sticker in order to replace it?
Hi E S,
are you talking about the battery adhesive? If that is the case i can say - this sticker holds the battery in place and prevents it from moving around. If there is no sticker you might hear some noice when shaking the phone because the battery is moving. However it is unlikely that the battery disconnects because of that since the connector sits under a small metal shield. Depending on the phone movement theres a tiny chance that the battery or its cable deforms or gets damaged from moving around over time. It is not necessary to replace the adhesive with an original one, however i recommend using any double sided tape or similar rather than nothing.