Ir para o conteúdo principal

Este guia tem alterações mais recentes. Mudar para a última versão não verificada.

Nook Tablet Midframe Replacement

O que você precisa

  1. Nook Tablet Midframe Replacement, Back Cover: passo 1, imagem 1 %32
    • Flip the Nook over.

  2. Nook Tablet Midframe Replacement: passo 2, imagem 1 %32 Nook Tablet Midframe Replacement: passo 2, imagem 2 %32
    • Lift the flap that reads "Nook" to reveal the tape that is underneath. Remove the memory card if one is present.

    • Remove the tape covering the round holes to reveal two T5 Torx screws.

    • Remove the two T5 Torx screws securing the back cover.

  3. Nook Tablet Midframe Replacement: passo 3, imagem 1 %32 Nook Tablet Midframe Replacement: passo 3, imagem 2 %32
    • Insert the flat end of a spudger between the front panel and the rear assembly.

    • Though these photos show a screwdriver, use a spudger or plastic opening tool in order to prevent damage to the device.

    • Use a spudger to lift the the back panel from the rest of the Nook.

  4. Nook Tablet Midframe Replacement: passo 4, imagem 1 %32 Nook Tablet Midframe Replacement: passo 4, imagem 2 %32
    • Slide the spudger around the edges of the Nook to loosen the back panel.

  5. Nook Tablet Midframe Replacement: passo 5, imagem 1 %32
    • Pull the back panel off the Nook.

  6. Nook Tablet Midframe Replacement, Screen Bezel: passo 6, imagem 1 %32 Nook Tablet Midframe Replacement, Screen Bezel: passo 6, imagem 2 %32
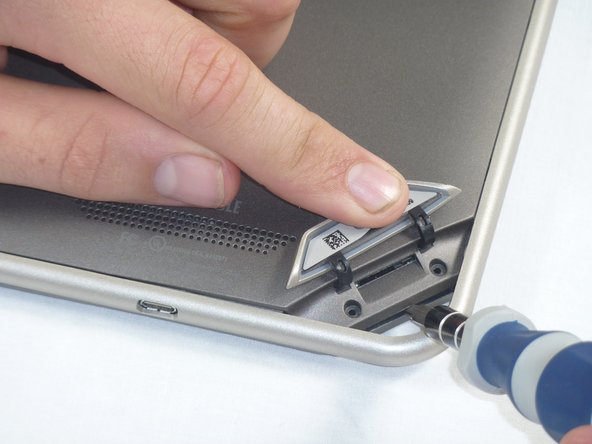
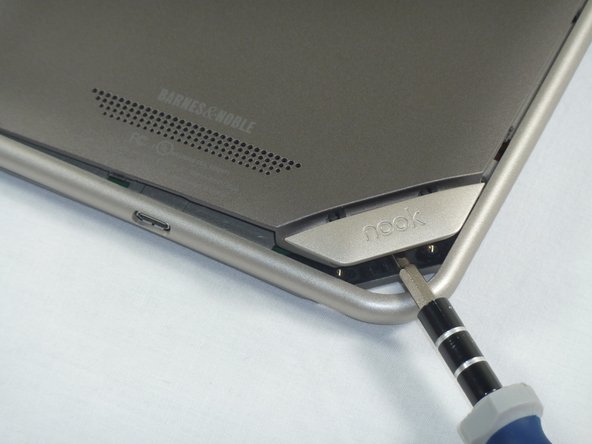
    • Using the T5 Torx screwdriver, remove the ten T5 screws from around the edges of the silver midframe.

  7. Nook Tablet Midframe Replacement: passo 7, imagem 1 %32 Nook Tablet Midframe Replacement: passo 7, imagem 2 %32
    • Using a spudger or plastic opening tool, carefully pry the screen bezel away from the silver midframe.

  8. Nook Tablet Midframe Replacement, Disconnect the Battery: passo 8, imagem 1 %32 Nook Tablet Midframe Replacement, Disconnect the Battery: passo 8, imagem 2 %32
    • Lift up the foam pad at the corner of the battery to reveal the battery connector.

    • Use a spudger or plastic opening tool to disconnect the battery cable from the motherboard.

    • These photos show a screwdriver, but we recommend using a nonconductive tool like a spudger to prevent a potential short.

  9. Nook Tablet Midframe Replacement, Midframe: passo 9, imagem 1 %32
    • Lift up the foam that covers the power connector and volume connector.

    • Disconnect the power and volume cables from their sockets on the motherboard.

  10. Nook Tablet Midframe Replacement: passo 10, imagem 1 %32 Nook Tablet Midframe Replacement: passo 10, imagem 2 %32
    • Carefully lift the silver midframe away from the motherboard and display assembly.

Conclusão

To reassemble your device, follow these instructions in reverse order.

Holly Lowe

Membro desde: 09/26/12

238 Reputação

Autoria de 3 guias

Equipe

Cal Poly, Team 1-4, Propen Fall 2012 Membro de Cal Poly, Team 1-4, Propen Fall 2012

CPSU-PROPEN-F12S1G4

Membros da 4

Autoria de 14 guias

0 comentários

Adicione um comentário

Exibir estatísticas:

Últimas 24 horas: 0

Últimos 7 dias: 3

Últimos 30 dias: 4

Duração total: 406