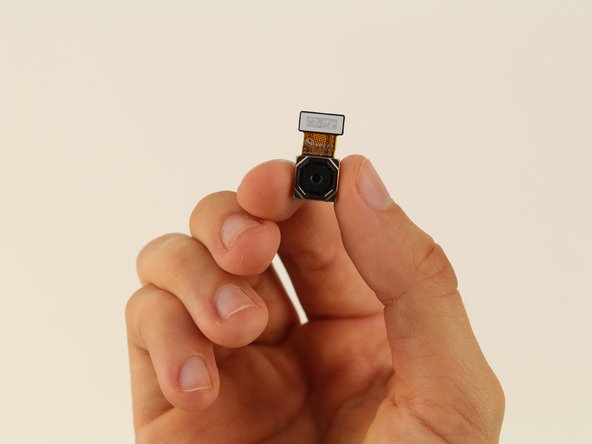
Ir para o conteúdo principal

Nokia 6 Rear-Facing Camera Replacement

O que você precisa

  1. Nokia 6 Rear-Facing Camera Replacement, Display Assembly: passo 1, imagem 1 %32 Nokia 6 Rear-Facing Camera Replacement, Display Assembly: passo 1, imagem 2 %32 Nokia 6 Rear-Facing Camera Replacement, Display Assembly: passo 1, imagem 3 %32
    • Power off your Nokia 6 before beginning disassembly.

    • Insert the SIM card ejection tool into the hole on the left side of the phone.

    • Remove the SIM card and microSD card.

  2. Nokia 6 Rear-Facing Camera Replacement: passo 2, imagem 1 %32
    • If your display glass is cracked, take precaution by taping over the display to prevent further breakage and harm.

    • Lay overlapping strips of clear packing tape over the Nokia 6's display until the whole screen is covered.

  3. Nokia 6 Rear-Facing Camera Replacement: passo 3, imagem 1 %32
    • To soften the adhesive, use a heat gun and heat one edge of the phone for five minutes.

    • To use the heat gun, plug it into an outlet.

    • When the heat gun is plugged in, the heat gun automatically turns on and will start blowing hot air.

  4. Nokia 6 Rear-Facing Camera Replacement: passo 4, imagem 1 %32
    • Take a Jimmy and slide it under the glass after the adhesive has been softened.

    • Place a pick under the glass after lifting with the pry tool so that the screen won't re-adhere to the frame again.

    • Make sure to not touch the LCD edge underneath the glass layer with the metal pry tool or the cards. This can damage the ribbon cables underneath and compromise the structural integrity of the phone itself.

    • The corners of the screen are the most fragile part of the screen. Make sure that the entire edge of the screen is dislodged from the frame before prying at the corners.

  5. Nokia 6 Rear-Facing Camera Replacement: passo 5, imagem 1 %32
    • Lift the screen off of the phone.

  6. Nokia 6 Rear-Facing Camera Replacement: passo 6, imagem 1 %32 Nokia 6 Rear-Facing Camera Replacement: passo 6, imagem 2 %32
    • Use a Phillips #000 screwdriver to remove the 1 mm x 1.4 mm screw holding down the metal bracket over the screen ribbon connector.

  7. Nokia 6 Rear-Facing Camera Replacement: passo 7, imagem 1 %32
    • Remove the metal bracket with a tweezer.

  8. Nokia 6 Rear-Facing Camera Replacement: passo 8, imagem 1 %32
    • Use a spudger to disconnect the screen ribbon connector and free the display assembly.

    • The corners and edge of the LCD are fragile. Be careful attaching it to the back of the phone.

    • Carefully remove the screen from the device.

  9. Nokia 6 Rear-Facing Camera Replacement, Home Button Assembly: passo 9, imagem 1 %32
    • Disconnect the battery connector with a spudger.

  10. Nokia 6 Rear-Facing Camera Replacement: passo 10, imagem 1 %32 Nokia 6 Rear-Facing Camera Replacement: passo 10, imagem 2 %32
    • Use a Phillips #00 screwdriver to remove the 1.2 mm x 2.2 mm screw in the upper hand corner of the phone.

    • Use tweezers to remove the bracket.

  11. Nokia 6 Rear-Facing Camera Replacement: passo 11, imagem 1 %32 Nokia 6 Rear-Facing Camera Replacement: passo 11, imagem 2 %32
    • Detach the cable with the black nylon spudger.

    • Detach the home button and remove it from the device.

  12. Nokia 6 Rear-Facing Camera Replacement, Midframe: passo 12, imagem 1 %32
    • Remove 18 screws.

    • There is one 1 mm x 1.4 mm screw that needs to be removed by a Phillips #000 screwdriver.

    • One of the screws is 1.2 mm x 4.2 mm and will be removed by a Phillips #00.

    • The remaining 16 screws can be removed by the Phillips #00 screwdriver and are 1.2 mm x 2.2 mm.

  13. Nokia 6 Rear-Facing Camera Replacement: passo 13, imagem 1 %32 Nokia 6 Rear-Facing Camera Replacement: passo 13, imagem 2 %32
    • Decouple the midframe with the spudger and remove the midframe from the device.

  14. Nokia 6 Rear-Facing Camera Replacement, Motherboard: passo 14, imagem 1 %32 Nokia 6 Rear-Facing Camera Replacement, Motherboard: passo 14, imagem 2 %32
    • Remove the bracket with tweezers.

  15. Nokia 6 Rear-Facing Camera Replacement: passo 15, imagem 1 %32 Nokia 6 Rear-Facing Camera Replacement: passo 15, imagem 2 %32 Nokia 6 Rear-Facing Camera Replacement: passo 15, imagem 3 %32
    • Detach the two cables with the spudger.

    • Detach the cable with a pair of tweezers.

    • Be careful when detaching the cables, make sure to not completely remove the cables from the phone!

  16. Nokia 6 Rear-Facing Camera Replacement: passo 16, imagem 1 %32
    • Remove six screws.

    • Two of these screws are 1.0 mm x 1.4 mm and need to be removed by a Phillips #000 screwdriver.

    • The remaining four screws are 1.2 mm x 2.2 mm and are removed by a Phillips #00 screwdriver.

  17. Nokia 6 Rear-Facing Camera Replacement: passo 17, imagem 1 %32 Nokia 6 Rear-Facing Camera Replacement: passo 17, imagem 2 %32
    • Remove the motherboard from the Nokia 6 with the spudger.

    • Be careful because the motherboard is fragile. Wiggle it gently to remove it.

  18. Nokia 6 Rear-Facing Camera Replacement, Rear-Facing Camera: passo 18, imagem 1 %32
    • Turn the motherboard around to see the rear camera.

  19. Nokia 6 Rear-Facing Camera Replacement: passo 19, imagem 1 %32 Nokia 6 Rear-Facing Camera Replacement: passo 19, imagem 2 %32
    • Remove the rear camera with the spudger.

Conclusão

To reassemble your device, follow these instructions in reverse order.

2 outras pessoas executaram este guia.

Chrissy Robins

Membro desde: 04/15/19

1.510 Reputação

Autoria de 10 guias

Equipe

Cal Poly, Team S9-G15, Maness Spring 2019 Membro de Cal Poly, Team S9-G15, Maness Spring 2019

CPSU-MANESS-S19S9G15

Membros da 4

Autoria de 14 guias

0 comentários

Adicione um comentário

Exibir estatísticas:

Últimas 24 horas: 0

Últimos 7 dias: 2

Últimos 30 dias: 3

Duração total: 465