Esta versão pode conter edições incorretas. Mude para o último instantâneo verificado.
O que você precisa
-
Este passo não foi traduzido. Ajude a traduzi-lo
-
Use a metal spudger to remove the white plastic screw covers stuck to the lower case near the front of the Wii.
-
-
Este passo não foi traduzido. Ajude a traduzi-lo
-
Remove the two 8.3 mm Tri-Point screws hidden under the covers you just removed.
-
-
Este passo não foi traduzido. Ajude a traduzi-lo
-
Remove the single 5.9 mm Phillips screw under the controller port door nearest the faceplate.
-
-
Este passo não foi traduzido. Ajude a traduzi-lo
-
Use a metal spudger to remove the rubber foot stuck to the side of the Wii near the DVD drive opening.
-
-
Este passo não foi traduzido. Ajude a traduzi-lo
-
Remove the single 5.9 mm Phillips screw hidden under the foot you just removed.
-
-
Este passo não foi traduzido. Ajude a traduzi-lo
-
Carefully pull the faceplate away from the front of the Wii.
-
Use a pair of tweezers to disconnect the LED cable's plastic connector from the motherboard.
-
Remove the faceplate.
-
-
Este passo não foi traduzido. Ajude a traduzi-lo
-
Open the controller port cover until it is perpendicular to the black controller port bezel.
-
Pull the controller port cover straight up to release it from the outer case.
-
-
Este passo não foi traduzido. Ajude a traduzi-lo
-
Remove the two remaining 4.1 mm Phillips screws along the top edge of the black plastic controller port bezel.
-
Lift the bezel from the long edge furthest away from the controller ports and remove it from the Wii.
-
-
Este passo não foi traduzido. Ajude a traduzi-lo
-
Remove the two 5 mm Phillips screws above the controller ports.
-
-
Este passo não foi traduzido. Ajude a traduzi-lo
-
Use a metal spudger to remove the three highlighted screw covers stuck to the side of the Wii.
-
-
Este passo não foi traduzido. Ajude a traduzi-lo
-
Remove the following screws:
-
Two 5 mm Phillips screws
-
One 8.2 mm Tri-Point screw
-
-
Este passo não foi traduzido. Ajude a traduzi-lo
-
Use a metal spudger to remove the two rubber feet stuck to the bottom face of the Wii near the rear ports.
-
-
Este passo não foi traduzido. Ajude a traduzi-lo
-
Remove the two 8.2 mm Tri-Wing screws hidden under the feet you just removed.
-
-
-
Este passo não foi traduzido. Ajude a traduzi-lo
-
Lift the outer case straight up off the body of the Wii.
-
-
Este passo não foi traduzido. Ajude a traduzi-lo
-
Remove the small Phillips screw securing the battery door to the bottom panel.
-
Pull the battery door out of the Wii.
-
-
Este passo não foi traduzido. Ajude a traduzi-lo
-
Remove the 8.2 mm Tri-Point screw that was hidden beneath the battery door.
-
-
Este passo não foi traduzido. Ajude a traduzi-lo
-
Remove the two 8.2 mm Tri-Point screws securing the DVD drive shield near the controller ports.
-
-
Este passo não foi traduzido. Ajude a traduzi-lo
-
Lift the DVD drive shield upward and remove it from the Wii.
-
-
Este passo não foi traduzido. Ajude a traduzi-lo
-
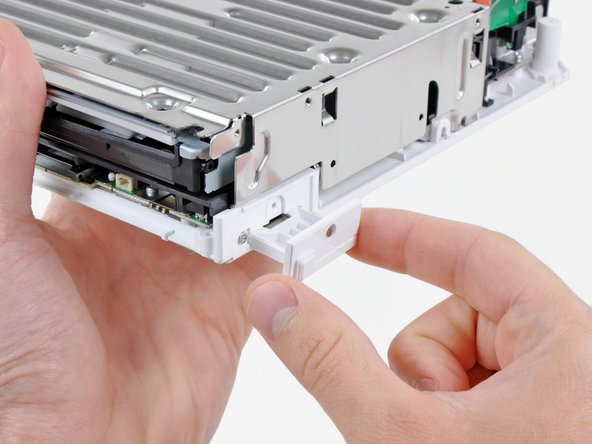
Remove the four 9 mm #1 Phillips screws securing the DVD drive to the bottom panel.
-
-
Este passo não foi traduzido. Ajude a traduzi-lo
-
Lift the side of the DVD drive opposite the controller ports enough to access the cables on its bottom face.
-
Carefully pull the DVD drive power cable out from under the plastic shroud near the heat sink.
-
-
Este passo não foi traduzido. Ajude a traduzi-lo
-
Pull the DVD drive power cable away from its socket on the DVD drive.
-
-
Este passo não foi traduzido. Ajude a traduzi-lo
-
Use your fingernail to flip up the retaining flap on the DVD drive ribbon cable socket.
-
Pull the DVD drive ribbon cable out of its socket.
-
Remove the DVD drive from the Wii.
-
-
Este passo não foi traduzido. Ajude a traduzi-lo
-
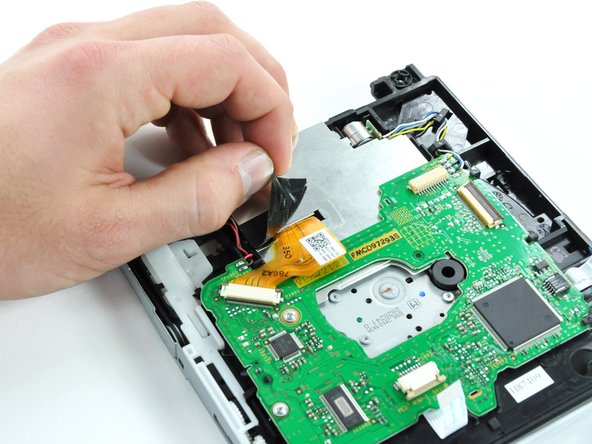
Pull the disc detector ribbon cable straight out of its connector with a pair of tweezers.
-
-
Este passo não foi traduzido. Ajude a traduzi-lo
-
Use the tip of a spudger to push the sides of the ZIF connector fastener securing the spindle motor ribbon cable directly away from the connector.
-
Disconnect the spindle motor ribbon cable by pulling it straight out of its connector with a pair of tweezers.
-
-
Este passo não foi traduzido. Ajude a traduzi-lo
-
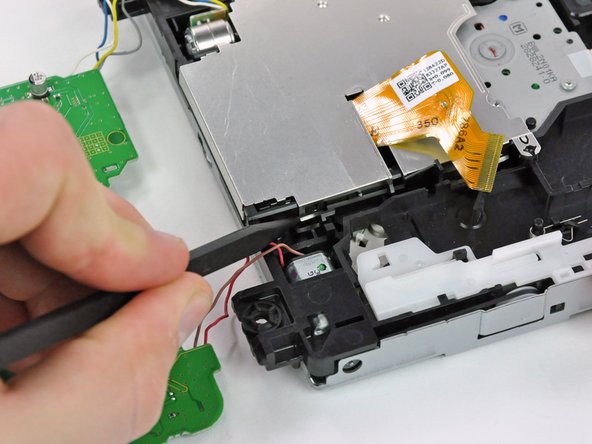
Remove the piece of black cloth tape that covers a portion of the lens ribbon cable.
-
-
Este passo não foi traduzido. Ajude a traduzi-lo
-
Disconnect the lens ribbon cable by first pushing the two locking tabs of the ZIF connector towards the ribbon cable with the tip of a spudger.
-
Use a pair of tweezers to pull the lens ribbon cable straight out of its connector.
-
-
Este passo não foi traduzido. Ajude a traduzi-lo
-
Remove the two 5.0 mm Phillips screws securing the DVD drive board to the drive housing.
-
-
Este passo não foi traduzido. Ajude a traduzi-lo
-
Lift the DVD drive board off the drive housing by first lifting the side with the lens ribbon cable connector.
-
Pull the opposite side of the DVD drive board straight out while lifting the entire board straight up to free it from the small black plastic tabs holding it in place.
-
-
Este passo não foi traduzido. Ajude a traduzi-lo
-
De-route the cables that are soldered to the DVD drive board from underneath their black plastic tabs with the tip of a spudger.
-
-
Este passo não foi traduzido. Ajude a traduzi-lo
-
Remove the single 5.0 mm Phillips screw from the DVD lens EMI shield.
-
-
Este passo não foi traduzido. Ajude a traduzi-lo
-
Use the tip of a spudger to bend the two metal clips up enough so that they are no longer fastened to their respective plastic tabs.
-
-
Este passo não foi traduzido. Ajude a traduzi-lo
-
Insert the tip of a spudger into the hole that is closer to the red and pink wires that connect to the DVD drive board.
-
Rotate the spudger to pry the first tab out of its hole on the DVD drive housing.
-
-
Este passo não foi traduzido. Ajude a traduzi-lo
-
Repeat the action in the previous step to pry the second tab on the EMI shield out of its hole on the DVD drive housing.
-
-
Este passo não foi traduzido. Ajude a traduzi-lo
-
Grasp the EMI shield by the two edges that are free and rotate the entire piece slightly towards the edge that is still held down until the final two remaining clips are free.
-
Lift the EMI shield straight off the DVD drive.
-
-
Este passo não foi traduzido. Ajude a traduzi-lo
-
Remove the 5.0 mm Phillips screw that is closer to the yellow, blue, white, and grey wires.
-
-
Este passo não foi traduzido. Ajude a traduzi-lo
-
While holding the DVD drive with one hand, grasp the DVD drive lens retaining pin (closest to the screw that was just removed) with a pair of needle nose pliers.
-
Slide the retaining pin out towards the edge of the DVD drive housing.
-
Once the pin moves easily, grab it with your fingers and pull it out of the DVD drive housing completely.
-
-
Este passo não foi traduzido. Ajude a traduzi-lo
-
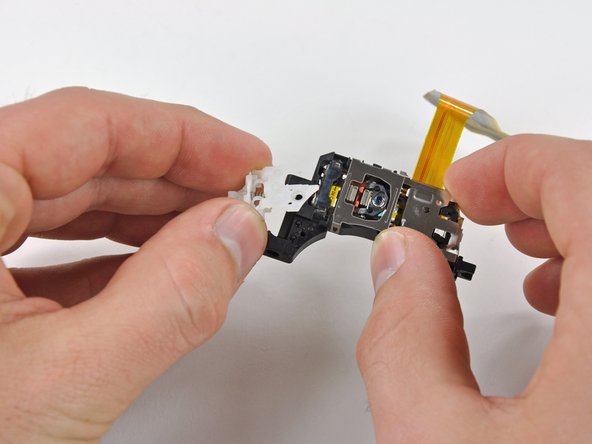
Grab the DVD drive lens assembly by the side that the retaining pin was just removed from.
-
Remove the lens assembly from the DVD drive housing.
-
-
Este passo não foi traduzido. Ajude a traduzi-lo
-
Remove the 4.2 mm Phillips screw that secures the white plastic bracket to the lens assembly.
-
Lift the bracket off the lens assembly.
-


Cancelar: não concluí este guia.
137 outras pessoas executaram este guia.

25 comentários
Many thanks for the excellent guide - my wii is working again!
This is one of the best set of instructions I have ever used. Easy to follow steps with accurate illustrations. Very well done, I don't know how you could make it any better! A++,