Ir para o conteúdo principal

Este guia tem alterações mais recentes. Mudar para a última versão não verificada.

Nintendo Switch Shield Plate Replacement

O que você precisa

  1. Nintendo Switch Shield Plate Replacement, Release the Joy Con controller locking tabs: passo 1, imagem 1 %32 Nintendo Switch Shield Plate Replacement, Release the Joy Con controller locking tabs: passo 1, imagem 2 %32 Nintendo Switch Shield Plate Replacement, Release the Joy Con controller locking tabs: passo 1, imagem 3 %32
    • Before you begin this repair, make sure the device is completely powered off.

    • Press and hold down the small round button on the back of the Joy Con controller.

    • While you hold down the button, slide the controller upward.

  2. Nintendo Switch Shield Plate Replacement, Remove the Joy Con controllers: passo 2, imagem 1 %32 Nintendo Switch Shield Plate Replacement, Remove the Joy Con controllers: passo 2, imagem 2 %32 Nintendo Switch Shield Plate Replacement, Remove the Joy Con controllers: passo 2, imagem 3 %32
    • Continue sliding the Joy Con upward until it's completely removed from the console.

    • Repeat this same process for the other Joy Con.

  3. Nintendo Switch Shield Plate Replacement, Remove the back-side screws: passo 3, imagem 1 %32
    Ferramenta utilizada nesse passo:
    Magnetic Project Mat
    $19.95
    Comprar
    • Use a Y00 screwdriver to remove the four 6.3 mm-long screws securing the rear panel.

    • Throughout this repair, keep track of each screw and make sure it goes back exactly where it came from.

  4. Nintendo Switch Shield Plate Replacement, Remove the top and bottom screws: passo 4, imagem 1 %32 Nintendo Switch Shield Plate Replacement, Remove the top and bottom screws: passo 4, imagem 2 %32
    • Use a JIS 000 driver or an official iFixit PH 000 driver to remove the following screws securing the rear panel:

    • One 2.5 mm-long screw on the top edge of the device

    • Two 2.5 mm-long screws on the bottom edge of the device

    • To prevent these tight screws from stripping, apply firm downward force, work slowly and try another JIS 000 or PH 000 driver if the screws won't come out.

  5. Nintendo Switch Shield Plate Replacement: passo 5, imagem 1 %32 Nintendo Switch Shield Plate Replacement: passo 5, imagem 2 %32
    • Use a JIS 000 screwdriver or an official iFixit PH 000 driver to remove the two 3.8 mm center screws on the sides of the device (one on each side).

  6. Nintendo Switch Shield Plate Replacement: passo 6, imagem 1 %32 Nintendo Switch Shield Plate Replacement: passo 6, imagem 2 %32
    • Use your finger to flip up the kickstand on the back of the device.

    • If there's a microSD card in the microSD card slot, remove it now before you continue to the next step.

  7. Nintendo Switch Shield Plate Replacement: passo 7, imagem 1 %32
    • Use a JIS 000 screwdriver or an official iFixit PH 000 driver to remove the 1.6 mm screw in the kickstand well.

    • Close the kickstand.

  8. Nintendo Switch Shield Plate Replacement: passo 8, imagem 1 %32 Nintendo Switch Shield Plate Replacement: passo 8, imagem 2 %32 Nintendo Switch Shield Plate Replacement: passo 8, imagem 3 %32
    • Open the game card cartridge flap.

    • The game card cartridge flap attaches to the other half of the plastic shell, preventing you from completely lifting up the rear panel if it's closed.

    • Lift the rear panel up from the bottom of the device and remove it.

  9. Nintendo Switch Shield Plate Replacement, Remove the microSD card reader: passo 9, imagem 1 %32
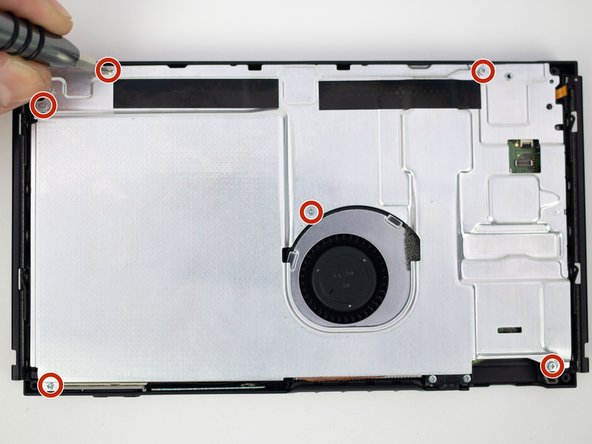
    • Use a JIS 000 screwdriver or an official iFixit PH 000 driver to remove the 3.1 mm screw securing the microSD card reader to the device.

  10. Nintendo Switch Shield Plate Replacement: passo 10, imagem 1 %32 Nintendo Switch Shield Plate Replacement: passo 10, imagem 2 %32
    • Use your fingers or a pair of tweezers to lift the microSD card reader straight up from the device to disconnect and remove it.

    • During reassembly, make sure the press connector underneath the foam pad is firmly connected to the motherboard. It may help to remove the foam pad before reinstalling the card reader.

  11. Nintendo Switch Shield Plate Replacement, Shield Plate: passo 11, imagem 1 %32
    • Remove the six 3.1mm Phillips #000 screws from the shield plate.

  12. Nintendo Switch Shield Plate Replacement: passo 12, imagem 1 %32 Nintendo Switch Shield Plate Replacement: passo 12, imagem 2 %32 Nintendo Switch Shield Plate Replacement: passo 12, imagem 3 %32
    • Remove the shield plate from the device.

    • A thick pink thermal compound bridges the gap between the shield plate and the copper heat sink underneath. For best results, whenever the shield plate is removed, refer to our thermal paste guide to remove the old thermal compound and replace it with an appropriate, thick compound such as K5 Pro during reassembly.

Conclusão

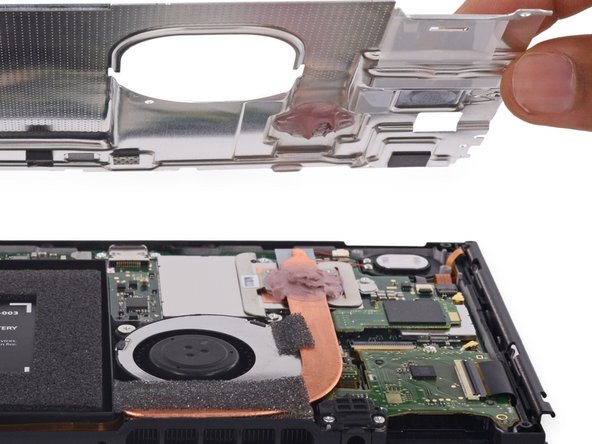
To reassemble your device, follow these instructions in reverse order.

21 outras pessoas executaram este guia.

Blake Klein

Membro desde: 01/29/17

70.510 Reputação

Autoria de 50 guias

0 comentários

Adicione um comentário

Exibir estatísticas:

Últimas 24 horas: 9

Últimos 7 dias: 76

Últimos 30 dias: 295

Duração total: 16,035