Esta versão pode conter edições incorretas. Mude para o último instantâneo verificado.
O que você precisa
-
Este passo não foi traduzido. Ajude a traduzi-lo
-
Turn your GBA upside down so that the battery compartment is facing up.
-
Remove the one Phillips screw holding the battery compartment cover in place.
-
Remove the battery compartment cover.
-
-
Este passo não foi traduzido. Ajude a traduzi-lo
-
Pry the battery up with your fingernail or Spudger.
-
-
Este passo não foi traduzido. Ajude a traduzi-lo
-
Remove the 6 Tripoint screws holding the case together.
-
Pry the 2 halves apart. Do not force it though, or you may break your GBA.
-
Set the bottom half away for later.
-
Be sure not to lose the small, square nut that hold the battery compartment nut in or else you will not be able to screw the battery compartment in.
-
-
-
Este passo não foi traduzido. Ajude a traduzi-lo
-
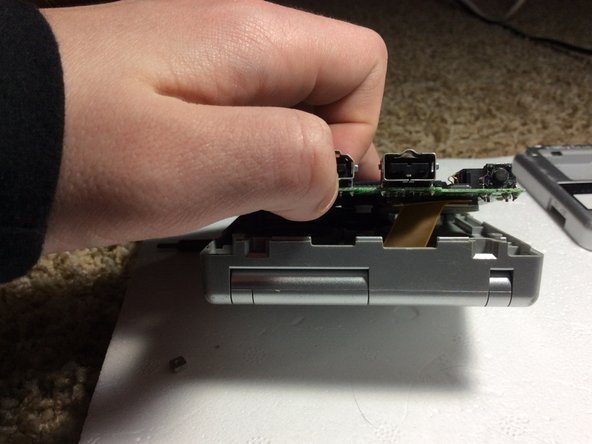
Unscrew the three Phillips screws holding the motherboard to the mid case.
-
WARNING!!! Do NOT Take the motherboard off yet. It is still Secured with A Ribbon Cable.
-
Turn the GBA so that it is like the Third photo.
-
-
Este passo não foi traduzido. Ajude a traduzi-lo
-
Fold the motherboard down like in the first photo. Be sure that the case is ON TOP of the motherboard.
-
Use a screwdriver or tweezers to unplug the ZIF Connector from the motherboard.
-
Take the Screen ribbon cable out of the motherboard.
-
-
Este passo não foi traduzido. Ajude a traduzi-lo
-
Use a flat-blade screwdriver or the pointed side of a spudger to remove the 5 rubber screw covers.
-
Unscrew the 5 tri point screws under the rubber pads.
-
Close the GBA and unscrew the single Phillips screw on the bottom.
-
-
Este passo não foi traduzido. Ajude a traduzi-lo
-
Open up the GBA and everything should fall apart. Thread the ribbon cable through the opening and lift the screen out of the upper case.
-
You are done!!
-


Cancelar: não concluí este guia.
34 outras pessoas executaram este guia.


8 comentários
One issue - you never mentioned how to get the hinge off, so getting the ribbon in and out is.. hard.
Last part of step 5, that screw hidden under the ribbon cable, is what holds the hinge in.
hello can i ask something? can you take apart the lcd? because my lcd has fungus
I am pretty sure, as the actual screen can be separated from the plastic cover (the thing that says game boy advance). I’ve never seen fungus in a screen though. That’s interesting.
Hello friend! One question: in the replace screen there is retroillumination? or i have to do something? Thx for your answer!