Ir para o conteúdo principal
Participe da comunidade de reparos - Criar conta

Nintendo DSi XL Volume Buttons Replacement

O que você precisa

  1. Nintendo DSi XL Volume Buttons Replacement, Battery: passo 1, imagem 1 %32 Nintendo DSi XL Volume Buttons Replacement, Battery: passo 1, imagem 2 %32
    • Remove the two Phillips screws securing the battery cover to the back of the handheld console.

    • Lift the battery cover off the back of the DSi XL.

    Pergunte ao FixBot

    Comentar

  2. Nintendo DSi XL Volume Buttons Replacement: passo 2, imagem 1 %32
    • Lift the battery from the DSi XL.

    Pergunte ao FixBot

    Comentar

  3. Nintendo DSi XL Volume Buttons Replacement, Lower Case: passo 3, imagem 1 %32 Nintendo DSi XL Volume Buttons Replacement, Lower Case: passo 3, imagem 2 %32 Nintendo DSi XL Volume Buttons Replacement, Lower Case: passo 3, imagem 3 %32
    • Remove the four rubber screw covers on the lower case by prying them up with a push pin.

    Pergunte ao FixBot

    Comentar

  4. Nintendo DSi XL Volume Buttons Replacement: passo 4, imagem 1 %32
    • Remove the following seven Phillips screws that secure the lower case to the rest of the DSi XL:

    • Four silver 5.3 mm screws

    • Two black 5.3 mm screws

    • One black 2.5 mm screw

    Pergunte ao FixBot

    Comentar

  5. Nintendo DSi XL Volume Buttons Replacement: passo 5, imagem 1 %32 Nintendo DSi XL Volume Buttons Replacement: passo 5, imagem 2 %32 Nintendo DSi XL Volume Buttons Replacement: passo 5, imagem 3 %32
    • Turn the DSi XL over, and open the display.

    • Insert a spudger between the upper and lower case at the bottom left corner of the DSi.

    • Slide the spudger along the bottom edge of the upper case to release the latches securing the upper case to the lower case.

    Pergunte ao FixBot

    Comentar

  6. Nintendo DSi XL Volume Buttons Replacement: passo 6, imagem 1 %32 Nintendo DSi XL Volume Buttons Replacement: passo 6, imagem 2 %32
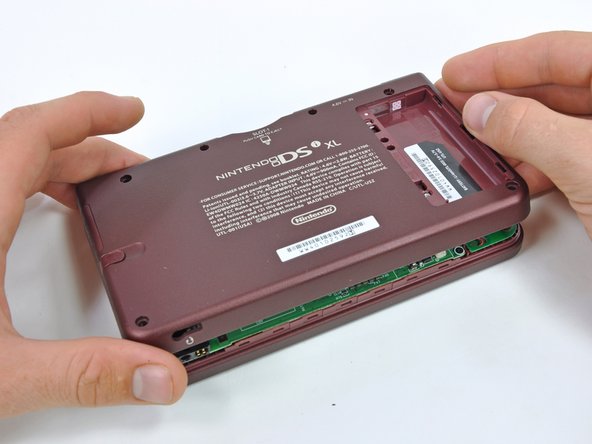
    • Close the display and turn the DSi XL over.

    • Lift the lower case from the front edge.

    • Rotate the lower case away from the DSi.

    • The lower case cannot be completely removed yet, since it is still connected to the motherboard.

    Pergunte ao FixBot

    Comentar

  7. Nintendo DSi XL Volume Buttons Replacement: passo 7, imagem 1 %32 Nintendo DSi XL Volume Buttons Replacement: passo 7, imagem 2 %32
    • Using a spudger, pry the SD card/right shoulder button connector off its socket.

    • Pry the volume button/left shoulder button connector off its socket on the motherboard with a spudger.

    Pergunte ao FixBot

    Comentar

  8. Nintendo DSi XL Volume Buttons Replacement, Volume Control Switch: passo 8, imagem 1 %32
    • On the inside of the battery compartment, use the tip of a spudger to detach the metal latch securing the volume control switch in place.

    • The latch will only move about 1 mm.

    Pergunte ao FixBot

    Comentar

  9. Nintendo DSi XL Volume Buttons Replacement: passo 9, imagem 1 %32 Nintendo DSi XL Volume Buttons Replacement: passo 9, imagem 2 %32 Nintendo DSi XL Volume Buttons Replacement: passo 9, imagem 3 %32
    • Using the flat end of a spudger, remove the adhesive securing the volume control switch ribbon cable to the back of the battery compartment.

    • Using the flat of a spudger, pry the volume control switch straight up out of the lower case.

    • Remove the volume control switch from the DSi XL.

    Pergunte ao FixBot

    Comentar

  10. Nintendo DSi XL Volume Buttons Replacement: passo 10, imagem 1 %32
    • Using the flat end of a spudger, remove the volume control buttons from the metal backing bracket.

    • The bracket is attached by a strong adhesive. Work slowly and carefully, being sure to not damage the ribbon cable.

    • Volume control switch remains.

    Pergunte ao FixBot

    Comentar

  11. Nintendo DSi XL Volume Buttons Replacement, Volume Buttons: passo 11, imagem 1 %32 Nintendo DSi XL Volume Buttons Replacement, Volume Buttons: passo 11, imagem 2 %32 Nintendo DSi XL Volume Buttons Replacement, Volume Buttons: passo 11, imagem 3 %32
    Ferramenta utilizada neste passo:
    Tweezers
    $4.99
    • While pushing the volume buttons through their holes in the lower case, remove the buttons and their silicone pads with a pair of tweezers.

    • Work patiently and carefully as the silicone pad is easily torn.

    • Remove the buttons from the silicone pad.

    Pergunte ao FixBot

    Comentar

Conclusão

To reassemble your device, follow these instructions in reverse order.

Cancelar: não concluí este guia.

Uma outra pessoa concluiu este guia.

Brett Hartt

Membro desde: 04/12/10

132.210 Reputação

Autoria de 144 guias

Equipe

iFixit Membro de iFixit

Staff

122 Membros

Autoria de 27.498 guias

0Comentários do guia

Comentar

Visualizações:

Últimas 24 horas: 1

Últimos 7 dias: 24

Últimos 30 dias: 129

Ao todo: 9,156